ReWire Essentials 2: Host ReWire Client Applications
Introduction
In this second installment of the ReWire Essentials series, we are going to look at hosting ReWire client applications. Clients route their information to the host (or mixer) application through the ReWire mechanism, and using Max/MSP as a host gives us options to have some fun with both the playback and output of the connected application.
Tutorials in this series:
From Max/MSP to Your Host (Part 1)
Host ReWire Client Applications (Part 2)
Subversion with ReWire (Part 3)
Using Max with Reason (Part 4)
The basic connection strategy for hosting ReWire clients involves the rewire~ object. This object gives us the means to select a ReWire client, use the available audio outputs and control the connected devices transport controls.
Download the Max patches used in this tutorial.
Hosting a ReWire client
It doesn't take much for Max/MSP to be a ReWire host - the rewire~ object is the magic ingredient. This object accepts two arguments: the client device's name, and the number of audio outputs to be created. However, both of these arguments are optional; you can use a message to select a client, and the number of channels defaults to a reasonable stereo pair.
In order to know which clients are available to the rewire~ object, you can connect the second outlet from the right (with the hint text: "Menu of Installed ReWire Devices"), and connect it to a umenu object. Now, when you bang the input (or when you save and open the patcher again), this umenu will contain all of the ReWire devices you have on your system. When you change menu entries, you will see the message "rewire~: opened device XXX" in the Max window.
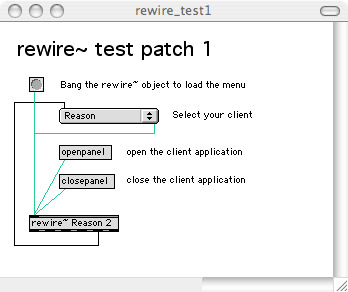
Once you've selected a device, you need to be able to open the client program. You can do this manually, but it is much more convenient to open the client from your Max/MSP patch. The openpanel message (when sent to the rewire~ object) will open the selected application and create all of the connections between Max/MSP and the client. The closepanel message is the same as exiting the client from its menu. Not all client applications respond to these messages; for example, Reason reacts to open/close operations, but Ableton Live just ignores them.
Controlling the output
Now that we've instantiated a device and opened it, we will want to route the client's outputs to the Max/MSP outputs. ReWire clients can have up to 256 outputs, but not all of them are useful to us. In most cases, the first two available outputs will provide a stereo mix - we just need to expose them to the two outputs of the rewire~ object. This mapping of client audio signals is accomplished with the map message.
In order to see the available client outputs, we connect umenu objects to the rightmost outlet of the rewire~ object. When rewire~ receives a bang (or when a saved patch is opened), this will load the menu with all of the outlets provided by the client. In our example patch, we will have two menus - one for the left output (numbered "1") and one for the right output (numbered "2").
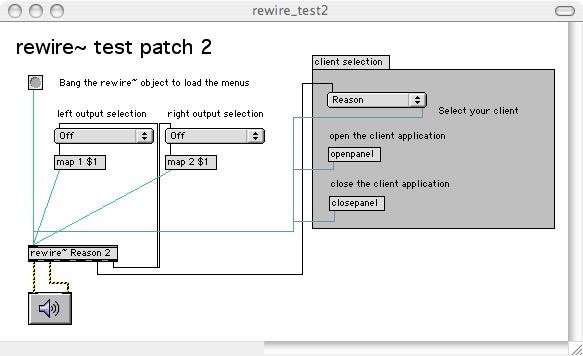
Now, the addition of two map messages will allow us to select the client outputs that we want to use within Max/MSP. Once these are set up, and the audio outputs of rewire~ are connected to an ezdac~ object, we are able to create audio in our client that is exposed to our Max/MSP patch and sent to the audio output.
Controlling the transport
Next up is controlling the transport of the client application (assuming it has a transport). In my examples, I will be controlling the transport of Propellerhead's Reason, but you will find that this mechanism works regardless of the client in use.
Turning the transport on and off is pretty simple: the rewire~ object responds to 0 and 1 as off and on, which is exactly the output of a checkbox object. So, connecting a checkbox to the input of rewire~ will turn the client's transport on and off. Tempo is similarly controlled using a tempo message, combined with a floating point number. In our example, I use a numberbox to control the client's tempo.
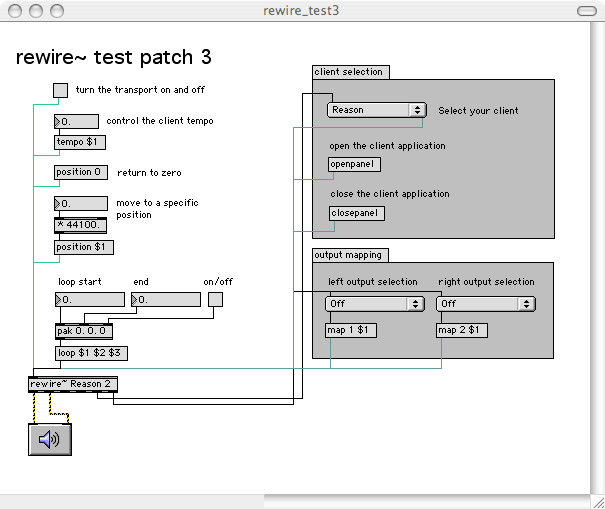
Controlling transport position is a little trickier. There is a position message that will tell the client where to go. However, this message takes a position parameter in samples, so you will have to do some calculation to make it work correctly. In the example, I have two position messages: one (the position 0 message) is the equivalent of "Return To Zero", the other takes the output of a numberbox (treated as seconds), multiplies it by 44,100 to turn it into samples, then sends the message to the rewire~ object. Note: this makes a lot of assumption; most importantly, it assumes that you are working at a 44.1K sample rate. If this is not the case, you need to change the calculation to match the sample rate of your project.
Finally, in addition to controlling the on/off state and current position, we can also control the loop parameters of the client. This is done through the loop message, which takes three parameters: loop start (in samples), loop end (in samples) and loop on/off. I've added this to the example program, but didn't convert the numberbox objects from seconds to samples - this is something that you can do for a ReWire exercise!
Sending other data
Controlling a transport may be your cup of ReWire tea, but there are other ways to use ReWire connectivity. One common method is using Max/MSP as a bridge to control and effect instruments within the Reason environment. Reason has a lot of built-in functionality, but its sequencer seems somewhat pedestrian, and the lack of support for standard plug-ins means that you may have trouble using Fragulator (or using any other VST plug-in) on your audio signal.
Sending a MIDI message to Reason is very simple; you format a message the way that is acceptable for the rewire~ object. This requires a midi message, some number formatting and a little ingenuity. The arguments for the MIDI message are rather low-level (and closely related to the MIDI spec), and may not be totally familiar to the first-time user.
All midi messages are in the format "midi t b c n n...", where:
t is a timestamp (always 0 for now),
b is the ReWire MIDI bus (between 0 and 254, but normally 0),
c is the MIDI command (generally called the "status byte"),
n, n ... is the data for the selected MIDI command.
Let's focus on the MIDI command (or status byte). In MIDI world, status bytes are a combination of the command you want to transmit, and the MIDI channel you want to affect. So, for example, a 144 means that you want a note-on to be triggered on MIDI channel 1, while a 146 would represent a note-on triggered on channel 3. You can think of 144 as being the "starting point" for MIDI note-on messages.
Following the status byte, you need to send the appropriate data for the selected command. In the case of a note-on, you need to send the note number and a velocity level. Other messages may require fewer data bytes; for example, a program change command only needs a single data byte: the program number.
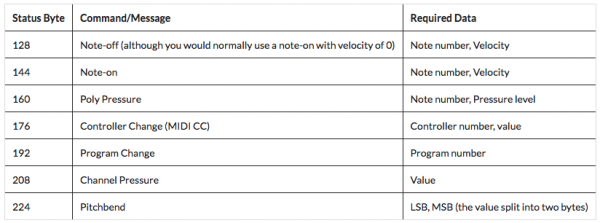
Here is a chart of the basic MIDI status bytes and the data they require:
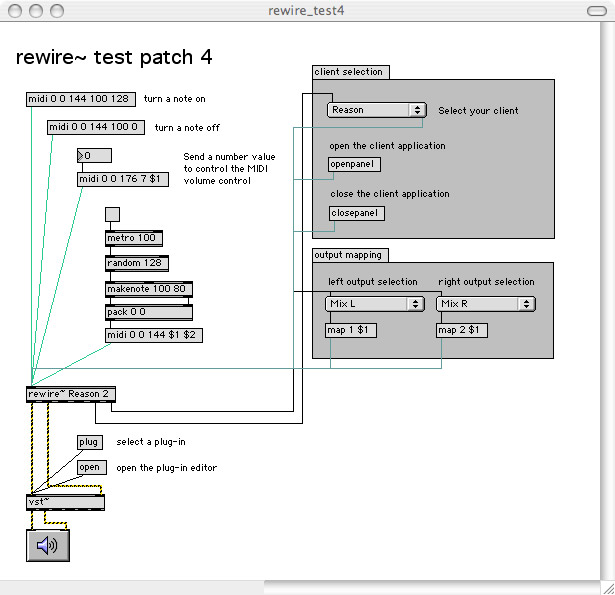
In my example, I've removed all of the transport controls, and am left with a wide-open work area for the new section of the patch. In my particular case, I'm connected to Reason; however, you can tie into the ReWire connection of almost any program that has a performance instrument or synthesizer. Using the midi messages, I can add a couple of messageboxes with various command, and I can easily control the ReWire'd instrument. I can also create my trusty "random note generator", feeding a makenote object, to created the melody of the cosmos…
I also want to run ol' Fragulator on the result, so I've put a vst~ object on the outputs of the rewire~ object. Adding a few controls allows me to open and adjust the VST options, resulting in a live control and effects system for my Reason software system.
Conclusion
In this tutorial, we learned how to connect to a ReWire client application, how to route its audio, how to control the transport and how to send it MIDI messages. Using this information creatively can provide totally new methods of music creation. Some example of interesting applications might be:
A vinyl-style "spin-down" of an Ableton Live client (using the tempo message).
A complex keyboard mapper for Propellerhead's Reason (routing incoming keyboard messages to multiple Reason instruments).
Creating glitch-y playback of an FL Studio project (by rapidly changing the current position and loop points).
As you can see, it is easy to envision ReWire as a starting point for integration of new technology into your Max/MSP programming. It is just as easy to see Max/MSP as a "glue" technology to combine different programs into a single complex environment. In our next ReWire tutorial, we will look into further control of a host program, featuring the hostcontrol~ object. Until then, have a blast using ReWire client control tools to horrify and mystify your friends and family!
by Darwin Grosse on December 15, 2006

