Create Your Own Default Workspace in Max 5
Customizing the Max UI
As we were preparing Max 5, we strove to make things as pleasurable for every user as we could. One of the ways we did this was to permit the customization of the way Max looks and acts, so users could adjust their experience to individual tastes and needs. In addition to an unprecedented number of configurable settings, Max 5 also provides a more navigable structure for making choices about your environment. In this article we'll discuss ways you can tweak the settings in various places to make your time spent in Max 5 more comfortable and fulfilling to your aesthetic requirements.
Color Coordinated
While one person may enjoy working in stark white windows with only shades of grey, another may prefer wild contrasts of hue and intensity in their patching environment. Color is a mostly subjective experience, with many close ties to memory, psychology, and emotions. For this reason, the Object Defaults window was one of my personal favorite additions to the Max 5 feature set. The Object Defaults window allows you to easily select or modify a custom palette of UI colors that will be applied to all of your patches automatically. With Object Defaults, you can change the color of your patching environment to suit whatever mood you are in, similar to the way that a stylesheet works in website design.
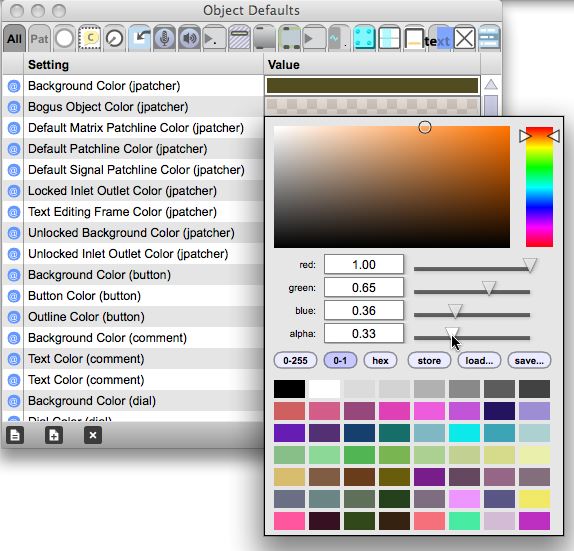
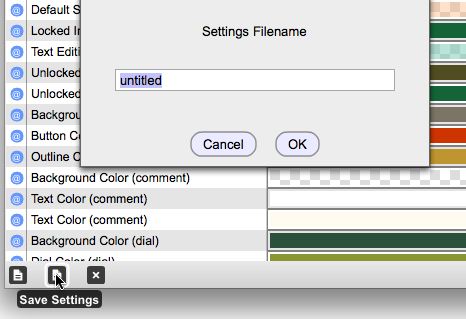
To get started playing with your color scheme, go into Option->Object Defaults to open the Object Defaults inspector. You will see a list of all of the different aspects of Max 5 that can be customized with a default color or other settings. Along the top of the window are tabs that can be used to only show settings associated with a particular object. To begin with, it usually helps to have an open patch that displays an instance of all of the UI objects that you want to customize. I usually keep a patch called "defaulter" around just for this purpose. From here you can use the color pickers to begin selecting and altering colors. If you come up with a set of defaults that you are happy with, click on the button at the bottom of the window to Save Defaults, and name your set. Max 5 comes with several useful and interesting color schemes that you can browse through and alter as you like.
If you find yourself reusing the same color often, it is a good idea to add it to the color swatches in the color picker window. To do this, simply click on the "store" button and then click the swatch that you would like to replace. Your custom swatches can also be saved from this interface. Any changes you make to your palette of swatches will be visible throughout the Max inspector windows. If you spend a lot of time working with UI design and color, you may want to save a custom palette for each project. One thing to remember with Object Defaults is that your color scheme is not saved with your patch, so it will look different on your friend's version of Max, unless she has the same maxdefaults file on her machine. If you want to keep your patch from being interfered with by other people's color preference, simply open the Patcher Inspector and check Save Default-Valued Object Attributes. Note this will also make your patcher files larger, but is anyone really concerned about patcher file size these days?
Easy Access
When in a creative fury of patching, there is nothing more annoying than having to stop what you are doing and hunt around for your favorite folder of audio files or interface pictures. Luckily, with the new database and File Browser window in Max 5, it is pretty easy to keep all of your frequently used files close at hand. We're going to take a look at some ways to make sure that you can focus more of your attention on patching and creativity by making good use of the File Browser.
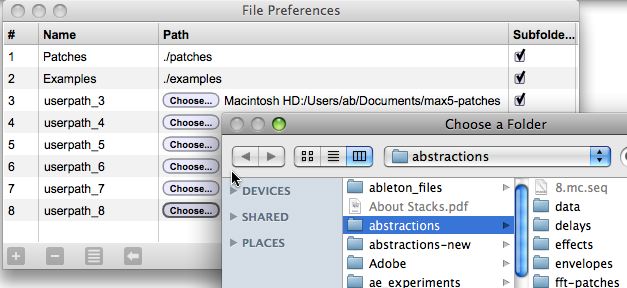
When working on a complex project, it usually helps to keep your files in a fairly organized directory that you can easily browse through and manage if need be. On my machine, I tend to keep hierarchically organized folders in my Documents folder for audio clips, abstractions, externals, and movies that I want to use in my Max patches. It is generally considered a good practice to create a central folder where you drop all of your important Max files outside of the Max application folder. This way, you can be confident that your personal files will be safe when reinstalling and updating your copy of Max in the future. Once you have your files in a folder, you can go to the Options->File Preferences window and add your custom folders to the Max database and search path. Once you have done that, all of the files in your folder will be searchable from within the File Browser. This allows you to easily drag and drop them into place in your patches. Remember that you can get more options by holding down Option/Alt while dragging.
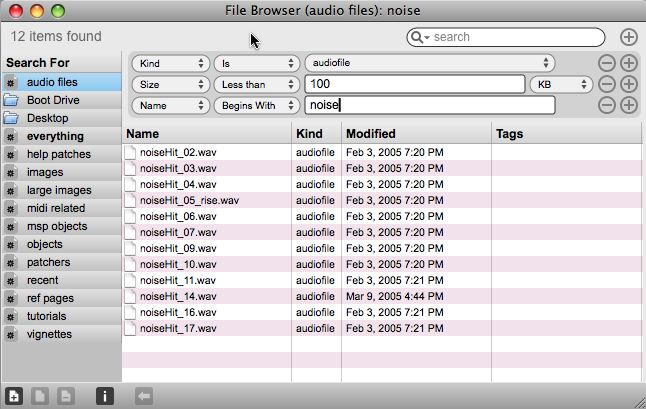
The File Browser ships with a number of useful default searches, such as images, objects, and tutorials that you can access by clicking on the name in the left-hand column. However, if you have a lot of audio files or images in your search path, these generic searches might not be narrow enough for your purposes. You can easily do a search by name using the search field in the top right of the File Browser, and you can further narrow your search by clicking the "+" button next to it. This will allow you to specify things like file type, file size, modified date, etc. For example, I made myself a custom search for short audio files less than 1 MB for use in a drum machine patch. Once you have come up with a custom search that you like, you can easily save it using the button on the lower left corner. You will want to rename it to something easy to remember for next time you need to find those files. If you have a fairly consistent naming scheme for your files, you can just do name-based searches to find what you are looking for.
If you already know the location of files that you want to open in Max, but don't want to use the Open... dialog every time, you can also define folder searches as well using the File Browser. The easiest way to do this is to simply drag and drop the folder from the Finder onto the Max File Browser. You can also browse using the File Browser interface by double-clicking the "Boot Drive" folder search and navigating to the folder you want. Once you have found it you can drag the folder into the saved searches column. One thing to remember about folder searches is that it doesn't respect whether or not something is in the search path or not. This means that dragging and dropping things from a folder search will give you an absolute filepath in your patch. If you will be using a folder full of files often, it is probably a good idea to just go ahead and add it to your File Preferences.
Your Preferences
The next window you will probably want to mess around with is the Preferences window. This window includes a number of settings that control the way that new patchers are created and saved, how the Max editing interface behaves, and how fonts are used throughout Max. You will find settings here to customize the colors, fonts, and behaviors of common interface devices like Assistance Bubbles and the Clue window. There are also settings here for customizing your user experience, like how long it takes to for an object to disappear after you delete it. If you find yourself getting into the Patcher Inspector often, it is probably a good sign that you should make some of those settings the default in the Preferences window. For instance, "grid size" seems to be one that most people end up changing to suit their purposes, as everyone has a different notion of what the perfect grid size is. If the anti-aliased text rendering makes your eyes tired, try turning on Native Text Rendering to use the OS standard text rendering engine.
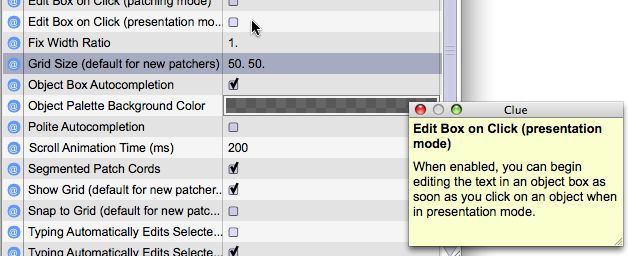
You will probably want to spend some time playing with many of these settings until you find the perfect fit. Remember, you can always change it later. If you are curious about what an unfamiliar setting does, open up the Clue Window to see a description of each setting as you mouse over it.
The Clue Window
In getting to know Max 5 and all of the interface and usability enhancements, the Clue window acts as your polite guide, telling you only what you need to know in any given context. While it may seem unfamiliar at first for old users, keeping a Clue window open will enable you to work faster by getting useful information on the fly, instead of having to open up a help file. You can also add Annotations to any object in your patch, which will show up in the Clue window when you mouse over the object. If you find the yellow color of this window distracting, don't forget you can adjust the Clue window color settings in the Preferences window.
Prototypes
If you find yourself making similar customizations to UI objects in your patches often, it is generally helpful to save your object as a prototype. To do this, you can simply make your customizations to the object of your choice and then go into the Object menu and select Save Prototype. A dialog box will open up and allow you to name your prototype. Once you have done this, you can easily place a copy of your prototype directly from the object palette. As you continue to work, you will develop a personal library of UI objects that can be reused at any time. You can also share your object prototypes with others by copying the folders located in the patches/object-prototypes folder.
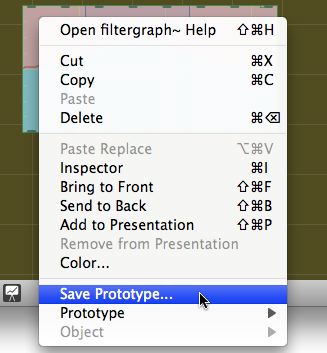
You can also use clippings to create small patch snippets that you can drop into your projects by using the contextual menu's Paste From... menu. Creating these snippets is as easy as saving your little patch in the patches/clippings folder.
I hope this has given you a few ideas about how you can begin to make your new Max 5 environment a little more cozy and conducive to your creative workflow. Stay tuned for more articles investigating new features of Max 5.
by Andrew Benson on August 11, 2008

