The Video Processing System, Part 1
Between the tutorials, Jitter Recipes, and all of the example content, there are many Jitter patches floating around that each do one thing pretty well, but very few of them give a sense of how to scale up into a more complex system. Inspired by a recent patching project and Darwin Grosse's guitar processing articles, this series of tutorials will present a Jitter-based live video processing system using simple reusable modules, a consistent control interface, and optimized GPU-based processes wherever possible. The purpose of these articles is to provide an over-the-shoulder view of my creative process in building more complex Jitter patches for video processing.
Download the patch used in this tutorial.
Download all the patches in the series updated for Max 7. Note: Some of the features in this system rely on the QuickTime engine. Using AVF or VIDDLL video engines will not support all functions. On both engines you may see errors related to loadram or have limited access to file record features.
Tutorials in this series:
Designing the System
I want to keep the framework for this project as simple as possible to allow for quickly building new modules and dropping them into place without having to rewrite the whole patch each time. This means staying away from complex send/receive naming systems, encapsulating complex stuff into easy to manage and rearrange modules, and using a standardized interface for parameter values. I also wanted to stay away from creating a complex and confusing framework for patching that would require a learning curve to implement.
For input, we'll use a camera input and a movie file playback module with a compositing stage after them to fade between inputs. For display, we'll create an OpenGL context so that we can take advantage of hardware-accelerated processing and display features to keep our system as efficient as possible. Between input and display, we'll put in place several simple effect modules to do things like color adjustment and remapping, gaussian blur, temporal blurring, and masked feedback. In later articles, we'll also look at ways to incorporate OpenGL geometry into our system.
For a live processing set up, being able to easily control the right things is very important. For this reason, we're going to build all of our modules to accept floating-point (0.-1.) inputs and toggles to turn things on an off. Maintaining a standardized set of controls makes it much easier to incorporate a new gestural controller module into your rig. For any live situation, whether it be video, sound, etc., it is going to be much more fun and intuitive if you use some sort of physical controller. There are many MIDI controllers, gaming controllers, sensor interface kits, and knob/fader boxes on the market for pretty affordable prices, all of which will be fairly straightforward to work with in Max. In addition to creating intuitive controls, we'll also look at ways to store presets to easily recall the state of your modules.
The Core
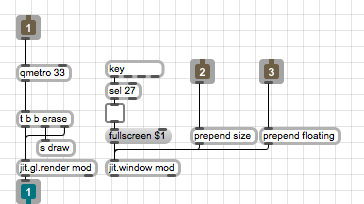
We're going to start building this rig by first putting together the core features that we'll need before moving on to the effects. First thing we'll need is a master rendering context where our patch will display its output. Looking in the "master-context" subpatch, you'll see the essential ingredients for any OpenGL context (qmetro, jit.gl.render, jit.window, etc.), along with some handy control features.

Notice that we are using a send object ('s draw') to send out a bang. This is an easy way for us to trigger anything that needs triggering in our system without running patch cords all over the place. Since we are building a pretty straightforward video processing patch, we don't need to worry too much about complex rendering sequences. In this patch we've also provided an interface to jit.window to quickly set it to predetermined sizes or to make it a floating window, as well as the inclusion of the standard ESC->fullscreen control. In our main patch we place the necessary interface objects to control these features, including a umenu loaded with common video sizes for the jit.window. This little umenu will certainly come in handy in other places, so I'll go ahead and Save Prototype... as "videodims". In our main patch you'll also notice the jit.gl.videoplane object at the end of the processing chain. This will serve as our master display object.
The Inputs
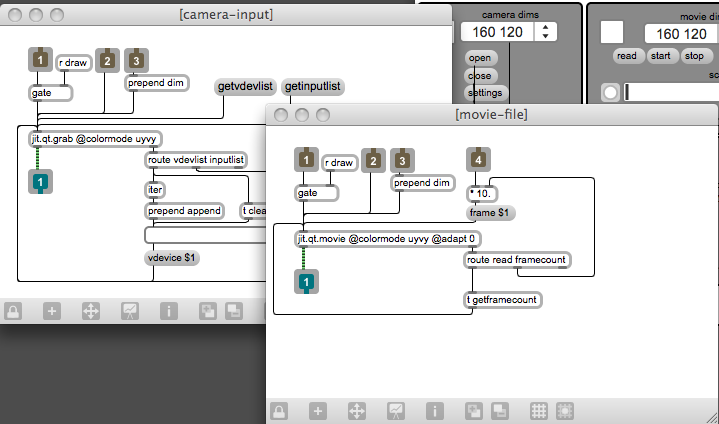
Now that we have the groundwork laid for our OpenGL rendering, we can begin to add functionality to our video processor. The obvious first step will be to add some video inputs to our system. The "camera-input" subpatch contains the essential interface for the jit.qt.grab object (Windows users should use jit.dx.grab instead). One thing you might notice is that we've reused the umenu for resizing here. Another thing to note is that we are using @colormode uyvy, which will essentially double the efficiency of sending frames to the GPU. For more information on Jitter colormodes, check out the Tutorials. We've also included a gate to turn off the bangs for this input module if we aren't using it. I've also borrowed the device selection interface from the jit.qt.grab helpfile.

In the "movie-file" subpatch, you'll find the essentials for doing simple movie playback from disk. A lot of elements have been reused from the "camera-input" module, but I've also created a simple interface for scrubbing through the movie to find the right cue point. The trick here is to use the message output from the right of jit.qt.movie to gather information about the file. When a new file is loaded, a "read" message comes out of the right outlet, which then triggers a "getframecount" message, the result of which we send to our multiplier object. At this point I should mention another little trick that I'm using, which is to setup the slider in the main patch to send out floating-point numbers between 0 and 1. To do this, I went into the inspector and changed the values of the Range and the Output Multiplier attributes, while also turning on the Float Output attribute. Once again, I save this object as a Prototype called "videoslider" so that I can use it anywhere I require a floating-point controller.

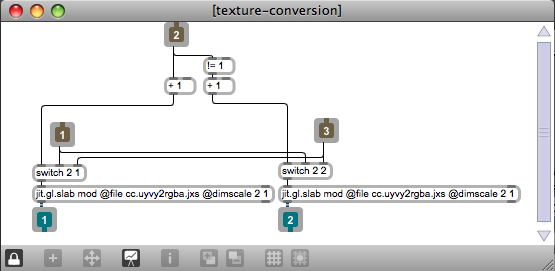
The final stage of our input stage is the COMPOSITOR section. This module contains two parts - a texture-conversion/input-swapping patch and a simple crossfading patch. Inside the "texture-conversion" patch, you'll see some simple logic that allows me to swap which channel the inputs are going to. This allows us to run the movie input even when turning off the camera module. Each input is then sent to a jit.gl.slab object that has the "cc.uyvy2rgba.jxs" shader loaded into it. This converts the UYVY color information into full resolution RGBA colored textures on the GPU.
Mixing Inputs
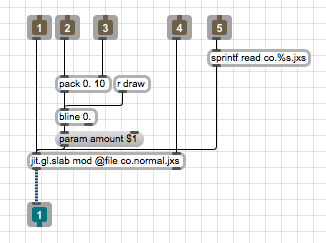
Once our input streams are on the graphics card as textures, we can use jit.gl.slab to do all sorts of image processing. The most obvious thing to do at this stage is to add a compositing module to combine the two inputs. Inside the "easy-xfade" patch you'll see a jit.gl.slab with the "co.normal.jxs" shader loaded into it. This does straight linear crossfading, a la jit.xfade.

We've also provided an interface to switch to other compositing functions, borrowed from one of the Jitter examples. The bline object is used here to create a ramp between states to provide smooth transitions. The benefit of using bline here is that it is timed using bangs instead of absolute milliseconds. Since video processing happens on a frame-by-frame basis, this proves to be much more useful for creating smooth transitions.
This wraps up our first installment of the Video Processing System. Stay tuned for future articles where we will be adding a variety of different effect modules to this patch, as well as looking at parameter management strategies.
by Andrew Benson on December 22, 2008

