A Video Processing Device for Max for Live

While many people are looking at Max for Live as a great way to integrate their favorite hardware controllers, build really unique effects, and add variety to their productions, I was eager to explore what could be done with video inside of Max for Live.
I have collaborated with musicians before that work exclusively inside of Ableton Live, so it struck me as a huge advantage to be able to build a triggered video playback and live processing system that worked inside of Live natively. Assuming you could keep the overhead low, it may even be practical to run both audio and video from a single Live set. To test this idea, I went for the most obvious solution, which was to use my Video Processing System patch as a starting point. What follows is a document of the process of getting a Jitter instrument working inside of Max for Live.
Download the Max for Live device used in this tutorial.
The Plan
In Max for Live, we have the option to create an Audio Effect, and Instrument, or a MIDI effect. For musical or sound-making devices, the choice is usually pretty clear depending on what sort of input and output you need. Since we are making a device that isn't outputting audio or MIDI information, it isn't obvious which type of device to use as a template. For this project, I decided to create a Max Midi Effect, since it allowed me to get MIDI input and pass that MIDI to other devices if I needed to. If we wanted to take audio input, it might make more sense to create an Audio Effect instead. The plan was to create a basic system where incoming MIDI notes would trigger different videos, and all of the controls would be mappable to MIDI and Live's internal modulation system. I also knew that several features of the VPS patch weren't going to be necessary, like the LFOs and the QT movie recording features. The rest would be simple copy and paste, with a little re-organizing.
A Note About Jitter in Max for Live
If you are a Max for Live user, but don't own a full copy of MaxMSP/Jitter, you may notice that jit.window and jit.pwindow objects have an intermittent overlay while editing your patch. This is the only hindrance to working with Jitter in Max for Live, and your windows will be fully functional inside of Live itself. This means that you can build and create Jitter-based devices, but you won't have seamless window output until you save and go back to Live. Jitter owners have no such hindrance.
Another important thing to remember when using Jitter inside of Live is that it is very easy to create duplicate devices in your Live set and create naming conflicts for things like Jitter windows, textures, or matrix objects. You may have to take some extra care with this, or use "---" before the names of windows and such to create device-unique names.
Getting out the Shoehorn
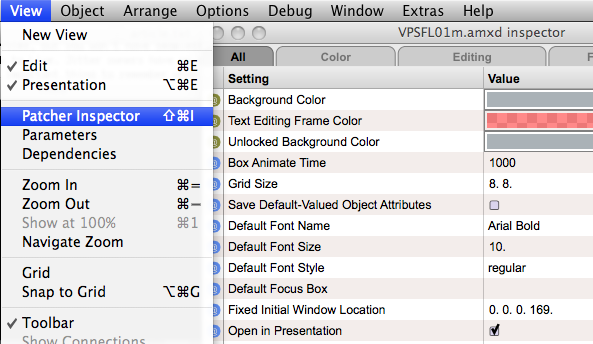
The first obstacle in getting a fully functional patch into a Live device is getting the UI to fit inside the fixed height device view. Without Presentation View, this might be near impossible for any reasonably complex patch. The first step is to go into the Patcher Inspector and turn on "Open in Presentation" so that the device shows up in Live with the organized presentation view. Still, given the vertical orientation of the original patch, some serious redesign is going to be necessary.

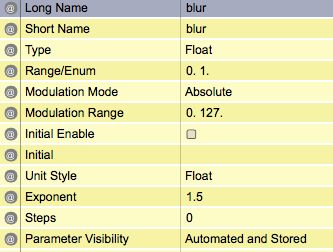
Before I get to that though, we'll start by replacing several of the standard Max UI objects with Live UI objects. These objects, in addition to looking at home inside of Live, allow us to use Live's native modulation, mapping, and preset-saving system. Since many of these objects also have built-in labels, a lot of the comment boxes in the patch could be eliminated. To replace all the sliders we first drop a live.slider object into the patch and open the inspector. Inside the inspector, we can set the Modulation Mode to Absolute, which enables clip modulation for the parameter. There are several different modulation modes, with Absolute being the most straightforward since it maps directly to the value of the modulation curve. This will give our new sliders similar settings to what we originally had, and allow for modulation of the slider value using Live's automation system. Once we've adjusted all the settings in the inspector, we can copy the generic live.slider, select the normal slider objects and then Paste Replace. Now all we have to do is go into each inspector and set the parameter names appropriately. From here it is a simple matter of combing through the user interface, replacing UI objects with their Max for Live equivalent, where appropriate.

Now that everything is looking more Live-like, we can begin reorganizing UI elements, condensing things down and ditching unnecessary labels to fit the limited space in our Presentation View.
Bringing in the MIDI
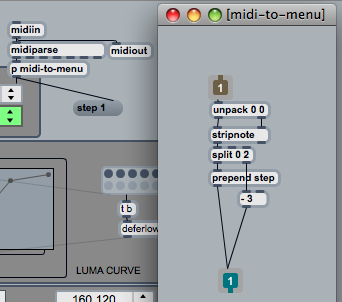
Since this is a Midi Effect, we'll use the MIDI note input to change the movies in the movie player module. Since the VPS 'mbank' module was already designed to have a simple 'step' message interface to jump to the previous, next, or random movie clip, or a number to jump to a specific index, parsing MIDI notes is pretty easy. Using a split object, the first 3 MIDI notes are routed to 'step' messages, while the rest of the note scale is used to jump to specific movies. This makes it really easy to create MIDI clips in Live that drive the movie selection.

The Test Drive
Now that we have a more tightly packed and concise device, it's time to give it a try inside of a Live set. To do that, we simply drop it onto a MIDI track, click "Load" to set the folder of movies, activate the camera (see previous VPS articles for a thorough explanation of the patch), and turn on rendering. Once we verify that we are able to make it work manually, it's time to try piping in some cues. For that, we double-click an empty clip slot to create an empty midi clip and draw in some notes at the very bottom of the scale. When we activate the transport and launch the clip, our movies should be changing in time with the rhythm.

To add a little extra excitement, we can modulate the parameters with the MIDI clip. To get started, activate the Envelopes button in the MIDI clip view and select one of the device parameters from the drop down menu (blur is a fun one). Adjust the automation curve by clicking and dragging. Repeat for any other parameters you'd like to automate. Enjoy.
by Andrew Benson on January 7, 2010

