Max for Live Tutorial

How would you like to be able to add pattr-based presets to your Max for Live device? Max for Live users can make use of the pattr family of Max objects to provide powerful ways to store, retrieve and interact with parameter data in their devices.
Using pattr objects in your device adds flexibility above and beyond the process of creating Live device presets you already know and love - you can store pattr presets as a part of your Live session and easily import collections of those presets with a single mouse click, use pattr presets to create and explore subsets of your Live device's functionality, and switch pattr presets using MIDI messages or internal programming.
Here's how you can pattrize your devices.
Max for Live differs from Max by itself in some important ways. Max for Live is a hosted application – it needs to work cooperatively with the Live application when handling things like parameter initialization, parameter automation, and MIDI mapping. The special family of user interface objects that come with Max for Live such as live.dial or live.gain~ make this process a lot easier by allowing you to set parameter-specific attributes in the Max object Inspector such as Initialization values and names used to identify automatible parameters.
If you're a Max user who's already familiar with using the pattr family of objects, you'll discover some interesting Max for Live tricks:
Max for Live user interface objects don't require naming or binding to pattr objects to make them "visible" to pattr. When used with the autopattr object, Max for Live user interfaces objects are automatically visible.
If you're used to storing pattr presets with your file by using the autorestore and savemode attributes to the pattrstorage object, you'll discover that you can set that behavior with a single mouse click.
The procedure for adding presets to a Max for Live device is similar to working with patches in the Max environment itself, and consists of five basic steps:
Decide which user interface objects in your device contain parameter data that you want to include as a part of a pattr-based preset. If your device contains any non-Max for Live user interface objects, add a Max pattr object for each one (we’ll show you how to do this in just a bit).
Add a pattrstorage object to your device. The pattrstorage object serves as a repository for parameter data and provides an interface for communicating with the data.
Add an autopattr object to your device. The autopattr object will automatically include
your Max for Live user interface objects in the pattr system.Add a Max preset object to provide an easy graphic interface for preset management.
Start creating and saving your own presets!
For this tutorial, we'll start with a Max for Live device called 4filter. It's a simple stereo quartet of cascaded biquad filters that lets you set the filter type, cutoff frequency, Q (the bandwidth of the filter), and the output gain of each filter to create exotic filtering effects. This device is particularly effective when you modulate the parameter values using LFOs or random value generators, but it’s also really helpful to be able to save the data for each of the cascaded filters as presets associated with your Live session.
To download a fully pattrized version of this audio device, click here.

1. The easy part (setting up your parameters)
If you work in the Max environment, the first part of pattrizing a Max patch involves making that object “visible” to other pattr objects. Using the special objects that come with Max for Live (objects whose names all begin start with live.) makes this step largely superfluous – Max for Live user interface objects are exposed to pattr objects from the moment you add them to your Max patch. There’s only one thing you might want to do, and that’s to provide a name to your user interface object that will make it easier to tell which user interface object represents a given button or slider or dial. The truth is that, as a careful Max programmer, you may already have done it.
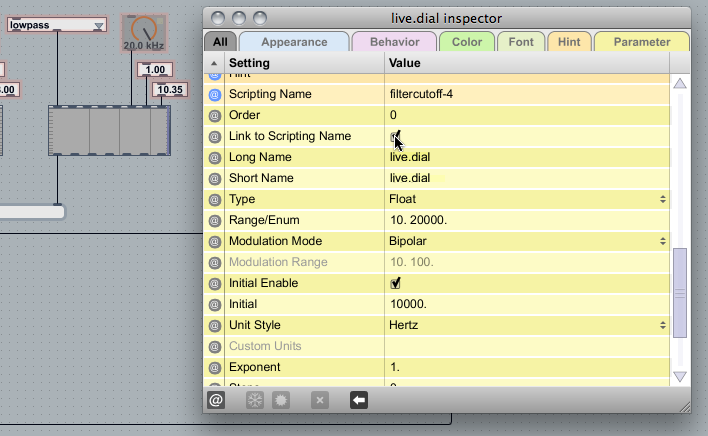
Max for Live uses the Long Name attribute to identify automatable parameters in your Max for Live device. The pattr family of objects, in turn, uses the Scripting Name attribute to specify pattr parameter names. They both function the same way in terms of default naming – the first user interface object you add to your patch has its Scripting Name and Long Name attributes set to the name of the object itself (e.g. live.dial), and subsequent objects are identified by an integer (e.g. live.dial[1], live.dial[2]… live.dial[N). These default names are not particularly helpful in allowing you to identify a specific objects parameter name. This problem can be solved by using the Scripting Name attribute to set the name for your parameter in conjunction with the Link to Scripting Name attribute. That way, the name you apply to your pattrized parameter will be the same label you see when you go looking for the parameter in the Live application’s Automation Control Chooser (You may have already done this, or the person who made the Max for Live device you want to pattrize may have done it for you. If so, you can completely skip this step).
Click on a Max for Live object you want to name and open the object's Inspector. Locate the Scripting Name attribute, and enter a name in the Value column. As the Ableton Max for Live Production Guidelines suggest, it's best to keep the names functional (and short). Click in the Link To Scripting Name attribute's checkbox to link the name you entered to the Long Name attribute.
Note: If you're a seasoned Max user, it might be helpful for you to know that the "scope" of names is different in Max for Live than in Max - Scripting Names are patcher-local, and parameter names are global for a device. Using unique names will help you to avoid potential problems.
You should repeat this procedure for each and every user interface object you want to include as a part of the preset data you save with your Live session. In the following example, we’ll set a new Scripting/Long Name for one of the live.dial objects, giving it the name filtercutoff-4. Believe me, this makes things a lot easier to deal with down the road.
Working with non-Max for Live objects (a slight digression)
The example device we’re working on here includes only those user interfaces objects created specifically for use with Max for Live. While you can go for a long time without ever needing a user interface object whose name doesn’t begin with live., there are some Max objects that don’t have corresponding Max for Live equivalents - rslider, for example. How can we use these objects in a Max for Live device?
You can use the Max pattr object not only to expose your object to the pattr system, but also to enable the features common to Max for Live user interface objects such as data initialization, visibility for parameter automation, and so on. Here’s a procedure you will repeat for each non-Max for Live user interface object your patch contains:
Add a pattr object to your patch (you’ll be doing this for each non-Max for Live user interface object your patch contains). When you add the object, the word pattr should be followed by a name to identify the parameter (e.g. pattr filter-gain1). The name you enter as an argument will function in the same way as the Scripting Name attribute to Max for Live objects – the name will identify it to other objects in the pattr family, and will also be the name used to identify the parameter for automation in Live.
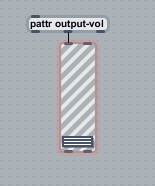
Connect the middle outlet of the pattr object to the user interface object you want to include in your pattr preset to bind the named pattr object to it. Here’s an example that binds a pattr object to the gain~ object and names the parameter output-vol:
Next, we'll set up the pattr object to store its initial state and to share its name with the Live application's Automation Chooser.
Click on the pattr object to select it and open the object's Inspector. Click the Parameter Mode Enable attribute's checkbox to enable the parameter mode. When you do, you'll see a new group of attributes appear in the Inspector.
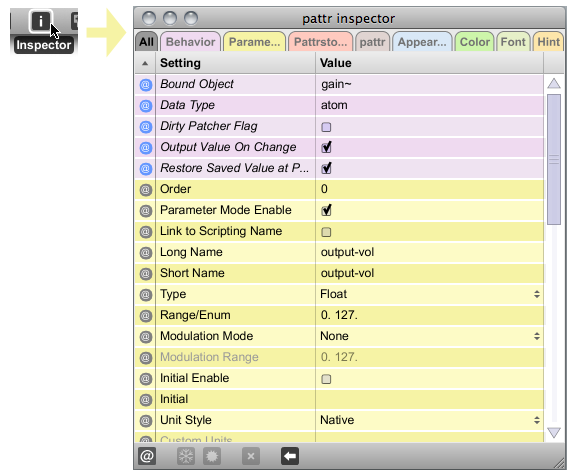
Click in the Link To Scripting Name attribute's checkbox to link link the pattr object's argument to the name attributes that the Live application uses to identify automatable parameters.
While initialization values are not required for Max for Live parameters, you'll find them useful if you want to have the default version of your Max for Live device have default values. If you want to include a default initialization value for your object (rather than the default initialization value of the Max object itself), locate the Initial Enable attribute in the Inspector and click in the checkbox to enable it. Click in the Value column of the Initial Enable attribute to get a vertical cursor, and type in an initialization value.
2. Add a pattrstorage object to your device
Lots of people talk about the pattr family of objects as though they’re only about adding the ability to create, store, and recall presets. While that’s understandable, the pattr object and its cousins are much, much more than that.
In reality, the pattr family of objects is a way to access and modify information with the Max patching environment. Using Max for Live user interface objects (or adding pattr objects to non-Max for Live objects) has the effect in the pattr world of declaring those objects as collections of interesting data (or client objects) in the Max environment. The next object we’re going to add – the pattrstorage object – is the way that we keep track of and communicate with and between those client objects. The pattrstorage object is used to view and modify client data, and to store and recall sets of data. Through the pattrstorage object, you can set and or retrieve data, interpolate data between two different sets of data when you retrieve it, and treat client data as the equivalent of destinations for send and receive objects.
Yeah. It does all of that.
But our interest here is in keeping it simple for those of you who want to start your love affair with the pattr family of objects by using it as a preset management system. This way, you can start by including your device in a Live set, create presets that work for your set, and be sure that they'll be all ready for your use the next time you load your set and go back to work (or play). Here we go:
Add a pattrstorage object to your patch. When you add the object, the word pattrstorage should be followed by a name to identify it (e.g. pattrstorage my-data). As with parameter names, it's best to keep the name functional and short (I’m calling my object my-4filter).
We can enable the saving of pattr preset data in your Live set rather than writing and reading preset data from an external data file by setting a single attribute.
If you're a regular user of Max accustomed to using the pattr family of objects, you're no doubt accustomed to saving pattr presets as a part of your patch by setting the autorestore and savemode parameters. Many users include those attributes as arguments to the pattrstorage object using the standard at-sign syntax (e.g. pattrstorage my-presets @savemode 0 @autorestore 0).
In Max for Live, you can achieve the same result by enabling the Parameter Mode Enable attribute.
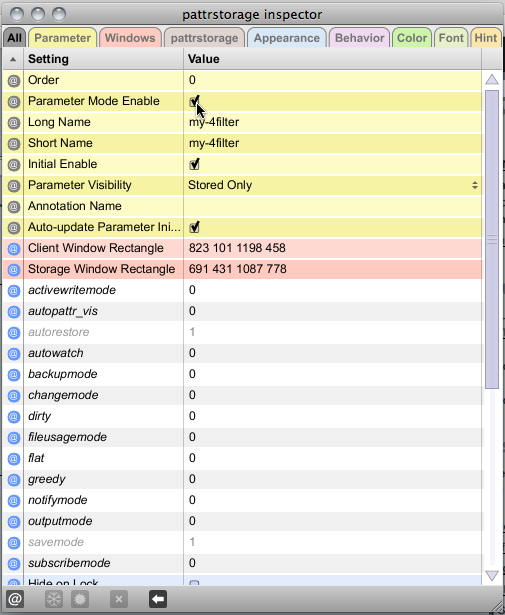
Select the pattrstorage object and open its Inspector. Locate the Parameter Mode Enable attribute and click in its checkbox to enable the parameter. When you do, you'll see a new group of attributes appear in your Inspector. These new attributes are all unique to the use of the pattr objects with Max for Live.
Note: You'll notice that when you click on the checkbox to set Parameter Mode Enable, the savemode and autorestore attributes will be greyed out when displayed. You may also notice that the values for the greyed out parameters are set to values of 1 rather than 0. The displayed values represent the default value of the attribute before it was disabled - the behavior of the pattrstorage object will be precisely as though you had set both attribute values to 0.
To make sure that changes in preset data are automatically updated while your patch is open for editing, locate the Auto-update Parameter Initial Value attribute and click in the checkbox. This automatically updates preset data while you're editing your patch.
Here’s what the Inspector listing should look like when you’re done:
3. Add an autopattr object to your device
The next step involves telling the pattrstorage object how to find all the Max for Live objects whose data we want to include in our pattr presets. And you won't even break a sweat doing it.
Add an autopattr object to your patch by clicking in the white space in your unlocked patcher window, typing "n" to add a new object box, and then typing the word autopattr, followed by a return.
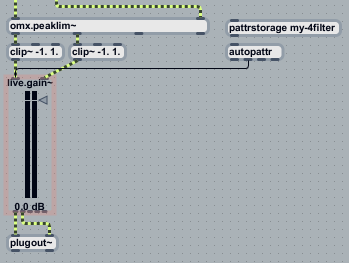
Here's the thing, though. The autopattr object will find all of the pattr-compatible objects in your patcher. What if you don't want to include a Max for Live object in your pattr preset? If you'll recall, we talked earlier about the idea that you might well spend more time excludingMax for Live user interface objects than you did adding them (and autopattr certainly makes adding them a snap). The autopattr object has an way to exclude user interface objects that will be familiar to you if you're a fan of the old Max preset object - it allows you to exclude user interface objects by making patchcord connections in a similar way to the manner in which you use patchcord connections to bind pattr objects. If you connect the second outlet of the autopattr object to any Max for Live user interface object, it will be ignored by the pattrstorage object.
Here's an example - after some thought, I have decided that I don't want to store the live.gain~ object's position as a part of my 4filter device's pattr presets. To exclude the object from your pattr presets, simply connect the second outlet of the autopattr object to the live.gain~ object.
Taking a look at the pattrized landscape
We're all set. Now let's look at what the pattrstorage object can tell us about pattr preset data in our patch.
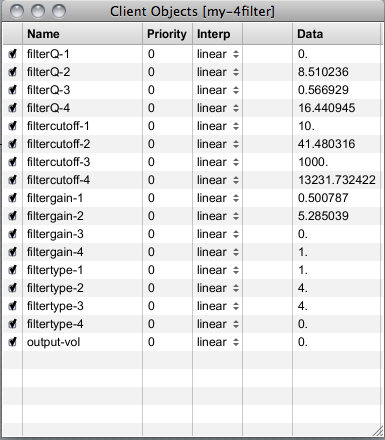
The client window displays the current subscriptions, priority, interpolation, enable state and data belonging to subscribed objects in your device. You can see the client window by double-clicking on the pattrstorage object. You'll notice that all the listings here have nice and easily identifiable names (the same names you'll see if you look at the Automation Chooser) because you set up your Scripting Name and Link To Scripting Name attributes up properly:
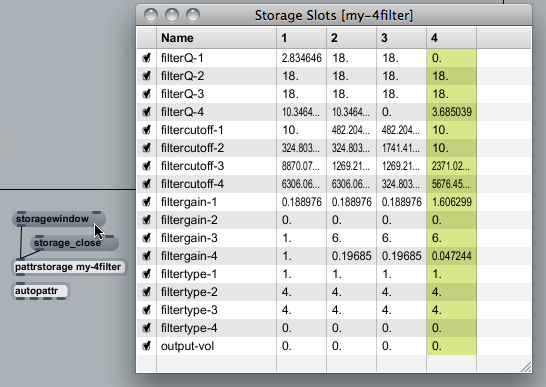
The storagewindow displays the contents of any stored pattr presets. You can see this window by sending the message storagewindow to the storagewindow object.
4. Add a preset object to your device to create a graphic interface for preset storage and recall
Finally, Let's add a preset object to our device to provide an easy interface for storing and retrieving presets. To add a preset object, click anywhere in the white space in your patch, type “n” (new) to get a new object box, and type “preset.” When you hit the carriage return, a preset object will appear. As you’ll recall, we gave our pattrstorage object a name when we created it. Here’s why that’s useful: Open the preset object's Inspector, locate the pattrstorage attribute, and enter the name we gave the pattrstorage object into the Value column. Setting this attribute associates the preset object in our patch with the named pattrstorage object and lets us use the preset object to set and restore presets.
You can now use the preset object as you normally would - to store a new preset, shift-click on any preset dot. You’ll see the dot change color, which tells you that there’ s a stored preset. To recall a preset, click on any dot that has a stored preset.

You can take it with you...
The procedure I've described in this tutorial provides the possibility to save pattr presets that apply to the Live Session you're working in; when you load the 4filter audio device, it will come up with an initial default setting, but it will have no pattr presets stored. Any presets you create while working in your Session will be saved along with the device in your Session document.
In addition to allowing you to create different and unique presets for your each session, there are some other ways to work with this feature.
Let's suppose that in the course of working in a Live Session, you create a collection of presets you would like to use again. Here are two ways you can recall those fantastic pattr presets:
When you've finished creating the preset(s), click on the Save Preset button in your devices Title Bar and give it a name by typing in the File Browser.
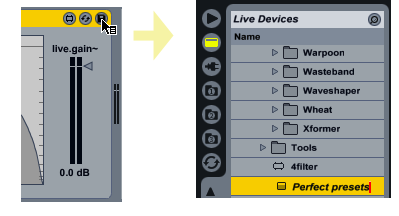
The Live preset you create will contain all of the pattr presets currently saved with your device. Getting them back will be a button click away.
You might find that you've created a set of pattr presets for use with a Live audio clip, and you'd like to be able to use that same clip and the device's presets somewhere else.
The next time you want to use your clip and Max for Live device and your pattr presets, use the Live browser to find the Live session that has your clip and device and click on the file tab to display the Project's contents. Click on the tab for the Session filename (the .als file) to display the session contents.
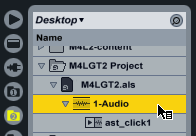
Double-clicking on the Audio track that you want to include will import and both the clip and your Max for Live device, complete with saved pattr presets and ready for action.
This is only the beginning of the cool things you can do with the pattr family of objects in Max for Live, but I hope you find it a good place to start. Now, get out there and make some presets!
by Gregory Taylor on May 19, 2011

