LFO Tutorial 5: LFO Child Slight Return
A while back, I wrote a series of four tutorials based around the idea of how you could generate and organize variety in Max patches. I wrote them first and foremost because that idea of generating and organizing variety by some means other than random numbers or noise sources has been an interest of mine for a long time. I thought it might be useful to show some examples of how one could make use of these basic techniques not just for generating raw material, but also for ways to transfer explicit control of a Max patch in live performance from the operator to some automated process (think of it as outsourcing) in ways that were less jarring than I often hear in live performance.
All LFO tutorials in this series:
I guess people liked the tutorials, which is always flattering. The email that followed was a mix of praise (which I always enjoy), responses that ran the gamut from requests about what to write about next to full-on patch grovels, and even some complaints that I was “doing obvious stuff” (I sure hope that these ideas appear to be obvious, in retrospect – that’s how I know an idea is a good one). In the final tutorial, I’d made the specific decision not to provide any kind of prejudicial example of specific implementation, figuring that no one would be in a better position to imagine what might be done next than readers themselves.
For this tutorial, I’ve tried to address a variety of suggestions and feedback and to extend the ideas covered in parts one, two, three, and four of my humble set of LFO tutorials. This tutorial contains three parts:
I’ve taken the basic LFO module I’ve used in the tutorials and extended it in some new and useful directions.
Based on my experiences working on development for Max for Live, I’ve added some interesting variants on how to transfer control from a user-defined parameter to an LFO-driven process based on the Live application’s “Modulation Modes.”
I’ve combined these changes and demonstrated one possible, if humble, future – creating a set of summed LFOs that drive the playback of the content of a buffer~.
Workin’ the waveform
Throughout the previous tutorials, I've been working with a simple single LFO module that included the ability to slave the LFO output to the Max transport, provided a number of different output waveforms, and also allowed for scaling the output waveform within the -1.0 - 1.0 waveform output range. That waveform is then sampled using the snapshot~ object and the output was used to control other parameters. Here’s what it looked like:
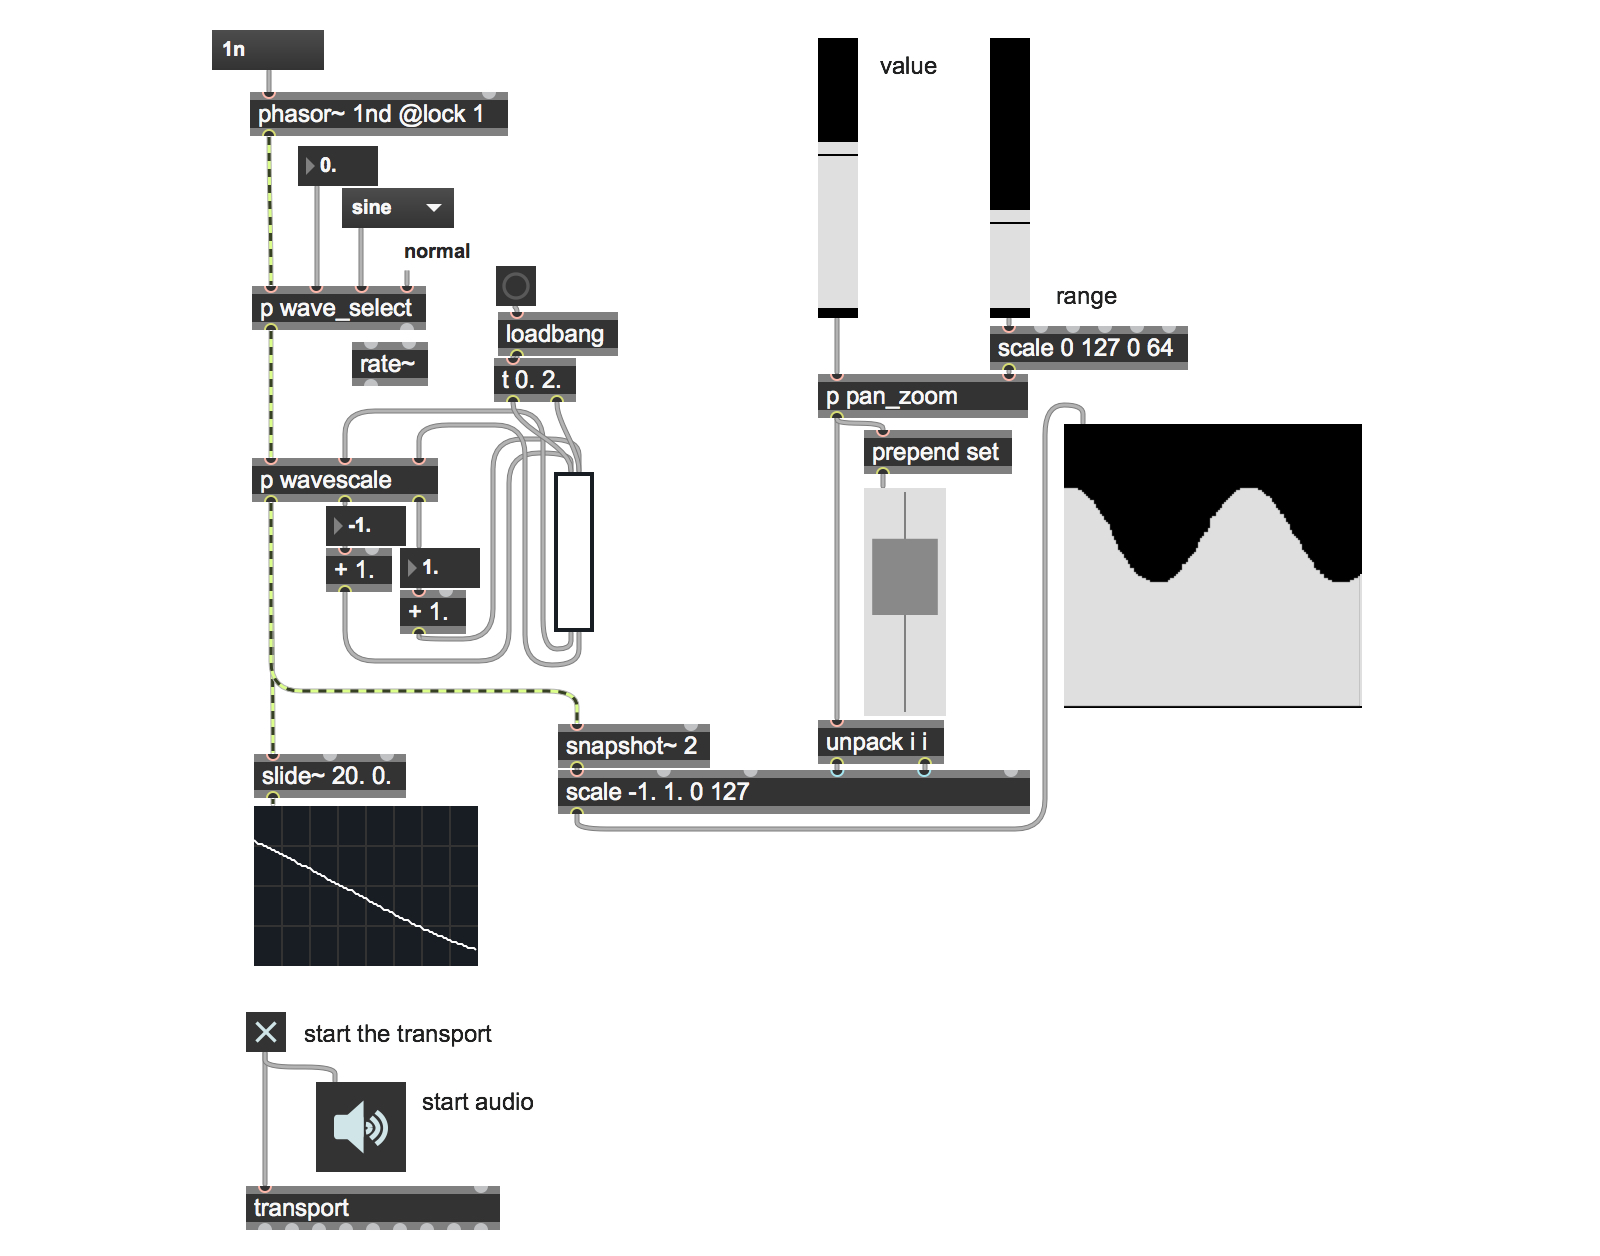
This tutorial uses a new variant of that basic single oscillator LFO with some added features.
Here's our new basic LFO:
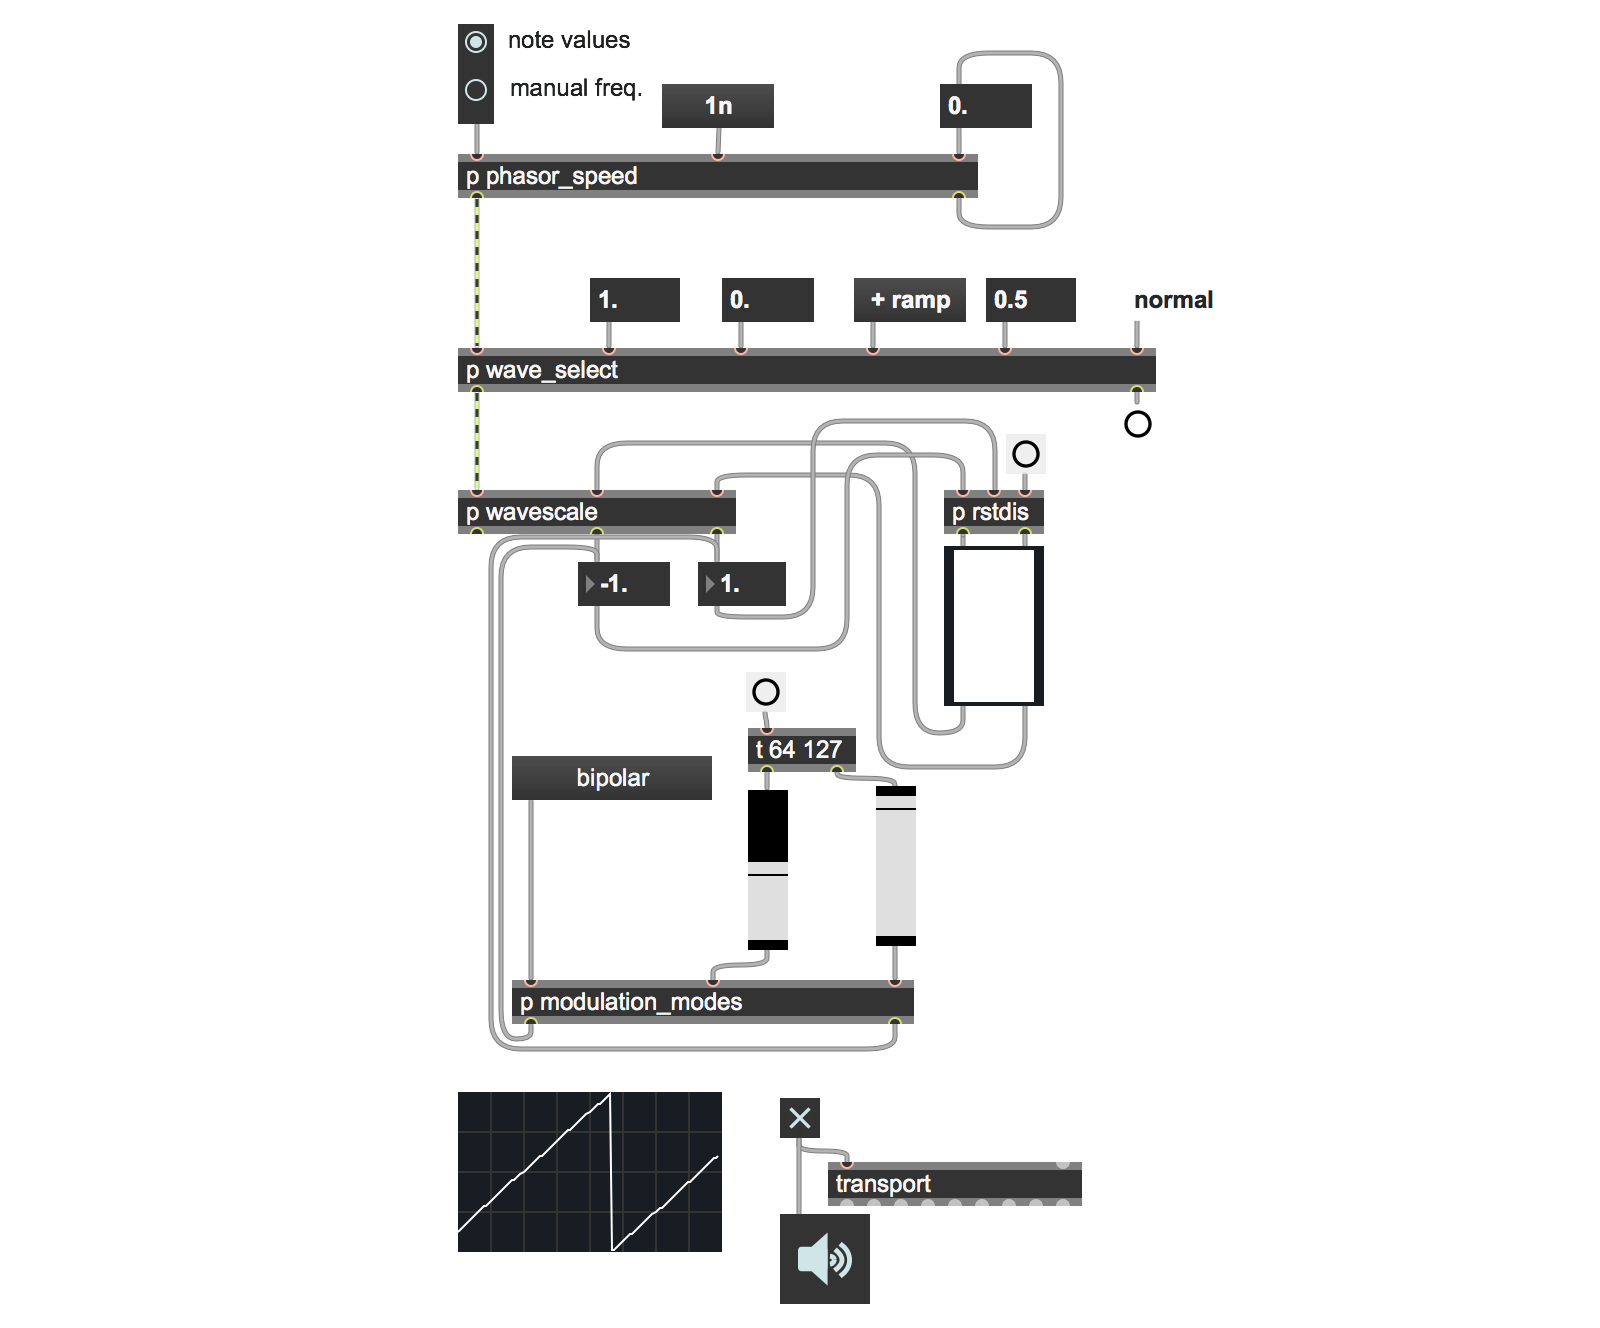
For the sake of functionality and readability, I’ve created subpatches that contain those new changes. Let’s look at those new features:
In our original LFO patch, the speed of the phasor~ object that generated waveforms was set using ITM-based note value settings to determine the rate. While that works just fine, I thought that I’d rather have a choice about whether or not to derive the speed of the phasor~ using Max 5 note values or to specify the phasor~ rate as a floating-point number that describes a frequency. The obvious reason for that is simple – I might someday want to use another LFO (or summed network of LFOs) to modulate the phasor~ rate. I realized that I could also consider the values stored in the umenu as representing a kind of synchronized sequence of frequencies that I could step through using some process (a counter? The contents of a coll object?). So it seemed like a good idea to build some flexibility into the LFO module here. I also realized in the course of patching that it’d be useful to know how the current tempo values represented by the ITM note values mapped to frequency in order to switch between time-synced to free phasor~ rates. So my new subpatch also includes some logic that will automatically set the frequency of the “free” oscillator to match the current value of the note value and the tempo I’m working with.
Let’s look at the inside of the subpatch:
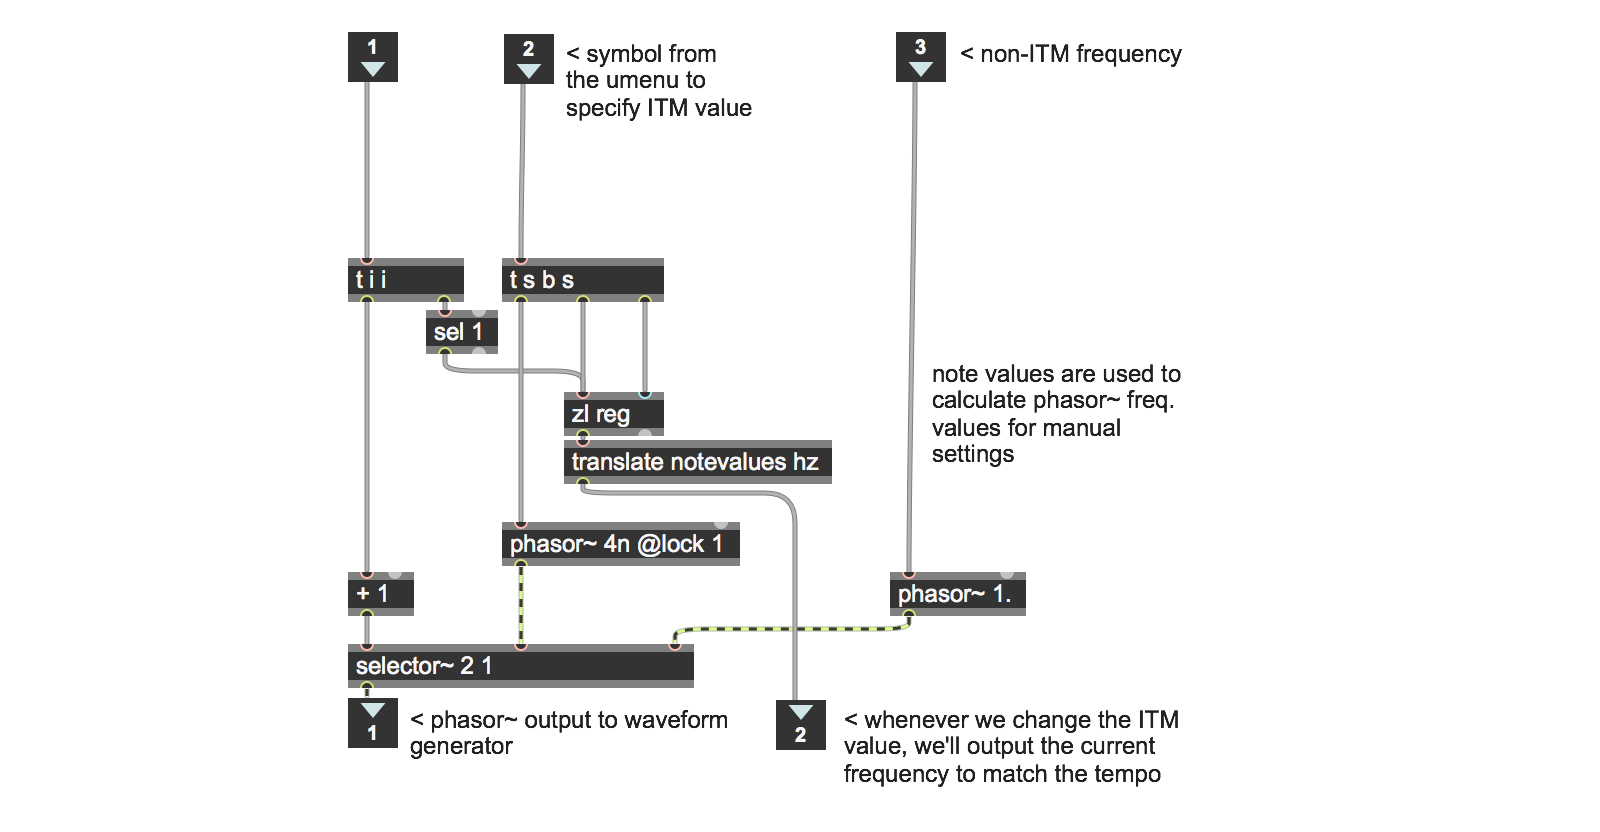
The bulk of the patch is exactly what you’d expect: some logic to select whether you want note values or numerical frequencies using the selector~ object as a switch (and that second argument to the object sets the default behavior). But I’ve added another useful feature in the center of the patch – the translate object that automatically converts the current note value into an equivalent frequency value in Hertz. There’s some trigger-based logic added to the inlets to make sure that the calculation will be triggered whenever a new note value is chosen, and also to make sure that the frequency value is sent to the second phasor~ object before switching to it (think of the zl reg object as the symbol equivalent of a Max int or float object that stores a value and will output the most recently stored value when a bang is received in the left inlet), but the translate object is right in the heart of things. If you spend much time working with the new musical time features of Max 5, this object will become one of your best friends. It takes two arguments – one to specify the kind of value you want to translate and a second argument to specify what kind of values you want to end up with. In this case, we’re translating note values (notevalues) to frequency (hz).
Choosing between manual frequency values or note values is certainly useful, but there’s another reason for wanting to derive the frequency value that corresponds to a given note value. Although I’ve not done it in this patch, you could use that value to derive a subdivision of frequency for generating tuplets well outside of the triplets and dotted notes and intervals described by standard Max 5 note values. If you’re interested in doing it, I’ve already done most of the heavy lifting and will leave the rest as an entertaining and potentially useful “exercise for the reader.”
Here’s your question: what would be the easiest way to specify phasor~ outputs that would give me tuplets that weren’t duples or triples? It’s not rocket science, but I’ve got other fish to fry, at any um… rate.
Although the wave_select subpatcher might look similar to the one we used in our last LFO tutorial, I’ve added a few things - things I use in my own practice, and some bits and pieces that began their lives as reader requests. Here’s the inside of the new and improved subpatcher.
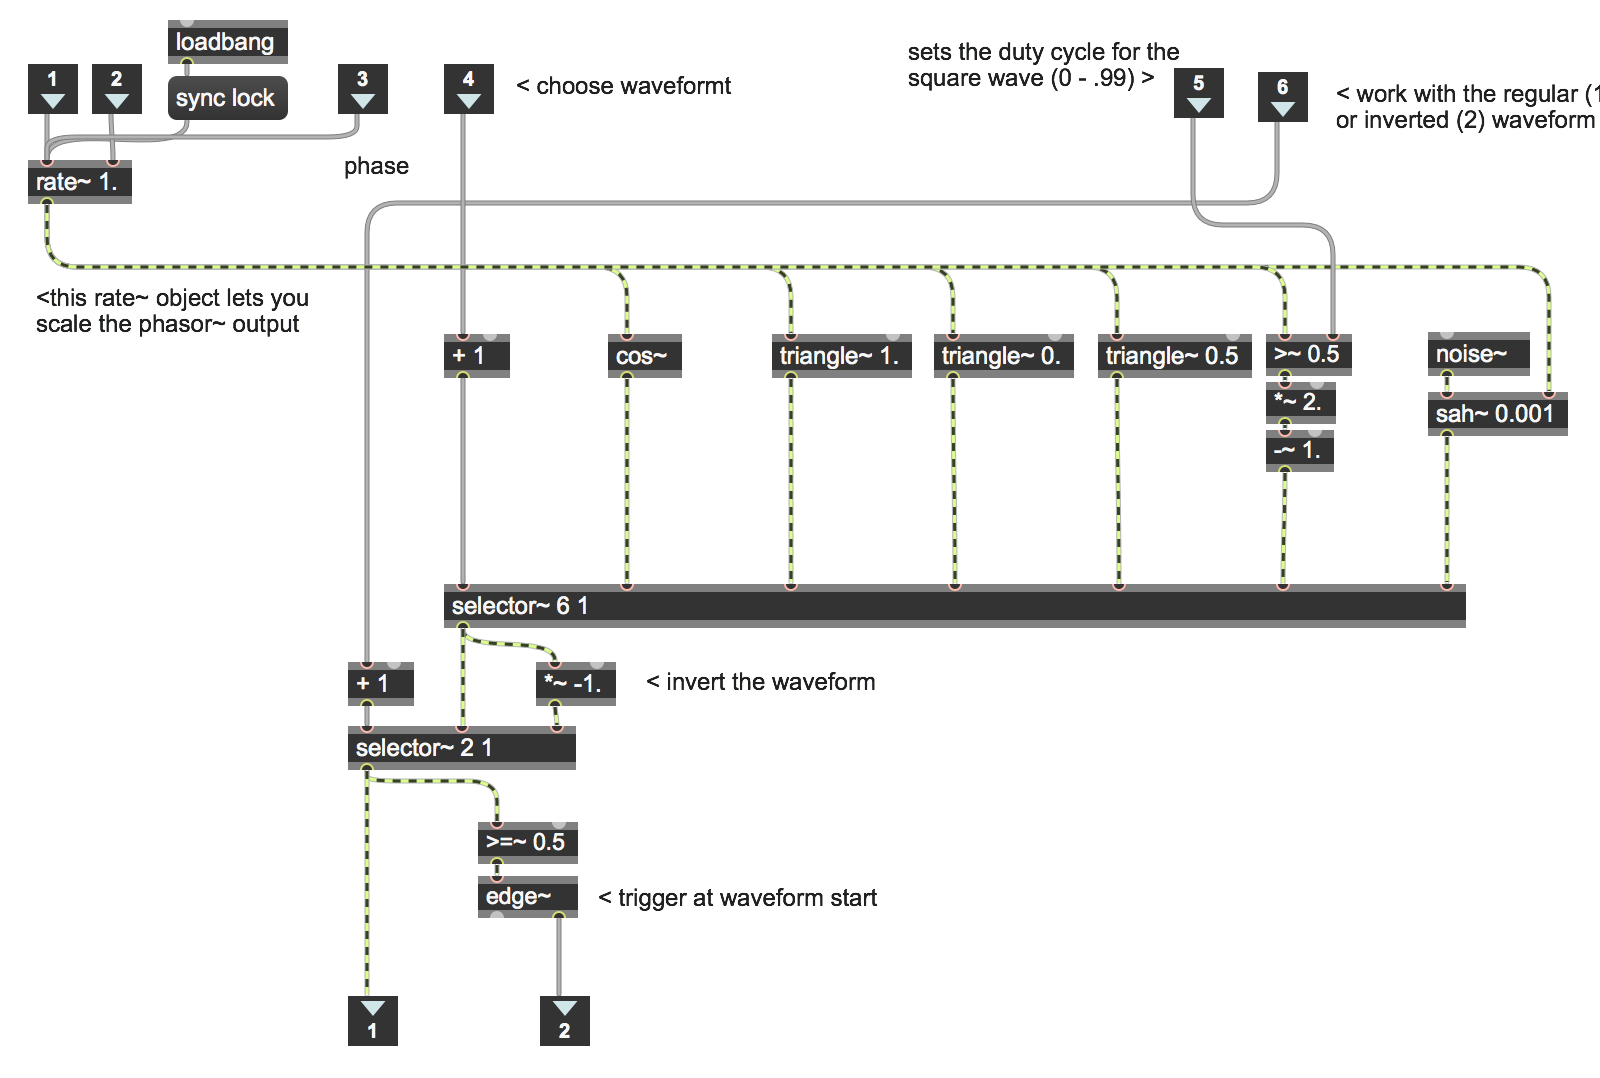
The first change is something simple that I can’t believe I didn’t add in the first place: the ability to set the phase of the output waveform. This isn’t at all difficult – we’re using a rate~ object already to provide a time multiplier to work LFO frequencies that are longer than a dotted whole note, it’s a simple matter to send a floating point value in the range 0.0 – 1.0 to the left inlet of the rate~ object. This lets us sum multiple versions of the same waveform that differ only in their phases, and create interesting effects by being able to place the start point of an oscillator’s output. It’s something I use all the time.
The second addition was a reader request for a negative-going ramp. To be honest, I didn’t add it because I tend to simply invert a positive going ramp waveform when I need one (Extra credit: is there a situation you can think of where this might be an important feature to have?). So I thought I’d add the new waveform as a way to point out a lovely feature of the triangle~ oscillator – its ability to use a signal input to change phase offset of the peak value. In effect, this lets us derive a standard ramp signal (the kind of output we see from the phasor~ object), a triangular waveform, and a reverse ramp signal merely by modifying the phase offset.
It may have occurred to you at this point that you could modify this patch so that there’s only one triangle~ oscillator object that takes an input value between zero and one to produce a variety of waveforms along the “positive-ramp to triangle to negative ramp” continuum. A fair number of savvy Max programmers use this feature to create oscillators with morphing waveforms, in fact. I’ll leave this as yet another interesting project for your edification. For this subpatch I’ve instantiated the triangle~ object three times, each with an argument that gives me a phasor~-style positive-going ramp (0.), a negative-going ramp (1.0) and a triangle wave output (.5).
Using square wave output in an LFO provides some interesting effects (it allows you to create ostinati, and the sudden jumps in mixed waveforms can be really useful), I thought it’d be useful to have a square wave output with a variable duty cycle that would allow me to relative amount of time at which the square wave output was high or low.
Finally, After I had the variable duty-cycle square-wave working properly, I realized that there was something else I would like to have. As nice as the square wave output is, the “jump” when it’s summed with existing waveforms is always a fixed amount. I was thinking that it would be nice to be able to use a sample and hold technique to provide random jumps at ITM rates rather than the set vertical offset, so I added a noise~ source and the Max sah~ object to sample the noise output to provide that non-deterministic vertical offset.
There’s more to modal modulation than Miles Davis
In the fourth tutorial, I spent a lot of time talking about what the relationship between a modulating LFO and a parameter would be, and tried to suggest some interesting ways in which you could using value scaling and value ranges to gradually turn control of a give parameter over to the LFO in a way that seemed smooth.
As you might imagine, a number of us here at Cycling ’74 have been pretty intimately involved with working with the new version of Ableton Live as we prepare for the release of Max for Live. One side effect of this frenzied activity for me personally has been encountering the ways in which the Live application thinks about modulating a parameter. Although they certainly have one method for modulating parameters that matches my personal approach, Live 8 recognizes a number of what they refer to as “Modulation Modes.” In brief, here’s what they are and how they work:
Unipolar: the parameter is modulated between the minimum range value and its current value
Bipolar: the full modulation range of a parameter is equal to twice the distance between the current value and nearest boundary of the parameter’s range (upper or lower). If the parameter is exactly halfway between the lower and upper range boundaries, the modulation range is equal to the total parameter range.
Additive: The modulation range from the current value is equal to plus or minus ½ of the total range of the parameter with values being truncated if they fall outside of the parameter range.
Absolute: The absolute mode requires that you specify a modulation range value, and uses the current value as either the upper or lower bound of the modulation range. If the current value is less than half of the full parameter range, the modulation assumes a lower range of the current value minus the modulation range. If the current value is greater than half of the full parameter range, the modulation assumes the upper range is current value and the lower range is equal to the current value minus the modulation range value.
Working with these modes in Live suggested that I generally use what Live calls “bipolar” modulation (it’s what the previous tutorial did when controlling the amount of modulation added to an LFO, in fact), but that there are some interesting features to doing that in other ways. So I sat down and decided to try to create a Max patch that would implement these modes of modulation. In part, I thought it would be useful to actually see all four modes operating next to each other at the same time to get a better sense of how they worked with various parameter changes. After some quality Max time, I emerged from my studio weary and singed, but holding aloft the modulation modes patch you see here.
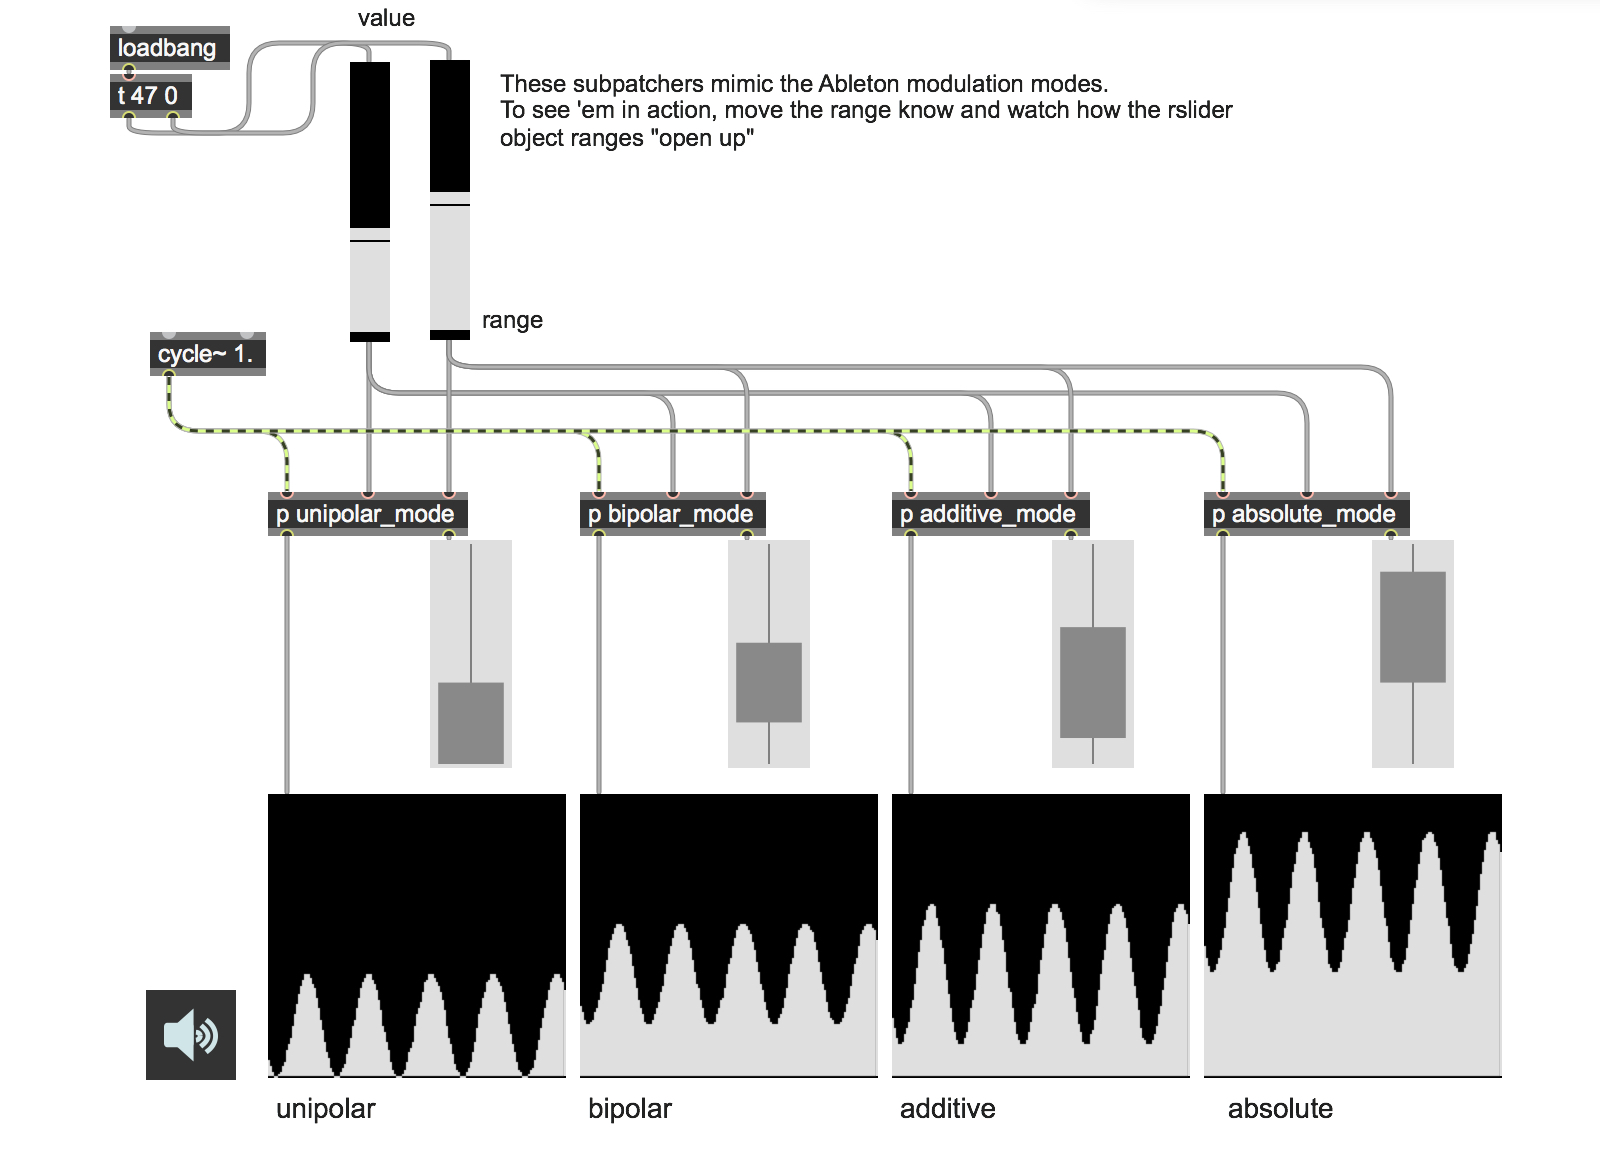
It uses the same value and range controls you saw in the previous LFO tutorials, but applies those inputs to four subpatches that implement each of the four modulation modes (feel free to open the subpatches up and poke around in them, of course), and then displays the new output ranges using 0-127 range slider (rslider) objects and applies the output range to a simple sampled sine wave for demonstration purposes.
This demonstration patch requires audio input to help you visualize the changes associated with each mode, and I initially kept the 0-127 range I used in the last tutorials. But when it came to adding the modulation modes to my patch, I realized that I could modify the patch just a little bit and make things easier to use. First, I really didn’t need to watch the output modes, so there wasn’t really any reason to be working with audio inputs, so I could remove that logic from the subpatch. After a little thought, I realized that I already had the patch functionality necessarily to scale the waveform output – the numerical outputs for the wavescale subpatch from a couple of tutorials back. All I needed to do was to modify the output of my modulation mode patch to output numbers in the range -1.0 – 1.0 instead of 0-127, and then connect the outlet of the subpatch that calculated modulation modes and I was all set. A nice bonus here was that my output was still in the signal domain – none of the waveform sampling we worked with in the last tutorial. So I sat down and removed some outlets, added a couple of scale objects to transform data ranges from 0-127 to -1.0 – 1.0, and I was ready to go.
Again - here’s the handy new LFO module with all the new added features and the modulation modes built right in, ready for use as a waveform or ready to be sampled for some other means:
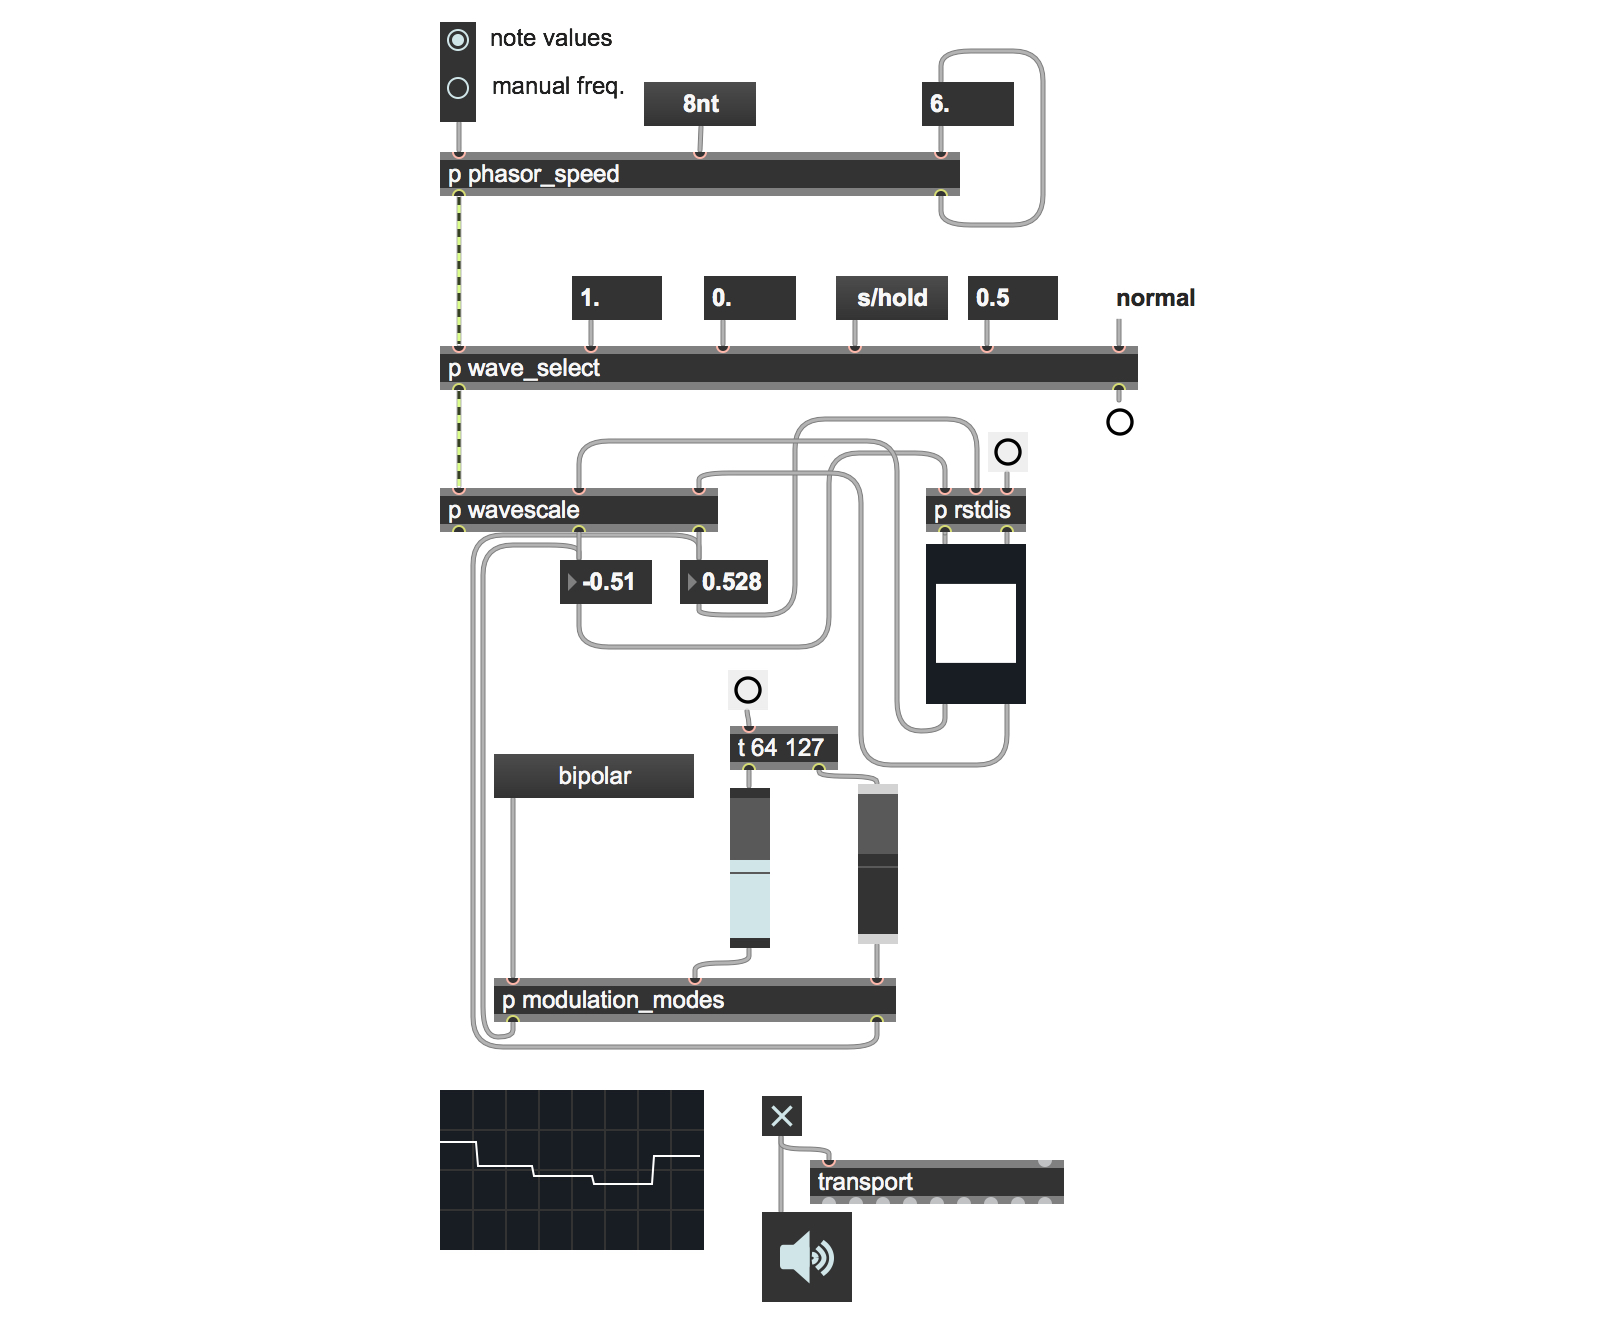
The careful reader will notice that I’d added some subpatches here that allow me to reset range slider (rslider) objects with the click of a button. I’m very partial to this technique – particularly for the ability to return to initial state in live situations. In I generally like to add the UI elements to the Presentation Mode and then make the buttons really tiny and position them at the position associated with a variable or locate them near to the UI I want to reset.

Putting the new LFO to work
You’ll notice that I used the phrase “generating and organizing variety” at the very beginning of this tutorial to describe my interest as a Max programmer and performer. The phrase has two parts, and I’ve arguably only dealt with half the question. I purposely left that the business organizing variety (i.e. making noise) as an exercise for my readers last time out. This time, I thought I’d finish off this tutorial by taking the LFO module we’ve just made and put it to work doing something interesting, or at least audible.
The humble Max wave~ object lets you use the contents of a Max buffer~ object with which it is associated with by name as a wavetable. All you need to do is to use a phasor~ object to drive the rate at which the wavetable is read.
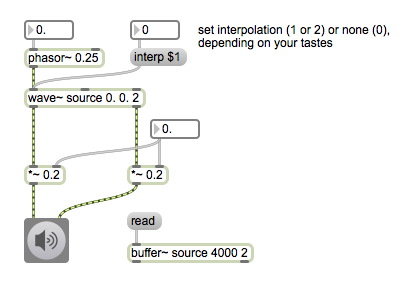
At low speeds, you can get something like regular buffer playback, and higher speeds will yield waveforms (that usually don’t have anything to do with the pitch or the original audio sample, of course. In these cases, the contents of the buffer translate to timbre rather than the sample at normal playback rates).
But we’re talking about Max patches here - the wave~ object accepts a signal input that is uses to read through the wavetable. There’s no particular reason that the signal input needs to be a single phasor~ object, or even that the input needs to proceed in a stately manner from 0. to 1.0 as the phasor~ object does. Consider the little LFO object I’ve just put together as an input source for a wave~ object.
There might be a couple of things to consider when using the LFO to drive the wave~ object for playback:
The LFO outputs signal values in the range -1.0 – 1.0, whereas the phasor~ object produces output in a narrower range of 0. – 1.0. What happens when the wave~ object gets a negative value between -1.0 and 0, as it would for one-half of the period of a sine wave? (Feel free to try it and see what happens).
If the phasor~ object’s output doesn’t start at 0. and end at 1.0, will we get complete playback of the sample? What if the sample goes from 1.0 to 0. or changes direction?
Square wave output won’t be particularly useful, since that kind of output won’t do much interesting in terms of audio playback – the horizontal portion of the square wave output will just output a steady value associated with a particular portion of the waveform. However, what do you think might happen if we were to mix square wave output with another kind of waveform (a ramp or triangle, for example)?
These questions suggest some interesting things we can take advantage of. We can modify or constrain the range the phasor~ object whose input the wave~ object uses for playback to produce interesting playback patterns – patterns that are locked to the current tempo of the Max transport, in fact. And we can combine the output of several synced LFOs to produce all kinds of interesting nonlinear playback.
The waveplayah patch is an attempt to do just that. Simply put, it takes a trio of the LFO modules we created earlier in the tutorial, sums their output, adds some playback logic that we can use to add a little interest to the proceedings, and lets us produce various kinds of nonlinear playback.
The amount of logic we need to add to create the waveplayah patch beyond simply duplicating the LFO module three times over is pretty simple. One thing we do need to keep in mind is that since we’re summing waveforms, the summed output range of the waveform will now potentially be in the range -3.0 – 3.0. We can fix that easily by multiplying the output waveform by .33 using the *~ object.
And since our summed output range doesn’t match the expected 0. – 1.0 range of a phasor~, we have some interesting opportunities to modify the way that our summed and synchronized waveform drives the wave~ object. The waveplayah patch has a subpatch called playback_mode that lets us map our LFO output in one of several ways. Here’s an example of how the playback_mode subpatch works.
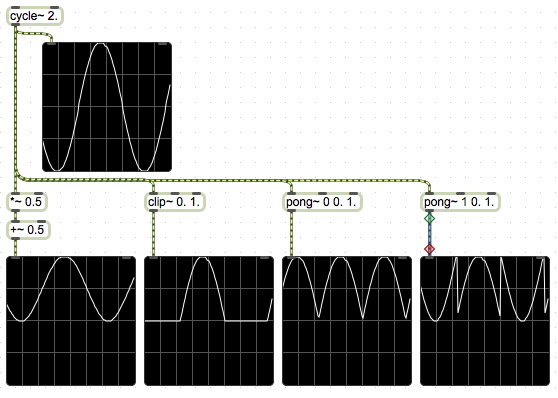
The first example uses signal multiplication and signal scaling to move the entire waveform so that it falls into the 0. – 1.0 range. The Max clip~ object is used for the same thing we did when we needed to create square wave output – arguments to the clip~ object set the low and high ranges for the output; anything that falls above or below that output range is simply clipped at the lower or upper range (We’ll leave it to you to imagine or discover what that sounds like). Finally, we’re using the Max pong~ object in the subpatch to provide us with two new playback options – folding and wrapping. The pong~ object can do both things – its first argument sets the mode of signal treatment (0 for wrapping, 1 for folding) and the second and third arguments set the lower and upper ranges below or above which the signal folding or wrapping will happen. The playback_mode subpatch provides all those options by using a gate~ object together with a menu object whose index number (with 1 added to that number so that we don’t have a 0 value – that would turn the gate off) sets which mode to use in playback.
Technical note: If you take a look at the inside of the playback_mode subpatch, you’ll notice, too that the first choice (scale) also includes a gate to turn the output of the *~ and +~ objects off. We’re doing that because the output of these two objects is always “on” and will be added to the other output waveforms if we don’t.
I’m kind of stunned by the range of kinds of output this little patch will produce, and hope you enjoy playing with it. There are some obvious improvements you might want to make, such as adding objects to the Presentation Layer to create your own UI for the playback unit, or pattrizing your patch to allow for quick preset loading. Or you just might want to spend a few days getting acquainted.
Next time out, I’ll show you how to turn the waveplayah patch into a Max for Live audio effect device (and, more generally, how to port a Max patch for use in Max for Live).
by Gregory Taylor on February 5, 2010

