LFO Tutorial 6: Live if you want it

Since a lot of people are interested in what the process of porting a Max patch for use in Max for Live looks like, I thought I’d take this tutorial as an opportunity to go over the steps I used to take my waveplayah patch and to convert it to a Max for Live device waveplayah.amxd.
In my last LFO tutorial, I took the basic LFO module I’ve been working with in the previous tutorials, added some new extensions, and created a nice little patch called the waveplayah that used a summed set of the LFO modules to drive the playback of the contents of a buffer~. A good deal of my thinking about and creating it overlapped with the arrival of Max for Live – it’s where I got the idea for the different modulation styles I talked about in our last tutorial, after all.
All LFO tutorials in this series:
Although every instance of porting a Max patch for use as a Max for Live device varies a little bit, here’s what the basic procedure looks like:
Decide what kind of Live device your patch will become (Instrument, Audio effect, etc.) and make the necessary I/O substitutions to work in the Live environment.
Replace any UI objects that represent parameters with their Max for Live counterparts (dial >live.dial, etc.) or set anything else that doesn't have a counterpart up to function in the Live environment.
Enable all device parameters and set their initial states.
Go through and set up the modulation types you wish to use for each UI object so you can use clip automation.
Use Max's Presentation Mode to set up your user interface within the standard rack space area, and save your patch so that it opens in Presentation mode.
If you’re planning to share your device with anyone, you’ll need to check to see if there are any Max objects or abstractions of files that you’ve used in your device that other users may not have. If there are, you'll have to include them in your device, freeze your device to collect everything together, and save the result.
Moving day
The first part of the patch to device conversion is simple copying and pasting. You’ll need to think of what kind of Max for Live device the patch you’re porting is going to be – an audio device, a MIDI instrument, or a MIDI effect device. Since our patch is going to become a Max for Live audio device, we start as we always do when creating Max for Live audio devices – by clicking on the Max Audio Effect icon in the Live browser and dragging it into the Effects rack on a Live track to create the familiar and popular starter patch, then clicking on the edit button in the device’s toolbar to launch the Max editor. We really don’t need anything else in the audio device starter patch except for the plugout~ object, so select and remove everything else, then move the lonely plugout~ object to the side for now.
Next, we’ll open the waveplayah.maxpat file from inside the Max editor as well. Choose Select All from the Edit menu, and then choose Copy to copy the contents of the patch to the clipboard. Go to the audio device starter patch and choose Paste from the Edit menu to copy the contents of the Max patch into the Live audio device patch. Before you forget, name and save your patch as waveplayah. Now, let’s get down to business.
First things first
The first and most obvious thing about converting a Max patch for use with Max for Live has to do with making the changes that will help the Max patch function most easily in the Live environment. That’s really composed of three different things:
A Max for Live device handles its input and output in ways that are specific to working in the Live environment; audio input and output are handled using the plugin~ and plugout~ objects.
Since the waveplayah patch loads a waveform into a buffer, we don’t really care about the audio input. This patch doesn’t need a plugin~ object at all, but we do need a way to load an audio file into our buffer. In this case, I’m going to keep it really simple and use a technique in the original patch that uses a button object to load an audio patch.
For output, we’ll use the plugout~ object from the audio device starter patch in place of the ezdac~ object in the original patch. And since we’re working in Max for Live, we also don’t need the transport object any more. When we use Max objects that support ITM (such as the phasor~ objects in our patch), the Live transport automatically becomes the transport that the patch uses. So we can remove the transport object, too.
The namespace in Max is global. That means that any time I have a named object such as a table or a buffer~ or a coll object, any reference I make to that named object anywhere will refer to an object with that name.
In the Max world, that’s a nice advantage and not that big of a deal, but when we deal with Max for Live, things can get complicated. In the case of the waveplayah patch, the wave~ object plays back the file loaded into the buffer named source (since the wave~ object includes the name of the buffer as an argument). That means that any wave~ object in any Max for Live audio effect device that makes reference to a buffer named source will refer to that buffer. That could get awkward when you use the waveplayah device in more than one audio track in a Live session.
Happily, there’s a very simple change I can make to sort this out. In Max, whenever the name of a buffer~ or table or coll object begins with three dashes (---), the named object will be used only within that specific device. So in my waveplayah patch, all I really need to do is to change the name of the buffer I’m using from source to ---source, and then make sure that the wave~ object references that new buffer name as an argument.
In order to make the best use of the things like creating presets and automating parameters in the Live environment, we should make use of the new Max for Live UI objects, which are already MIDI-friendly and can set and save initial states (which the Live application needs).
That’s really the part of the patch porting that takes most of the time, and I’ll describe that process in detail below.
Cleaning and sorting and organizing
The next task involves going through our patch and replacing every single Max user interface object with the Max for Live object that is its equivalent – every slider should be replaced by a live.slider object, and so on. We’re doing this because the Max for Live user interface objects have some special attributes that make assigning MIDI controllers and automating parameters much easier.
When converting large Max patches to Max for Live devices, I like to do this by adding a single Max for Live object to my patch, copying it to the clipboard, selecting every object I want to replace with that one and then choosing Paste Replace from the Edit menu (and then going through and filling in menus or tabs as needed). Your mileage may vary!
Technical detail: Although we aren’t doing it in this patch, you should keep in mind that the live.numbox object can be used to replace both floating point and integer number boxes in Max for Live. Since the Live application only works with integer values in the range 0 – 255, you should always replace integer number boxes with live.numbox objects whose Type attribute is set to Float and whose Unit Style attribute is set to Int.
There are a few rslider objects in my patch, and those objects don’t have a Max for Live equivalent. Since the range slider values can be set using the two number box objects to the left of each range slider, I decided that I didn’t need to worry about them and could leave them as is. Similarly, I really don’t care about the button objects I’m using to load audio or reset center and range values, either. But I did decide to replace the *~/number box stuff I was using to control output volume with a live.gain~ object.
Now that I’ve got all of my user interface objects swapped over to Max for Live objects, it’s time to do some housekeeping that’ll make our experience using the new device easier. Here’s what we need to do:
Unlike regular Max objects, Max for Live user interface objects can set and save an initial state (Yes, that’s right – the number of loadbang object objects in your patch just plummeted). We’ll need to add that to everything.
When you unlocked the original waveplayah Max patch, you probably noticed that a pair of objects - a loadbang object and a trigger (t) object - and a bunch of previously invisible patch cords suddenly appeared (If you’re wondering how that trick is done, you can Option-click (Macintosh) or Alt-click (Macintosh) and drag to select the objects and patch cords you want to hide or reveal and choose Hide on Lock from the Object menu. Any selected patch cords or objects will now be invisible when the Patcher window is locked. In the days before Max 5, that was how we initialized values in a patch). You can select the loadbang and trigger objects and just delete them. We’ve got a much nicer way to handle that now.
We’ll want to set up our UI objects so that they’ll work with Live’s parameter automation. That’ll mean setting up recognizable parameter names for our UI object and enabling modulation modes.
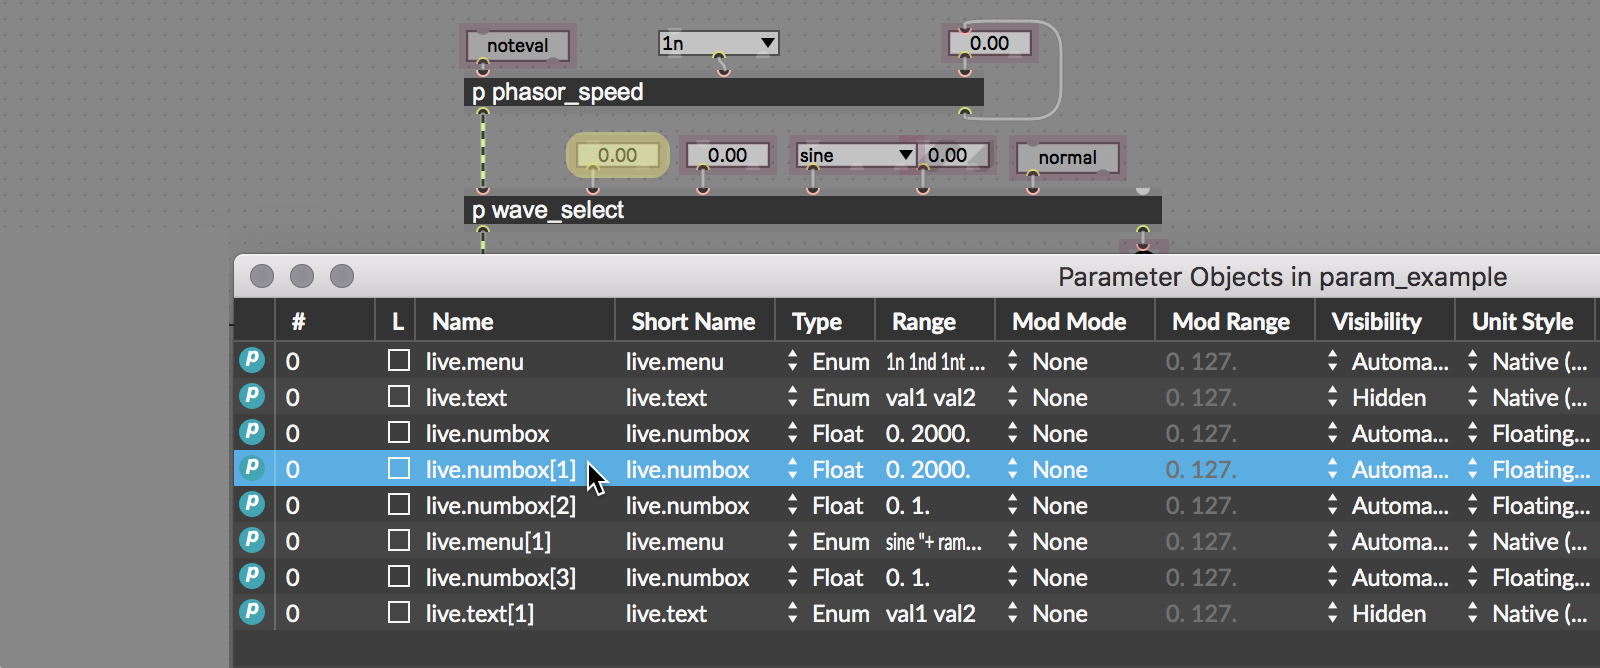
These tasks can be a little time-consuming in a patch that includes a lot of user interface objects, but Max for Live includes a new feature that makes the whole process a lot simpler – the Parameters window. The Parameters window provides you with a listing of all the relevant data about all the UI objects in your device in one place where you can view and edit them.
To view the Parameters window, choose Parameters from the View menu.
You’ll see a nice long list that includes every single Max for Live UI object in your patch. It will look a little scary at first, since every UI object is listed as something like live.slider[4] or live.numbox[14], but we’ll fix that in a minute.
The smart thing to do is to go through and give all the UI objects easily identifiable names so we can identify them if we want to automate a device parameter. But how do we know what’s what? Simple – click on the blue dot in the leftmost column in the Parameters window and watch your user patch – you’ll see the UI object turn a nice lime green.

To give the UI object a name (e.g. phase_1), double-click in the Name column in the Parameters window and type in a name. Then click in the Link checkbox to the left of the Name column to link this name to the Long Name attribute of the object (which is what Max for Live uses to identify parameter names for automation). Using the Parameters window, you can just go down the list and rename everything all at once.
You’ll also want to set each entry in the Parameters window to enable saving an initial value by clicking in the checkbox in the parameters column labeled “I” (initial value), and then double-click in the Initial Value column and type in a value (for menu items, use an integer and remember that the first menu item is 0). When you save and close your patch, all of your UI objects will be set to the initial values you type in.
Finally, you’ll want to set a modulation Range value for each parameter (the modulation ranges were what I described here, in case you’d like to refresh your memory). The Bipolar mode works well for nearly everything. In situations where you’re adding modes for things like toggle objects, you should choose Absolute.
Again, the great thing about using the Parameters window is that you do all the housekeeping in one place. Now that things are named and enabled, the only thing left to do is to arrange your interface.
Good interface design 101 – learning by doing
The next thing we’ll need to do is to create the user interface for our device – to take all the parameters in the Max patch and arrange them within the Live audio rack space. Max 5 comes equipped with the tools to make this process easy – the Presentation Mode. When using the Presentation Mode, you select only those portions of your Max patch you make up the user interface and arrange them as you want without affecting the layout of the original patch.
To create the audio effect’s UI, all we have to do is to select those parts of the patch we want to have visible – number boxes, sliders, menus and labels - and choose Add to Presentation from the Object menu. When we do that, every item we’ve selected will display a pink Presentation mode halo. When we click on the Presentation mode icon in the Max patcher window toolbar, everything but the objects we’ve added to the Presentation layer will vanish, letting us arrange the UI objects for our effect in a way that is pleasing and makes sense. This is often the step in creating any Max patch that takes the most time and fine-tuning, but hey - it's your interface, so take a little time to get it looking just the way you want.
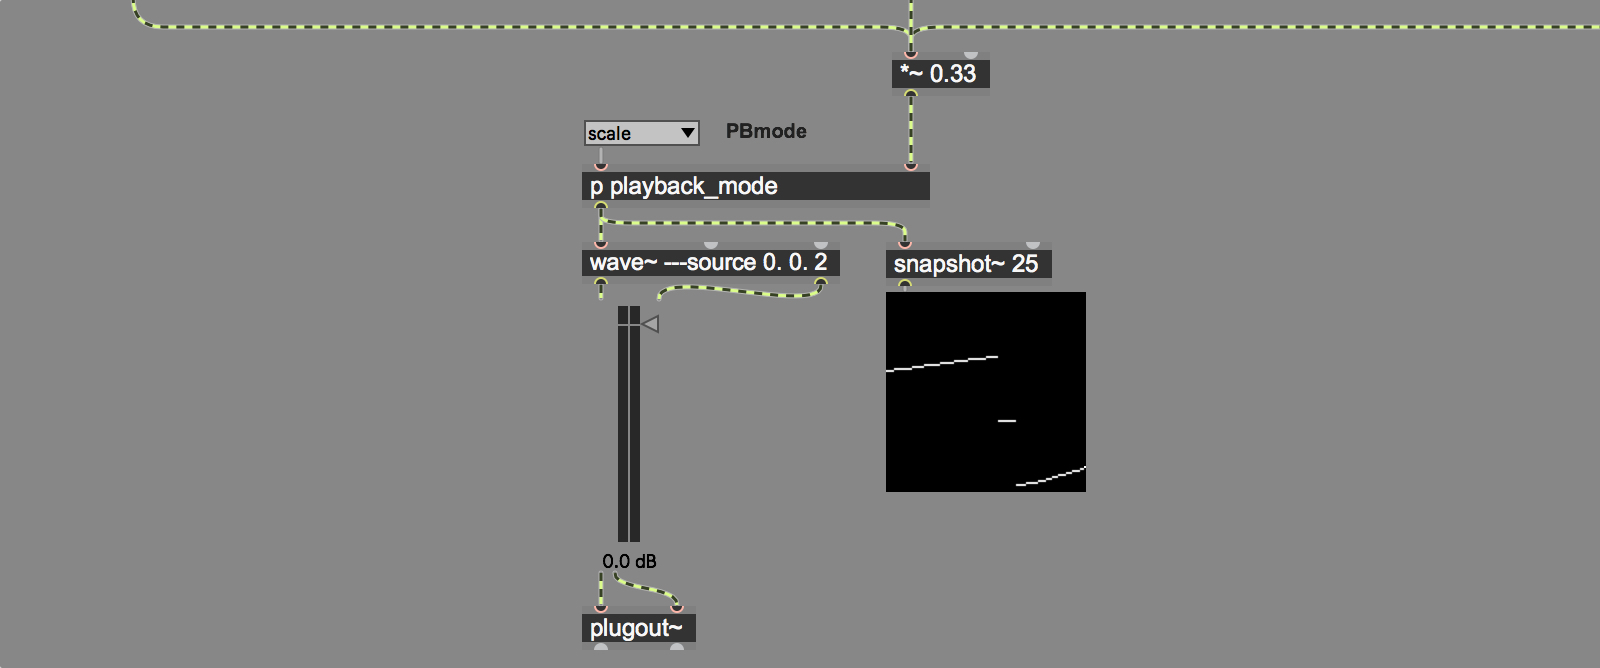
While working on porting the waveplayah patch, I decided that it would be nice to have some kind of visual indication of what the waveform driving the wave~ object in my device looked like, so I made one small addition to the original waveplayah patch– a bit of patching that samples the waveform output and uses a multislider object with its Slider Style attribute set to Reverse Point Scroll to draw a nice moving graph.

Once the design is formalized, we’ll need to set the patch so that the Presentation layer is displayed by default. To do that, choose Patcher Inspector from the View menu and click in the checkbox marked Open in Presentation. When you save and close the patch, you’ll see your layout displayed in the effects rack (If you re-open your patch to edit it, you’ll need to click on the Presentation layer icon in the toolbar in order to display the rest of your patch).
My work here is done
That’s the basic procedure for converting a Max patch to a Max for Live device. For your enjoyment, I’ve included an already-ported version of the waveplayah patch for your edification. But don't be lazy - it would still be a good idea to try converting the patch and creating your own user interface yourself for practice. After that, there are a whole lot more cool Max patches floating around than there are Max for Live devices, so you know enough to start finding things that interest you in the Max forum and on the web and converting them for your own use.
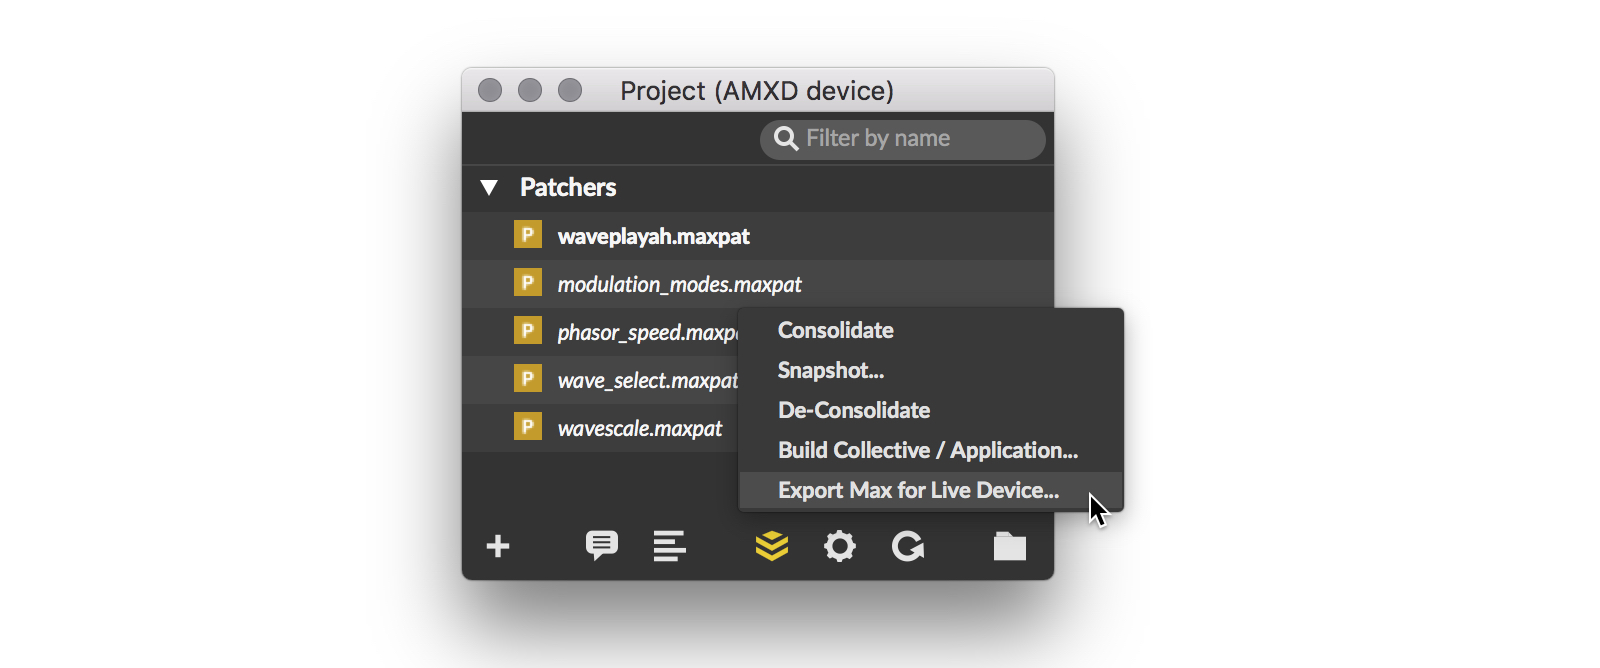
If you decide to start converting patches to devices, I'd strongly suggest that you consider using Projects as a way to organize your patches and keep track of things like abstractions you or another user has made. If you want to share any Max for Live device you create with anyone else, you’ll almost certainly want to use Projects as a way to create and save everything in a single location.
The easiest way to get acquainted with using Projects in Max is the go-to method for learning about anything in Max:
In any open patcher window, click on the Magnifying Glass on the patcher window's right-hand toolbar
Type "projects" into the text box
Scroll down through the search results to the Documentation section and click on the listing for About Projects (that little square with the G in it tells you that it's a Max Guide).
Double-click on the entry to open the Documentation browser.
One of the particularly nice feature of using Projects for the Max for Live devices you make is that building your .amxd device is simple using a Max Project - just click on the Manage Projects icon in the Project Browser's toolbar and select Export Max for Live Device... and you're all set.

In the next tutorial, we’ll discuss life in the “tweak loop” – that cycle of living with and improving your devices with things like presets, drag-and-drop interfaces, and the judicious application of color.
by Gregory Taylor on February 19, 2010

