
Jitter Recipes: Book 4, Recipes 44-53
A lot has happened since Jitter Recipes: Book Three. Max 6 came along, and brought with it a wealth of new tools for making some really fine Jitter work. With a full physics engine, support for complex scene hierarchies, advanced animation tools, it has taken me some time to catch my breath and get caught up. And don't get me started on Gen! Now I've emerged from the Jitter Test Kitchen to give you a new series of recipes that will help you get caught up too.
Below you will find the fourth installment of Jitter Recipe Collection. More snacks for the Patching Enthusiast! Stay tuned for more entries to your favorite cookbook.
Recipe 44: ScrollyBrush
General Principles
Using jit.mgraphics to create a nice airbrush effect
Combining graphics with compositing/feedback
Using jit.pix for some basic image compositing
Commentary
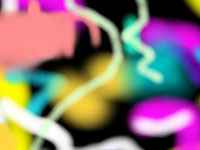
I thought it would be fun to come up with a drawing tool that moved as you draw, automatically creating tile-ready images. Combining some really basic MGraphics techniques with feedback and image offset makes for a super fun drawing patch. Start scrolling.
Ingredients
jit.mgraphics
jit.pix
jit.matrix
Technique
We'll start with creating our brush shape. To do this, the mouse coordinates from jit.pwindow are packed together and formatted to create a simple radial gradient in the correct location. Walking through that big message box, we paint the background white, create our gradient, create an ellipse vector shape, set the fill source to our gradient, and then fill the ellipse. You can see the result in the small jit.pwindow on the left.
To accumulate our brush strokes, we have a named Jitter Matrix "blip" that is composited with the brush shape for each frame.
The really tricky things are happening inside of the jit.pix object. You'll notice that the jit.mgraphics output is actually black and white, but the image we create is in full color. The red-channel of the brush image is taken and used to mix the accumulated image with a defined color (bcolor). Another way to think of it is that the brush image is the alpha channel in the compositing between the image and the color.
Finally, the scroll is done by adding to the coordinates used by the 'nearest' operator. If I had used 'sample', the image would look streaky before long, and wouldn't have that endless scroll effect I wanted. 'Nearest' will always take the nearest sample from the incoming matrix instead of interpolating.
Recipe 45: Humanoid
General Principles
Using hierarchical transformations to create an articulated figure
Combing jit.anim.node with regular OpenGL objects to create a more complex animated scene
Commentary
Animating with OpenGL in Jitter historically has been a sometimes tedious task. It was easy to feel jealous of the hierarchical animation tools in other non-realtime applications, where all you had to do is set up parent-child relationships and all the transformation would just work. Unless you were a jit.gl.sketch ninja, this sort of thing was beyond the scope of the casual home cook. The jit.anim objects make this sort of thing super simple, and once you master their use you'll be commanding robot armies with a gesture of your hand… if you're into that sort of thing. All of the techniques used here can also be used to control rigged 3D models as well.
Ingredients
jit.gl.material
jit.gl.gridshape
jit.anim.node
Technique
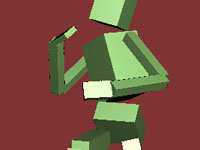
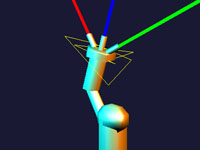
Fair warning - this patch takes up a lot of screen real estate. It takes a lot of space to map out a full humanoid figure with a bunch of jit.anim.node objects and gridshapes. That said, it's actually totally simple, and you'll be manipulating your own robots in no time.
Everything starts in the middle of the patch with the "ROOT" node. Connecting the output of another jit.anim.node will make that node a "child" of the master node. If you're not into patchcords, you can also set a parent node by using the @anim attribute. The layout of the patch mimics the layout of the figure with the head at the top, arms at the sides, and legs on the bottom. Try applying different rotations to the different joints to pose the figure.
The big secret to getting this patch to work though is appropriate use of @position and @anchor attributes. The @anchor allows you to set a rotation anchor that isn't in the center of the object, so the node will rotate around a joint instead of just spinning around. The @position @rotatexyz is always in relationship to the parent node (not center of the screen), so all child nodes will follow their parents around.
For some added fun, try using jit.anim.drive to animate the different joints in different ways.
Recipe 46: BitFills
General Principles
Procedural drawing
Using feedback and distortion to animate
Creating tiled images
Commentary
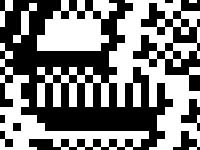
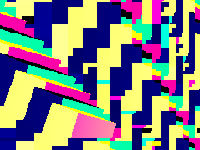
I've always been a sucker for the classic black and white pattern fills from MacPaint. I had the idea to create a way in Jitter to procedurally create my own bitmap patterns, so that I could develop animations and pattern designs with that retro digital look.
Ingredients
jit.matrix
jit.op
jit.repos
jit.pix
jit.map
Technique
This all begins with the "pencil" drawing setup. It's easy enough to use jit.matrix "set cell" messages to write values into a matrix, but I wanted my drawing to invert if the cell being drawn was already drawn to previously. To do this, I use the "jit.op @op ^" which performs a XOR operation. In other words, for each cell, if both inputs are turned on, it turns off, but if only one input is on, it turns on. The subpatch called "pencil-mover" handles moving the pencil location around.
After the pencil is drawn, the matrix is then passed along to a jit.repos object that distorts the image slightly. The jit.repos is used here in relative mode to make creating the distortion matrix a little simpler. After it goes through jit.repos, the output gets passed back to become the base for our next frame of drawing.
Finally, the jit.pix object here is set up to tile a larger matrix with our bitmap pattern.
Recipe 47: Scramble
General Principles
Using jit.gl.node to manage complex rendering
Rendering multiple OpenGL shapes to texture
Using jit.anim.node to scale and position 3D objects
OpenGL feedback and image processing
Commentary
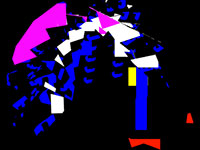
This week's Recipe is intense! OpenGL feedback has popped up in the Recipes numerous times, each time using a different mechanism. With Max 6, Jitter got a new way to manage rendering called jit.gl.node. If you learn to work with it, you will be able to craft more complex, more satisfying rendering systems than you thought was possible in Max. Rather than just replicate the feedback effects of a previous Recipe, I'm introducing a cool way to generate repeating patterns by offsetting a polygon shape in the feedback path. Couple this with some zooming, spinning, and color scaling, and you've got a pretty versatile video feedback system.
Ingredients
jit.gl.node
jit.gl.pix
jit.anim.node
jit.gl.mesh
jit.gl.slab
jit.gl.multiple
Technique
First let's look at what's going on with the jit.gl.node objects. The middle inlet of jit.gl.node is used to establish a parent-child relationship. All objects connected to the middle outlet become children of the node. This means that when that node is rendered, all those children will also be rendered. The node on the bottom is connected to most of the GL objects in the patch, so when that node is rendered, all those objects on the right will be rendered.
The bottom node also has "@capture 1", which means that it will render to a texture that is passed out of the left outlet. This is passed along to be displayed on a jit.gl.videoplane, as well as used elsewhere as the feedback frame. The top node is the parent of the bottom node, so the bottom node renders first. So, for the final output, what we really are rendering is that video plane with the scene captured to it.
Now lets look at all the layers of the scene that are being composited together. The first layer is a videoplane that just displays the feedback image, but has controls for scaling, positioning, and rotating it. The second layer is the polygon offset or "scramble", which uses a jit.gl.mesh with some clever texcoord/vertex generation going on in the subpatch. The third layer is a collection of colored planes rendered with jit.gl.multiple, and used to keep some splashes of color in the scene. Finally, on top of it all is a camera input layer running through a simple keying filter to make areas of the image transparent.
A lot of times when working with flat compositing stuff, I use @transform_reset 2 to maintain the image stretched to fit the window, which works well with feedback and capturing. In this case though I want to be able to rotate the feedback image properly, so instead of using @transform_reset, I used jit.anim.node. In this patch there is a "master" node that is scaled to the same aspect ratio as our OpenGL context (4:3=1.333 1. 1.). By attaching other child jit.anim.node objects, they will also automatically scale to the same aspect ratio. This is how all the objects in the scene are scaled. For the feedback plane, we're also scaling and positioning the node in relationship to the master node.
Finally, you put it all together with some intuitive controls and you have a nice set of effects for scrambling up some live video. For more fun, try adding different OpenGL objects to the bottom node and see how it works.
Recipe 48: PartyLights

General Principles
Creating an awesome particle physics generator with jit.gen
Using jit.gl.node and jit.gl.slab/pix for post-render effects on a scene
Creating a simple bloom filter
Commentary
Like anyone who spends a lot of time making visuals, I have a soft spot for particle effects. It's so easy to make something dynamic and pretty with fairly economical means, and if you know where to connect an LFO or two, you can spend more time pounding your fist than twiddling knobs. In the back of my head, I'm always thinking about new ways to work with particles, and when jit.gen came along, I was ready to try. This recipe is an appeal to the most self-indulgent sort of particle effects, complete with feedback trails and a bloom effect. This is a crowd-pleaser, so turn on your projector, turn up the DJ, and get ready.
Ingredients
jit.gen
jit.gl.pix
jit.matrix
jit.gl.node
jit.gl.mesh
jit.gl.slab
Technique
First, to see what the patch can do, try some of the presets. Once you've had some fun, let's switch into patching mode. The core of the patch is the jit.gen object that handles the particle generation and physics. Since particle physics relies on repeated transformation of points from frame to frame, we need some way to store the results of each calculation. Because jit.gen doesn't have its own memory, we have to use an external jit.matrix object to feedback the results as input. To change the number of particles we can just change the size of the storage matrix.
Here's a quick breeze through what's happening in jit.gen. The first input contains a matrix of position and "life" values (x,y,z,life). For each frame, we add a velocity amount (second input) to the position of each particle to animate them. Each frame we also apply a friction calculation to the velocity values for more realistic motion. For "force" we just apply a uniform addition across the whole matrix. We could stop with just the position and velocity values, but to really push this into a more luscious effect, we also store a color value for each particle (third input). The great thing about using jit.gen is that we can keep adding other features to our particle system just by adding more inputs and outputs and deciding how they should change with each frame.
The really tricky part of this patch, and key to a really convincing particle system, is the management of particle life and death. This is done by storing a life value for each cell of the particle matrix in the 4th plane of the position matrix. This value is incremented each frame by a value calculated as 1./life. When the value reaches 1., the particle is reset by setting the logic of the ? operator to false, which passes whatever is in the right inlet. You'll see that there is a ? object for every input/output, with the reset value going into the right.
Finally, to render the particles, we just draw them as big points in OpenGL. Notice that we aren't rendering the particles directly to the screen, but rather we're capturing it to a texture using jit.gl.node and then passing the captured texture through a blur and an additive blending jit.gl.pix patch. Also we use a jit.gl.slab in there for a feedback loop, so we get nice trails on our particles.
After the rendering, capturing, and post-processing, the final texture is passed to a jit.gl.videoplane that displays the final image. You will also notice there is a jit.gl.camera object in there to allow you to move around the particles in space.
Recipe 49: RoboMoves
General Principles
Animating OpenGL objects
Procedural animation technique
Working with jit.path for smooth motion
Commentary
When I made the Humanoid recipe, I quickly found myself looking for a way to set it to motion without having to crank on the trackpad. Having the ability to create a complex animation rig isn't much fun unless you have a way to make it move. After digging around a little bit in the pile of new Jitter objects, I found my answer in the jit.path object. Since the animation is represented by a Jitter matrix, all the usual techniques for generating, managing, and storing a matrix can be employed. Being able to work with animation loops in this way provides a good mix of randomness with repetition and control.
Ingredients
jit.path
jit.anim.node
jit.gl.light
jit.gl.material
jit.matrixset
jit.gl.gridshape
Technique
First, let's look at the setup inside the "robot" subpatch. The structure of this patch should be familiar to you if you've looked at the Humanoid recipe. There is a hierarchy of jit.anim.node objects that provides for all of the articulated joints of our robot. If you haven't taken time to play with the relationship between @anchor,@position, and @rotatexyz, go ahead and drop in some attrui objects to see how that works.
You might notice the jit.gl.node object at the top of this subpatch. This is there to make it so that we don't have to type in a context name for each of the GL objects in the subpatch. Using OpenGL implicit contexts in Max 6 isn't just a good way to save typing, but also makes it easier to reuse patches in other places without having to retype objects.
Okay, now let's look at jit.path. We're feeding it the output jit.noise, which is outputting a 4-plane float32 matrix. Before it gets sent to jit.path, the jit.submatrix and jit.concat objects are used to copy the first cell to the right side of the matrix. This will make the looping of our animation more seamless. To loop the animation, we use a counter to send "eval" messages.
It's worth mentioning that the the output of jit.path is just a list of interpolated numbers. In this case we are using them to drive rotation values for jit.anim.node objects, but these interpolated values could really be used for anything. To get nice fluid motion, we've set the interpolation mode to "spline" which interprets the input matrix as handles on a bezier curve
In addition to the random loops created by jit.noise, this patch also stores each loop matrix in jit.matrixset. This allows us to recall previous loops. The point of doing this is to add some amount of repetition and memory to an otherwise completely random setup. Using the ideas set forth in this recipe, along with a more advanced way to generate the animation values, one could make a fairly compelling procedural animation system.
Recipe 50: Branching
General Principles
Animating OpenGL objects
Using audio to drive motion
Working with jit.path for smooth motion
Commentary
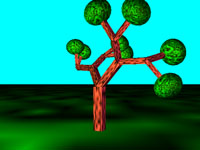
After the RoboMoves recipe, I wanted to try a slightly more complex structure and work with a simple audio responsive motion control. The repeated, branching structure of a tree provides the basis for this animation patch, and we use the amplitude of an incoming audio signal to scrub around the animation. While this recipe follows much of the same structure as RoboMoves, the effect of this is really different.
Ingredients
jit.path
jit.anim.node
jit.gl.light
jit.gl.material
jit.gl.gridshape
Technique
First, we'll look at the structure of the animation nodes. To create the tree, I created a repeated branching pattern with each parent node having 2 child nodes. By scaling the each jit.anim.node, we get a structure where the children keep getting smaller as we go down the hierarchy. The nice thing about this sort of repeated branching structure is that it was mostly just duplicating and connecting objects to get it set up.
If you wanted to make it even more complex, all you need to do is add in another layer or two of branching children.To animate the tree, we use jit.path, just like in RoboMoves, but instead of a looping counter, we have a peakamp~ object driving the eval message. The bline is there to smooth out the transitions and make it a little less hectic looking.
Recipe 51: Scrunch
General Principles
Pixel animations
Feedback with OpenGL
Color and spatial effects
Commentary
Sometimes the most effective projections are simple geometric animations. With that in mind, I put together a relatively simple patch that renders a gridshape as if it was a paintbrush. The image is then passed through a feedback path that includes some color and spatial manipulations. To give the whole thing a nice crunchy, demoscene-inspired pixel look, we can drop the dimensions on the captured texture and blow out the color scaling. I can almost hear the filter sweeps.
Ingredients
jit.gl.gridshape
jit.gl.node
jit.gl.pix
nodes
Technique
This patch uses the nodes object as the main drawing interface for the OpenGL gridshape position and scaling. By moving the node around and scaling it (Option/Alt-drag) we can reposition and resize the shape onscreen. This is an unusual way to use nodes, but it provides a nice interface for this purpose, and the values are easy to parse with a few route objects.
You'll notice that as you move the shape around, it leaves behind a trail of shapes. This is achieved by accumulating captured frames with texture feedback. You may not see any patchcords making a loop, but the feedback in this case is accomplished by rendering a background videoplane with the previous captured frame mapped to it. By passing the captured texture through a jit.gl.pix object (similar to jit.gl.slab), we can store each frame as it goes. We also pass the captured texture post-jit.gl.pix to a videoplane that is rendered onscreen.
Now if all we were doing was accumulating shapes onscreen this patch would be pretty boring. Using jit.gl.pix, we also have some zoom, offset, and color scaling/biasing happening to each frame as it comes through. The accumulation of these subtle manipulations each frame adds up to some dynamic effects.To get the pixelated look, try turning off @adapt on the jit.gl.node object and changing the "dim" control. To prevent the texture from getting a fuzzy linear interpolation look on output, we send the message "sendoutput filter nearest" to both the jit.gl.node and jit.gl.pix objects.
Recipe 52: DirtySignal
General Principles
Combining Jitter Matrix manipulations to replicate an effect
Using sound to distort video
Commentary
This recipe is an old-timey throwback to an earlier time, when you sat in your pajamas and tried to make out the scrambled cartoons on your television while the antenna was bent and wiggled to find a signal. Beyond just replicating the look of a messed up analog TV signal, this recipe also lays down a good foundation for experimenting with audio and video together, combining simple operations into a bigger look, and some classic Jitter techniques.
Ingredients
jit.matrix
jit.repos
jit.sprinkle
jit.altern
jit.convolve
jit.poke~
Technique
Starting at the top of the patch, we bring our image in with jit.grab and pass that through a jit.matrix that has "dstdim" attributes set. This is done to create a black border around the edges of the image. From there it is passed through jit.altern to create the horizontal stripes to mimic the look of scanlines. The main action in this recipe is the image distortion, which is achieved by combining jit.repos with some audio signals. Here jit.repos is used in relative mode (@mode 1) which is often a bit more friendly to work with, especially in situations like there where we want to push the image around. It's also set to have a wrap boundmode, which is essential for creating the vsync roll effect. To create the matrix of offset values, we use jit.poke~ along with some noisy audio signals. We can adjust how smooth the distortion is by changing the slide~ values. You'll notice that the audio input of the computer is also added in as a source for distortion. Once we get the video distorted, we need to finish the effect with some more spatial noise (jit.sprinkle) and some color effects. Punched up saturation is key to a good analog TV effect, so we add in jit.brcosa and create a little bit of feedback with jit.convolve to do a simple gain-blur so we get some color ghosting.
Recipe 53: FlyOver

General Principles
Creating generative fractal landscapes
Creating a scrolling "slitscan" effect
Working with particle-like motion
Commentary
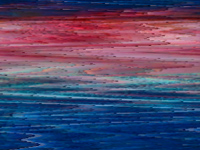
This recipe creates a fly-over style animation with generative landscapes, complete with basic camera controls. By combining a couple of simple tricks together, we get something soothing and evocative, and a basis for all sorts of generative terrain.
Ingredients
jit.concat
jit.gl.multiple
jit.gl.gridshape
Technique
The big trick in this patch is the scrolling effect where we get a new row of geometry each frame as the field scrolls toward us. To do this, we use jit.concat with feedback. This tacks on a new row of cells every frame, and we use a fixed jit.matrix object to limit the total size of the matrix. You'll see that setup used all over this patch, as each element of the scene is following the same scrolling logic.
To generate terrain, we use a jit.bfg object with the "fractal.hetero" function because it looks good. You'll notice that we are only using it to generate a single row of cells each frame. This is a good trick to avoid wasting a lot of CPU on fractal generation. Inside of the jit.gen object, we have a few little things that scales the fractal data and positions it across a flat plane.
To make sure the buildings in the scene sit on the terrain, we use a little jit.gen trick. Instead of just downsampling the terrain matrix, we use the terrain matrix as a lookup table for building positions. The "noise" operator used with "sample" in jit.gen is looking up a random position in the left input for each cell and passing it out. This output is then downsampled so we aren't bogged down rendering hundreds of cubes. This jit.gen trick is super useful whenever you want to take random samples from a larger mesh to make a smaller set of points. Finally we pass that matrix to jit.gl.multiple to render a bunch of cubes.
by Andrew Benson on March 20, 2012


