BEAP Analog Model Curriculum Outline
The course outline below is based on a workshop given at the Currents New Media Festival in 2013. It has been updated for Max 8; please use it in your own teaching or to learn on your own.
Introduction
What is the Analog Model?
Based on modular synthesis techniques.
Focuses on subtractive synthesis.
Built off of four primary tools:
Oscillators
Filters
Level Controls
Modulators
Why is this Important?
It is the basis for most modular synth techniques.
It is also the basis for a lot of synth-based music.
It provides a useful way to do sound design iteratively.
It sounds good, too!
What is necessary for this workshop?
A laptop with audio capability.
A pair of headphones.
An operating version of Max/MSP.
Selecting BEAP Modules
BEAP modules are located inside a browser in the left toolbar. Click on the BEAP icon to reveal the browser:
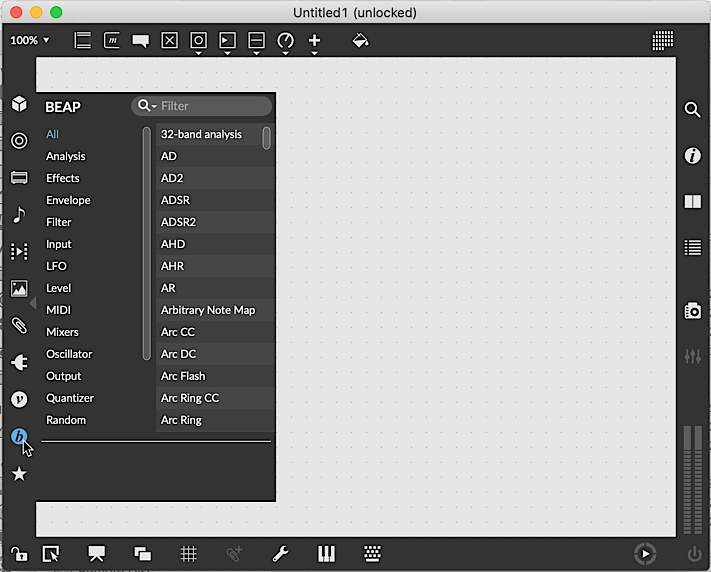
On the left side of the browser is a series of categories that allow you to limit the selection of items on the right. The right side of the browser is the list of modules available for the selected category. You can also use the text filter at the top of the browser to further limit the items available for selection.
We will be using this browser extensively throughout this workshop - so get comfortable with it!
Oscillators and Tone Generation
Oscillators are the way that synths make sound. They create repeated waveshapes at a set frequency.
Select the Oscillator category in the browser, then select the Oscillator option from the browser. Drag that entry onto the blank patch to create an Oscillator in the patch.
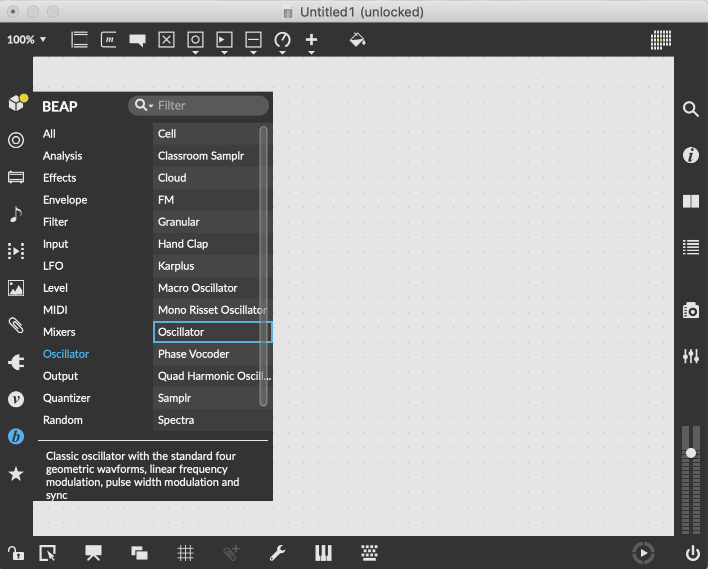
An oscillator by itself creates waveforms, but is not routed to our computer's output. For this, we need an Output Module.
Select a Stereo output module from the Output category and drag it onto your patch.
Connect the output of the Oscillator to both inputs of the Stereo module.
If the DSP is not already on, you can turn it on from the Stereo module. With DSP on, you should hear a tone.
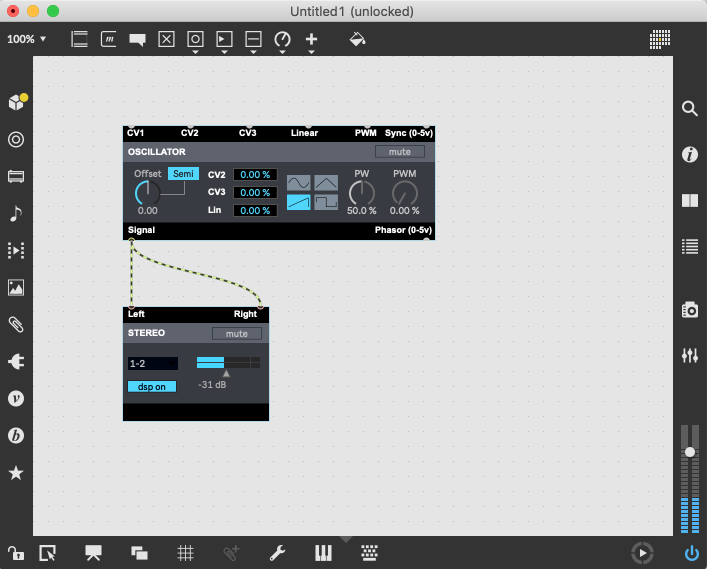
The two most important setting of the oscillator are the tuning and the waveshape.
Change the tuning by adjusting the offset knob on the front of the Oscillator module.
Because the button is set to "SEMI" means that we are tuning in musically-useful steps.
Change the waveform by selecting a waveform image in the button matrix.
Note how the waveform changes the timbre, but not the pitch, of the oscillator.
More than one oscillator can be used at a time to create more interesting tonality.
Select another Oscillator from the browser, or copy the existing one by option/alt-dragging the one already on-screen.
Select the patchcord going to the right inlet of the Stereo module, then grab the top handle and drag it from the first to the second oscillator.
Now you will hear an oscillator in each ear of your headphones. Adjust the offset and waveform in each to verify the changes.
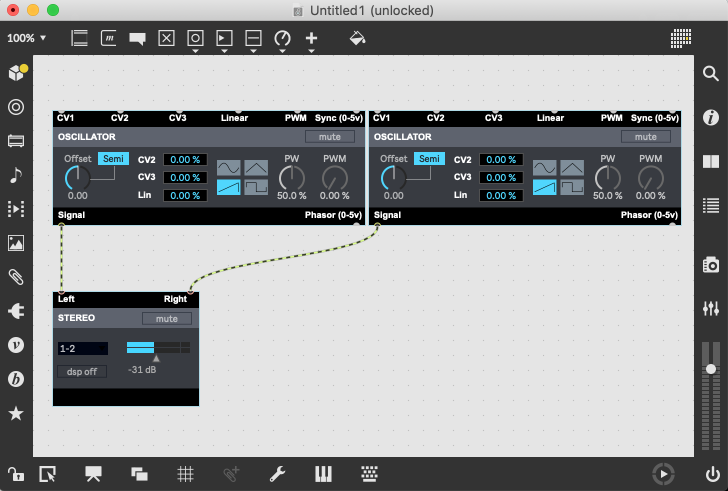
In order to have the two oscillators "mix" together, we need to use another module to combine them.
Add an audio mixer by selecting the Mixers category on the left side of the browser, then dragging the Audio Mixer object onto the patcher.
Connect the two oscillators to inputs 1 and 2 of the mixer, then connect the output of the mixer to the two Stereo inputs.
Turn up the volume of the mixer channels to hear a mix of the tones. You can alter the volume of each oscillator to create a nicely blended tone.
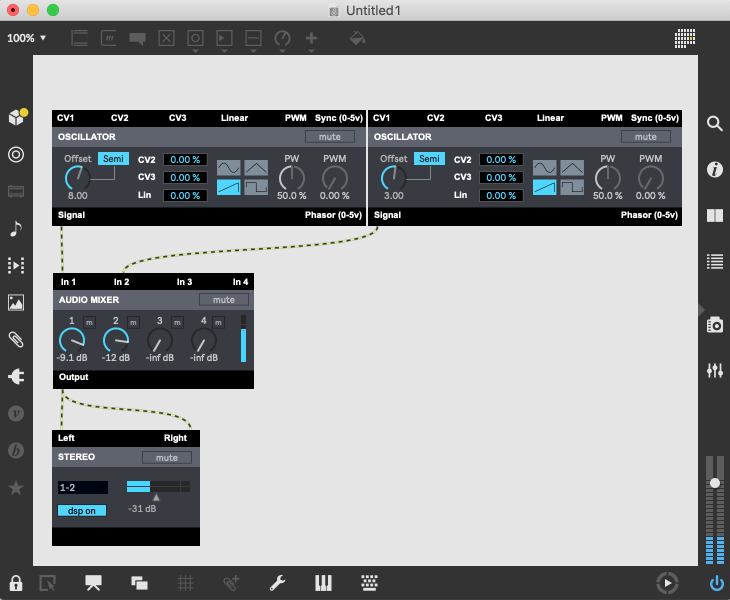
At this point, we are able to hear the oscillators, but it would be nice to change the pitch in a more interactive way.
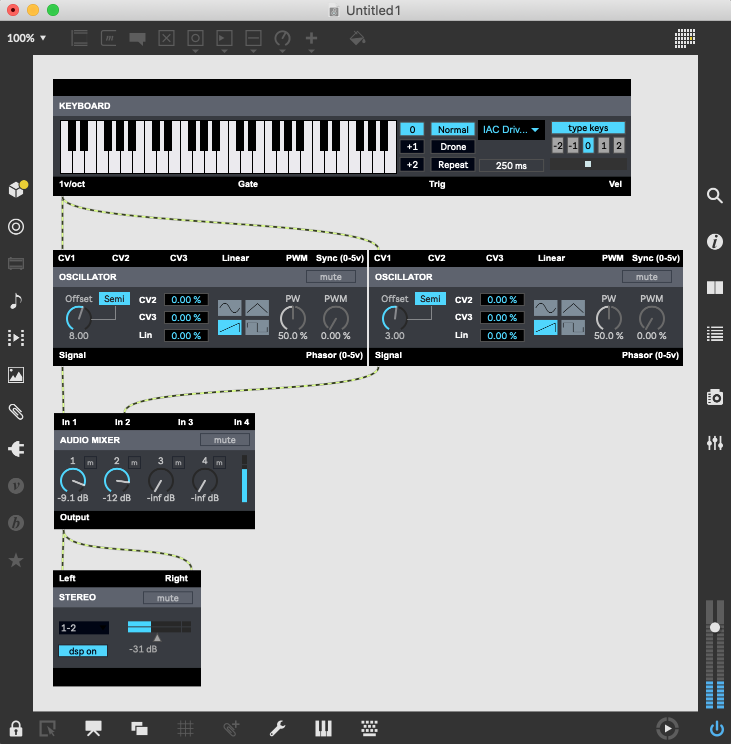
We need a controller, and will instantiate a virtual keyboard using the Keyboard item in the Input category of the browser.
Connect the 1V/Oct output of the Keyboard to the CV1 inputs of the oscillators. The terminology used here is from the modular synthesis world...
Lock the patch and click on the keyboard keys. You should hear the pitch change to match the keyboard notes.
Level Control/Gating with a VCA
One of the issues with our current system is that the oscillator tones never turn off.
This is how analog oscillators work - they are never really "off", they are only muted.
We can have our keyboard mute the signal if we use another module, and the gate output of the keyboard.
The VCA - Voltage Controlled Amplifier
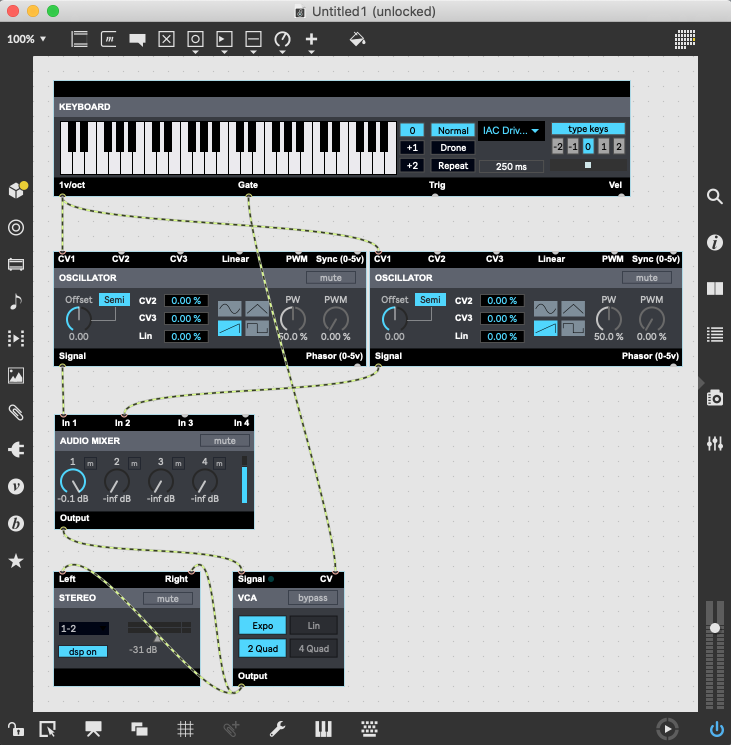
The purpose of a VCA is to use incoming signal values to adjust the amplitude of a signal. In this case, we will use it to control the volume of the mixer output.
Instantiate a VCA module from the Level category, then connect it between the Mixer and the Stereo Output module. The signal will immediately turn off.
In order to turn a VCA "on", we need to send it a HIGH value whenever a key is pressed, then a LOW value when the key is released. This is done using the Gate output of the keyboard, which produces exactly those values as we play the keyboard.
Connect the Gate output of the keyboard to the CV input of the VCA, then play the keyboard - and you will now hear the sound as expected.
Saving Your Work
At this point, we've put in enough work on our patch to want to save it. You will want to create a snapshot (open the Snapshot Pane, create a new snapshot and click the dot icon to save it in the patcher).
Select Save from the File menu and save the patch. Now, close the patch and Max, restart Max and select our saved patch from the "Recent Patches" menu. There we are - back where we started!
Filtering with an LPF
One of the things that make synthesis more compelling is the manipulation of the raw sounds that the oscillator creates. We use a filter to do this - it can be used to change the harmonic content of the core sound, giving us a broader palette of sonic variety.
The filter we are going to use is a Low Pass Filter (generally abbreviated as LPF), which dampens high frequencies while allowing low frequencies to pass through unchanged (hence its name).
Select the LPF module from the Filters category and add it to your patch. Put it between the mixer and the VCA so that we can affect the entire sound.
There are a few important control on this module. The cutoff frequency is the "fence" of the filter: everything above that frequency gets attenuated, while everything below that frequency is left unchanged. To directly change the frequency, turn off the "SEMI" mode and select a frequency.
There is a Res control which is also important - it determines the characteristics of the filter right at the cutoff frequency. A high Resonance setting will accentuate the sound right at the cutoff point, giving the filter a bit of a "kick" right at that frequency. This makes things a little more biting, and makes the filter a more significant part of the overall tone.
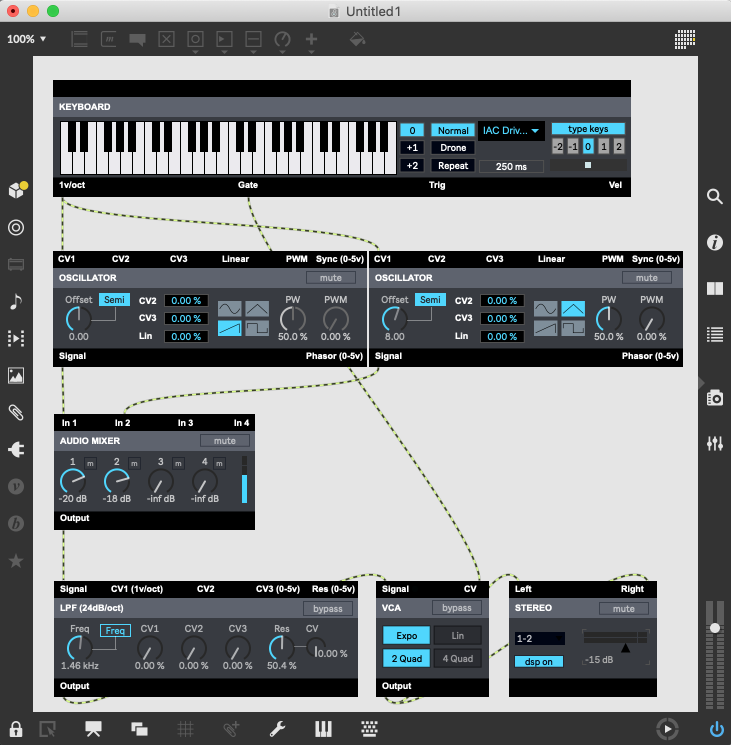
Try different settings while playing the keyboard. You should hear drastic changes in the sound of your created synth.
A very high Q setting will "whistle", because you are creating a feedback circuit in the filter module.
You can completely eliminate the sound with a low enough filter cutoff setting. This is because all of the frequencies created by the oscillators are fully attenuated by the filter. Some synthesizers use filtering, rather than a VCA, to control volume.
***
Modulating with Envelopes and LFOs
At this point, we've got a working synthesizer complete with filtering. But it sound a little "blah". We need to spice it up, and "modulators" are the key.
Modulators are the name given to modules that control the parameters of other modules.
In some cases, you can think of them as "Automators", since they automate the parameter changes based on some other process.
In this section, we are going to look at two different modulators: the Envelope and the LFO (or Low Frequency Oscillator).
Let's start with a simple envelope - the ASR Envelope.
The characteristics of an ASR envelope is that it uses a gate signal - like we get from the keyboard device - and turns it into a contoured control signal.
The acronym ASR stands for "Attack/Sustain/Release", and describes the three active segments of this envelope: the attack "ramp-up" time, the held "sustain" time and the release "ramp-down" time.
Using an ASR envelope allows us to smooth the edges of the gate signal, giving us more musical control of the sound of the synth we are building.
Now let's use the ASR envelope to make a smoother-sounding level change in our patch.
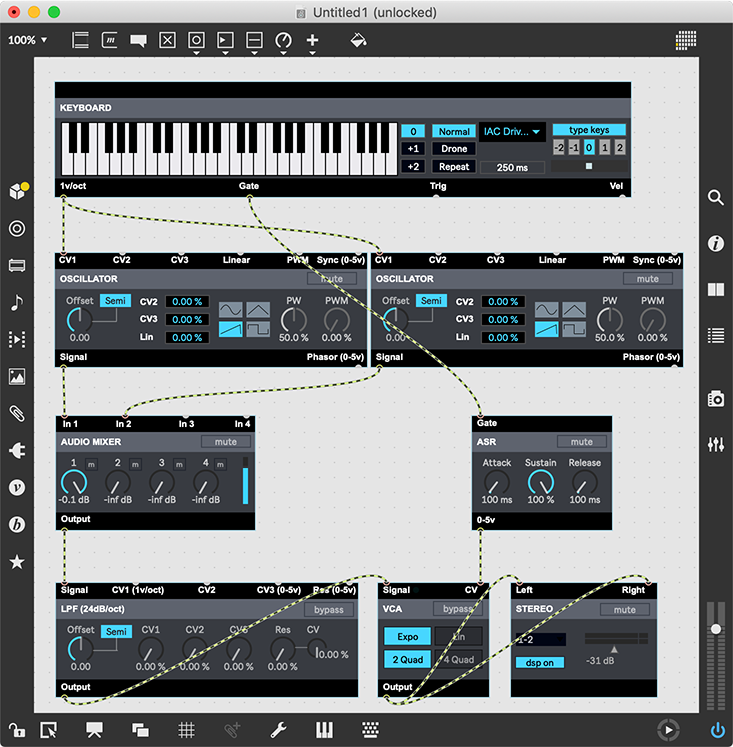
Add an ASR module (found in the Envelope category) to your patch, then connect the gate output of the keyboard to the gate input of the ASR.
Next, connect the ASR 0-5v output to the control input of the VCA (deleting the patchcord connecting it to the gate output of the keyboard.
Now, play the keyboard, but change the attack and release times of the ASR. You will hear that a longer attack time gives us a smooth ramp-up into the sound, and a longer release time gives us a smoother release of the note. This makes the sound of the synth much more usable for ambient or pad-like sounds.
Envelopes are cool with filters, too, but we are going to try something different - using an LFO (Low Frequency Oscillator) to change the filter sound.
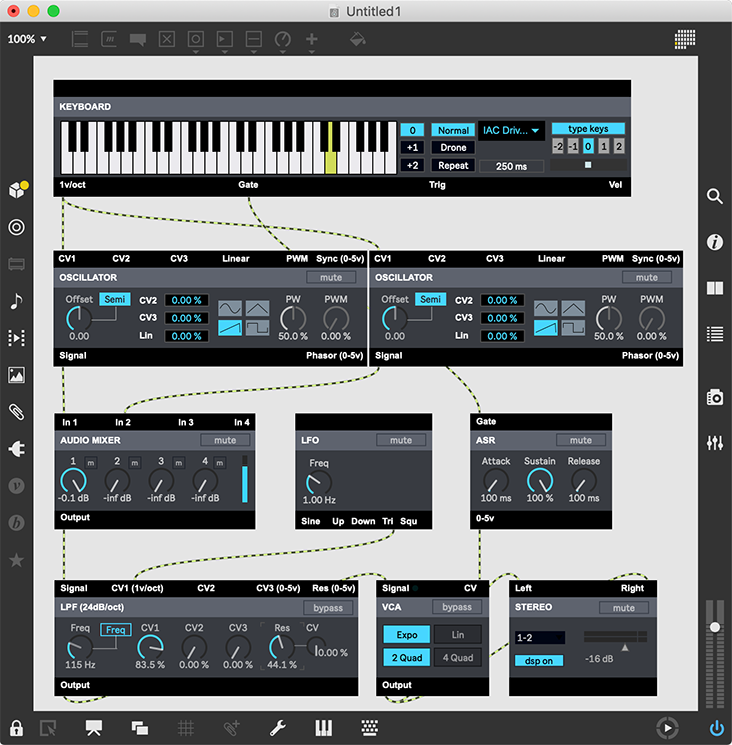
Add a LFO module to your patch (LFO, from LFO category), then connect the Tri output to the filter's CV1 input.
An LFO is an oscillator - similar to our sound generating device - but it runs at sub-audio rate. This means it can be used for gentle changes to other modules in a cyclical way.
The LFO, like the Oscillator used earlier, runs forever - and at full output level. In order to "tame" the amount of modulation, we can use the filter's modulation attenuators (in this case, the CV1 % control) to reduce the amount of effect the LFO has on the filter cutoff.
Creating a good LFO sound requires some fiddling with the baseline cutoff frequency, the modulation amount, and the LFO waveshape. Experiment with each until you get a useful sound. Congrats - you've now created a pretty awesome synth!
Improving the Sound with Effects
Awesome synth - but how to make it awesomer? Add effects!
Most modern synthesizer implementations - and even some classics - are dependent on effects to improve the sound.
There are many different types of effects, but we are going to focus on two time-domain effects: delay and reverb.
Delay effects are most often described as "echo" effects, but short delays give us slap-back, chorusing and flanging as well. Let's start off looking at straight echos.
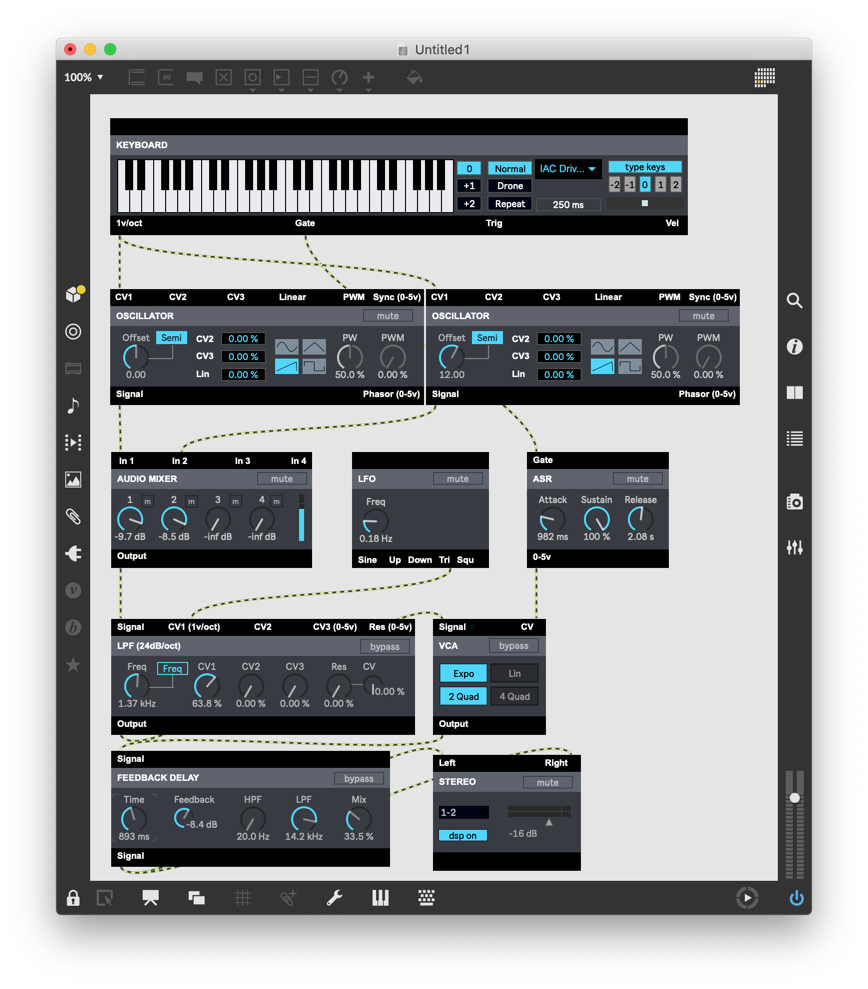
Add a FeedbackDelay (from the Effects category) to the existing synthesizer patch.
Set the delay time to something rather long - like 1 second (1000 milliseconds).
Patch the Feedback Delay between the VCA and the output. Now, when you play sounds, you should hear them echo.
Changing the Wet/Dry mix will allow you to adjust how much of the delay is present in the sound.
Changing the Feedback setting will allow you to determine how many times the delay will repeat.
Note that all of these settings also have CV (control) inputs, so you can vary them with other modulation tools.
Another important effect for synthesists is reverb. Some people overdo the effect, but it can add a lot of space to your synth's sound.
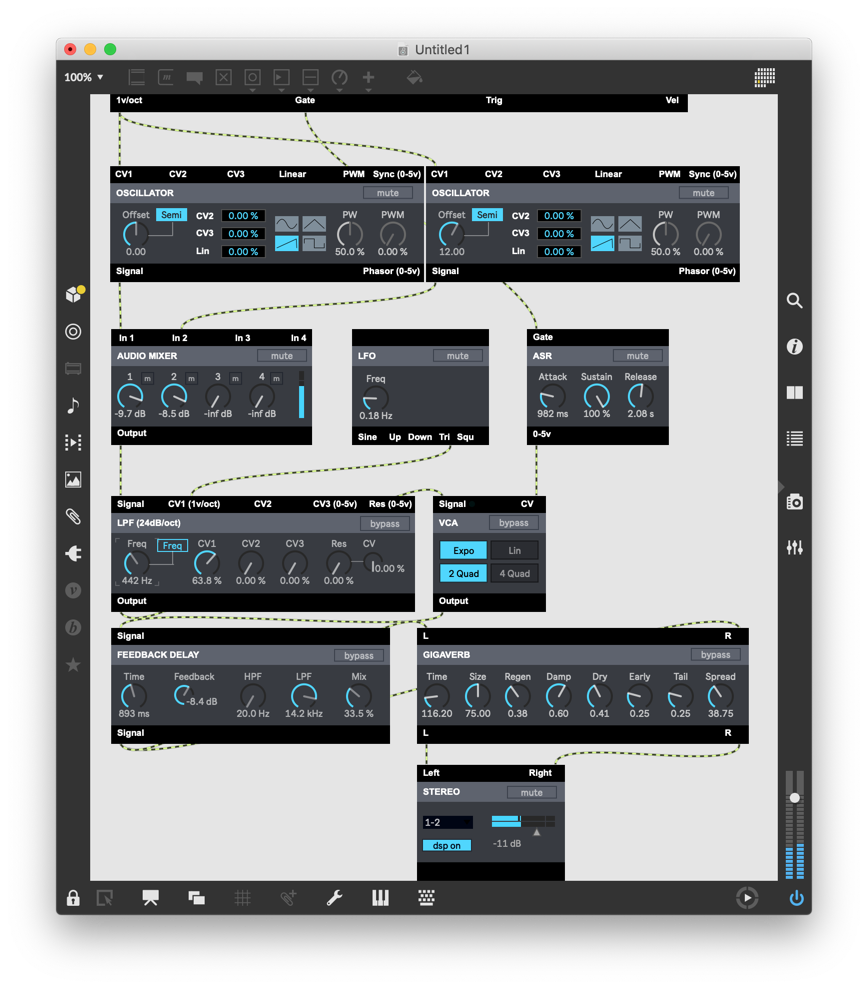
Add a Gigaverb to your patch, and insert it between the delay and the output. Note: You'll probably be scrolling off the bottom of the patch at this point!
Set the reverb time to a reasonable value (4 seconds or so), and change the Mix to about 40%.
Now, when you play a note, you get a much deeper sound. Also, because this comes after the delay, all the echoes are also reverberant.
Using a combination of delay and reverb can either overwhelm or super-enhance the sound - use your own judgement to find a good combinatifon of settings.
SAVE YOUR WORK!
Creating Material with Sequencing
By now you probably are getting pretty tired of using the on-screen keyboard. We are going to look at a synthesizer function that was a favorite of some of the earliest synthesists: step sequencing.
Delete the keyboard, and add a Sequencer device (Sequencer category) to your patch. Connect the CV output to your oscillators, and the Gate output to your envelope.
The Sequencer needs something to "drive" it. It can either use triggers or a centralized transport. We are going to use the second (transport) option.
Add a Global Transport module from the All category, and you will see the sequencer immediately start running. Success!
You can turn things on and off with the Transport on/off button, and change the speed by changing the BPM setting.
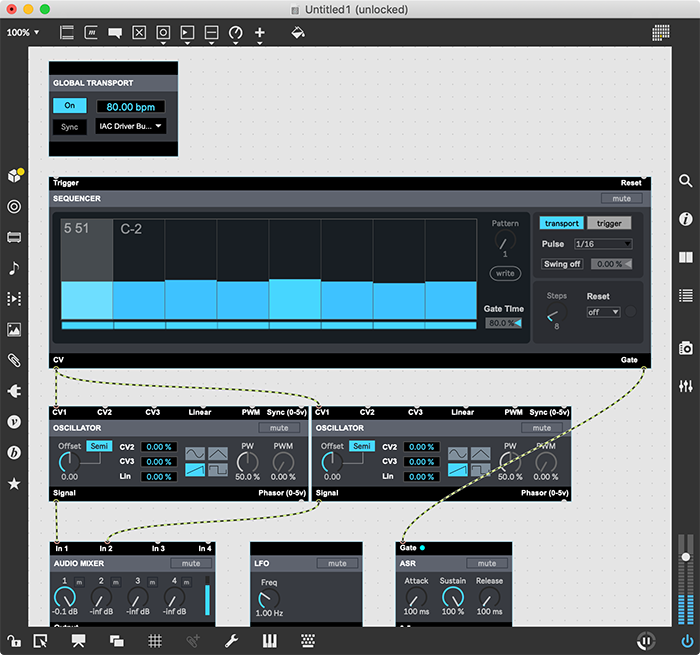
Let's look into the Sequencer in a little more detail...
The obvious most-important part of the user interface is pitch settings. These are the 16 sliders that allow you to pick "notes" to play at each step.
Less obvious, but maybe even more interesting, is the "Steps" setting. With this, you can select the number of steps that make up a sequence. This allows you to put together numerically interesting cycles (like 11 steps in a 16th note sequence) that can prevent things from sounding too stale.
Finally, there is the "Gate Time" option. When a sequence plays, it (in essence) emulates a keyboard player. The Gate time is the percentage of the time that the note is "held" before it is released. Play with this, in combination with your envelope settings, to change the character of the generated notes.
Recording your Output
Creating sound is cool - but it's even better if you can record it and work with it in other contexts.
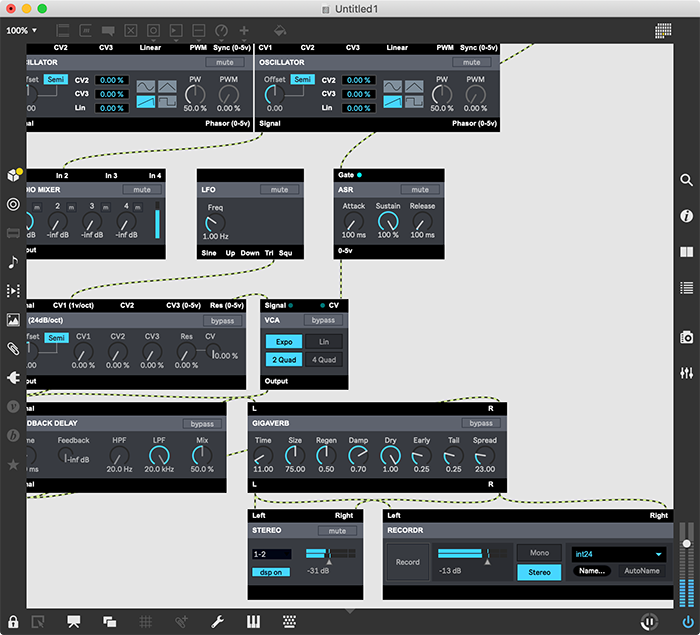
The Recordr module is our in-system audio recorder. Create one (it's found in the Output category), and tie it to the output of your effects.
Start by setting a name for the output file, then click on the Record button. The system is now capturing all of the audio from your system.
Start the sequencer and verify that the output is recording. The meters double as a volume control - make sure you are getting good levels.
Once you've recorded some sequencing, you can stop the recorder. Now check in your file system; you should find an audio file ready to use in your system.
If you have access to a file editing or DAW program, you can import the file there to build up a larger audio project.
Conclusion
At this point, we've covered all of the basics of synthesizer creation. Each of the things we covered can be tweaked into a thousand alternatives - and the BEAP system makes it easy to explore.
Also, as you can tell by the contents of the BEAP folders, there are a lot of modules we haven't touched. Each gives you more capability upon which to build your sound designs.
There are many books - both in and out of print - that can help you with modular-style sound design. Some of them are:
Programming Synthesizers (The Keyboard magazine library for electronic musicians) by Helen Casabona and David Frederick
Analog Synthesizers: Understanding, Performing, Buying by Mark Jenkins
Electronic Music: Systems, Techniques, and Controls by Allen Strange
The Complete Guide to Synthesizers by Devarahi
The Arp 2600 User's Guide by Jim Michmerhuizen
From here, the journey is up to you. Enjoy!
by Darwin Grosse on June 19, 2013

