Vizzie Video Experiments Curriculum Outline
The course outline below is based on a workshop originally presented by Darwin Grosse at the MediaLive Festival in 2013, and since updated for Max 7 by Gregory Taylor. Use it in your own teaching or to learn on your own.
Introduction
An Overview of Vizzie
Max takes a different approach to programming.
You program using visible connections between objects rather than textual editing.
The basic paradigm is: create objects, then connect them with patchcords.
One way this changes things: You can run the program while editing it!
Another way it changes things: It preferences iterative (on-the-fly) programming.
One important aspect of Max is the creation of reusable systems based on existing objects.
Vizzie is a system of these "reusable modules", and is the system we will be using for our work.
How You Select Vizzie Modules
Vizzie is built with Max, and uses all of the strategies of Max programming.
Vizzie has a specific purpose: to allow us to have fun manipulating visuals while learning the Max development system.
You get to Vizzie modules by clicking on the Vizzie (V) icon on the lower left-hand side of the patcher window to display the Vizzie browser
To load a Vizzie module, click on the name of a Vizzie module and drag it into an empty part of the patcher window.
Create a Basic Movie Player
We will find all the modules in the INPUT and OUTPUT sections
The names of modules are "funny" - this is an attempt to avoid naming collisions.
Loading and manipulating the PLAYR
Load a PLAYR (from the INPUT tab of the Vizzie browser), and see how it reacts to clicks. (Editing Mode)
Lock the patcher and see how it now reacts to clicks. (Performance Mode)
Drag a movie file from your computer onto the PLAYR and see how it operates.
Run through the controls on the PLAYR, how to set them, and how to reset them.
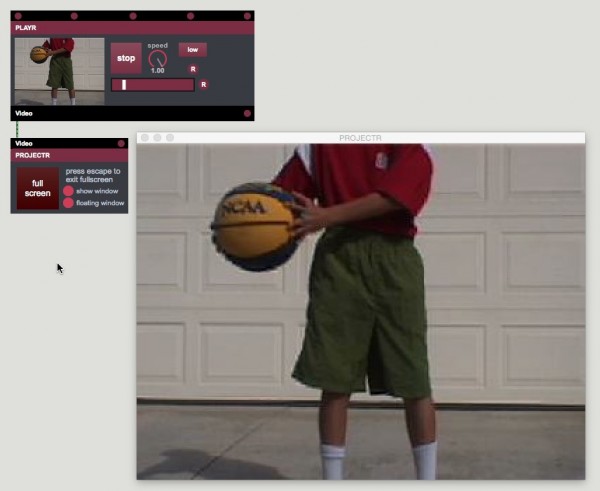
Add a PROJECTR to get a window
Unlock the patch and add a PROJECTR from the OUTPUT tab of the Vizzie browser. Connect the PLAYR to the PROJECTR, lock the patch, and see how it operates.
Click on the FULL SCREEN button to see what happens, and how to return to the patch.
Save the patch, close the patch and reopen it. Discuss the state into which the patch returns.
Viewing Your Progress and Adding Visual Effects
While the PROJECTR is great for things like playing fullscreen video, there are times when we just want to monitor the current output of our patch. For that, we'll use the Vizzie VIEWR module. One advantage is that we can use as many VIEWR modules in a Vizzie patcher as we want; we can only have one PROJECTR module in a Vizzie patch.
Unlock the patch, click on the PROJECTR module, and hit the delete key to remove it
Add a VIEWR module to your patch from the OUTPUT tab of the Vizzie browser
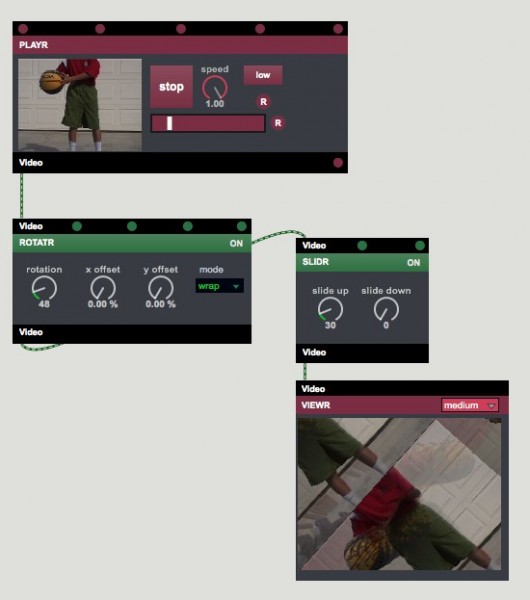
Add a ROTATR module from the EFFECT tab of the Vizzie browser
Connect the output of the PLAYR module to the input of the ROTATR module
Connect the output of the ROTATR module to the input of the VIEWR module
Start the PLAYR, move the controls of the ROTATR to see the activity.
Click on the word
ONin the green band at the top of the ROTATR module. Note the ability to disable the effect by clicking on the imageClick on the drop-down menu on the VIEWR module and try different window sizes
Next, add a SLIDR after the ROTATR
Add another effect - a SLIDR from the EFFECT tab of the Vizzie browser - after the ROTATR module (between the ROTATR and the VIEWR)
Note the change to the image based on rotation and SLIDR settings.
Describe the serial nature of the data flow.
Using Generators to Alter the Effects
Creating an effects chain is fun, but it is even more fun if we have the system generate parameter changes for us!
This is done using "Generator" modules, listed in the GENERATOR menu section of the Vizzie browser
Add a TWIDDLR to the patch from the GENERATOR tab of the Vizzie browser.
The output of the TWIDDLR can be used on non-video input to control (or modulate) the control values.
You can tell which value will be controlled by hovering over the input - the modulation parameter will be displayed.
Connect the TWIDDLR output to one of the parameters and see how it modifies the controls on-the-fly.
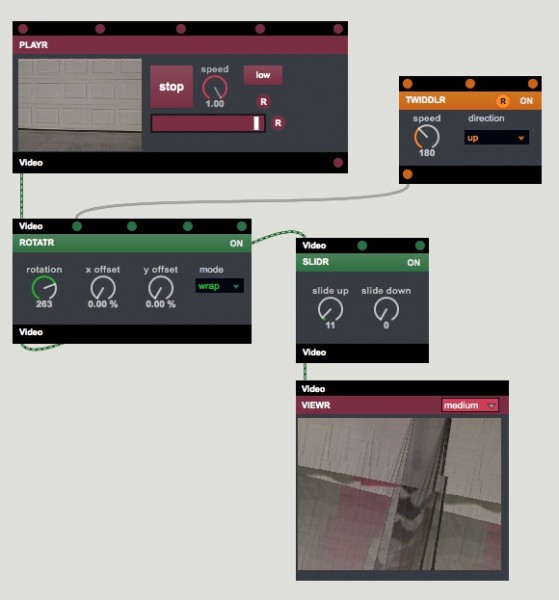
You can turn the output from the TWIDDLR on and off by clicking on the word
ONin the orange band at the top of the TWIDDLR module, as you did earlier with the ROTATR module
There are many different Generator modules available.
Try the WANDR for creating random effects changes.
Try the STEPPR to create a stepped, sequenced set of value changes.
Create a Webcam Viewer as an alternative test system
A lot of time, it's more interesting to work with live video rather than movies.
Replace the PLAYR with a GRABBR (from the INPUT tab of the Vizzie browser) to get live video from your webcam
Connect it to the rest of your processing stream in place of your PLAYR module, then turn it on
Assuming that your system is set up correctly, you should see live video processed through your effects chain.
Making the visuals more abstract means using some new modules from the EFFECT tab of the Vizzie browser.
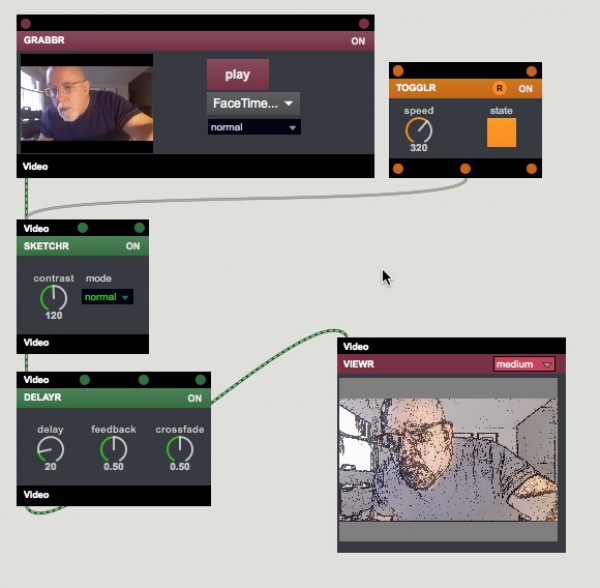
The SKETCHR turns your video into line drawing-like video.
Smearing the SKETCHR output with the SLIDR, ROTATR, DELAYR and other effects provides complex, but abstract, results.
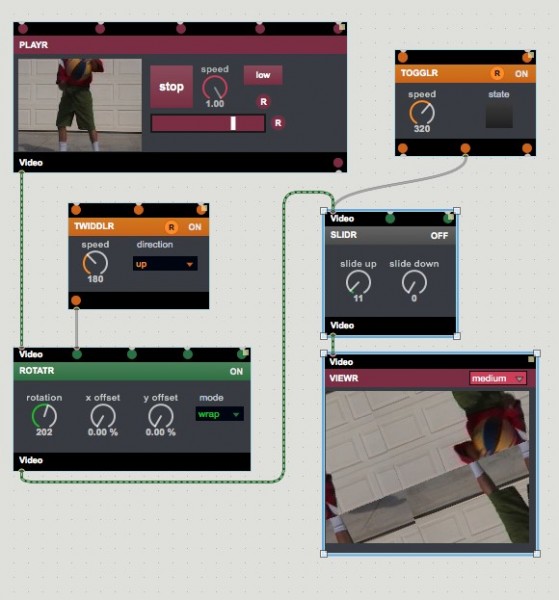
We can make an even more interesting display by generating a lot of on/off changes to the effects chain.
Use a TOGGLR from the GENERATOR tab of the Vizzie browser to control the the SKETCHR. Turn the module on and off by connecting center data outlet to the video input of the SKETCHR.
Add more TOGGLR modules to other effects, and have them change at different rates to create a generative flashy output.
Create a Video Mixer
If you've tried to have two effects or video streams running simultaneously, you will probably have found some problems (flashing).
In order to get multiple video streams running, we need to "mix" them.
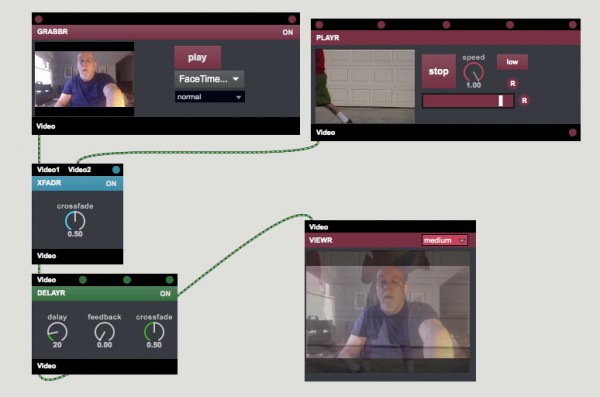
The simplest mixer is the XFADR module; it does a crossfade between any two video streams.
Add an XFADR (from the CONTROLLER tab of the Vizzie browser), then connect both a GRABBR and PLAYR. Load the PLAYR with a movie, turn on the GRABBR, then mix the two streams to see it in action.
You can create a generative mix by using a TWIDDLR to automate a fading system.
If you need to mix more than two streams, you can add another XFADR and PLAYR to make a more complex system
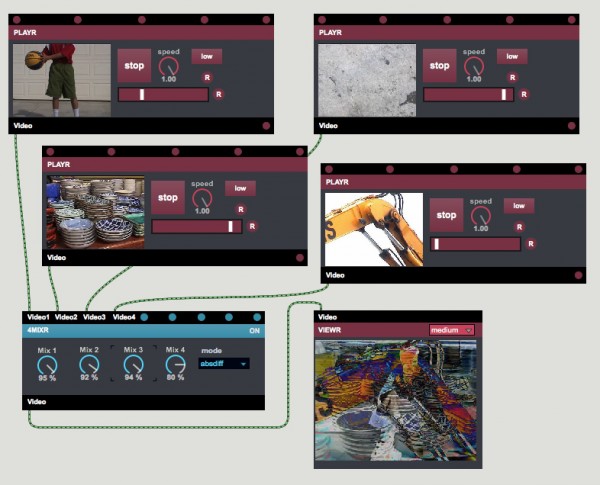
One of the downsides of the XFADR is that bringing up one video automatically reduces the other. What if you want to have more control?
Try a 4MIXR (also from the CONTROLLER tab of the Vizzie browser) for more complexity and less "black out"
Each of the channels can be automated (WANDR or TWIDDLR again...) for generative results.
If you have "masked" video, you can combine them with the 4MIXR as well.
Create an Effects Switcher
Sometimes, we will want to actually make a system where we can alternate between effects streams.
Create a new patch, and start with a single PLAYR and VIEWR
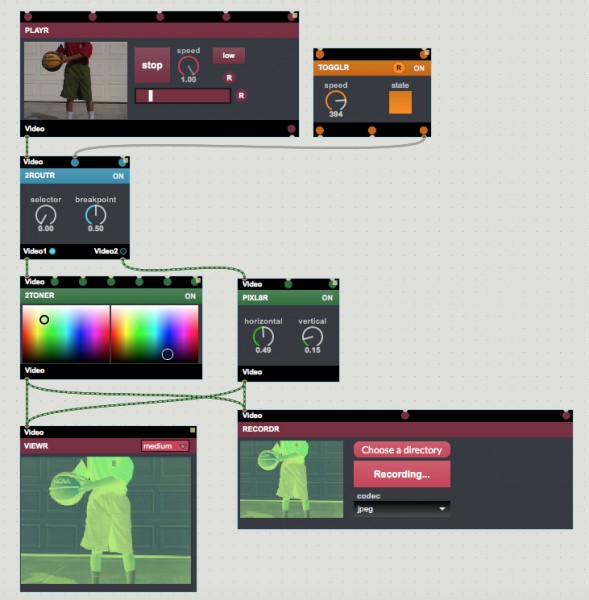
Drop in a 2ROUTR (from the CONTROLLER tab of the Vizzie browser) to create parallel effects paths.
Now, for each path, create an effects stream that contains one or more EFFECT modules.
Use the 2ROUTR to choose which stream is active, or connect a WANDR/TOGGLR to automate the switching. Make sure you use the first data input (selector) rather than the second data inlet (which sets the point at which the two input streams change).
You can also use a CLICKR (found in the CONTROLLER menu section) to make it easier to switch between the streams in the heat of a show!
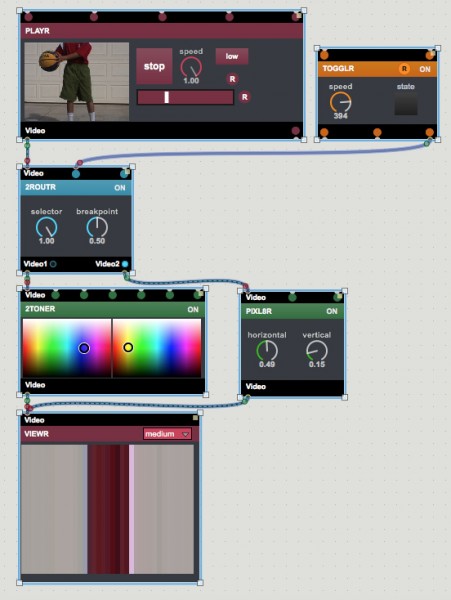
Note that you can have both of the effects streams go into a single VIEWR. Why doesn't this cause flashing?
The 2ROUTR only sends video frames down one of the effects paths.
The effects that are not in the "active" path never receive video frames, so they never output anything.
Since only one of the paths is generating frames, no collisions occur - therefore, there is no flashing!
Recording the Output
We don't really have a simple way of "piping" the video to some recorded form, but it sure would be nice!
Add a RECORDR from the OUTPUT tab of the Vizzie browser) - this is our video recorder.
Connect it just like you would connect a VIEWR; it is just a tool to capture video frames that would otherwise be displayed.
Click on the "Choose a directory" button and use the file dialog to choose the place your movie will be saved.
When you are ready to record, just hit Record. When you are done, turn it off.
Where's the file? It's in the directory you chose when you clicked on the "Choose a directory" button, and it has a unique name based on the date and time the recording was made.
Now that you have a file, you can use it in a video editing program, or use it as new material for more Vizzie manipulation.
Use Vizzie Abstractions for More Compact Patching
Creating your own Vizzie patches can take up a lot of screen space. You can make use of a special feature of the Max programming environment called abstractions to help you keep your patching compact.
Every single Vizzie module is a wrapper around a Max abstraction – a Max patch that has all the same inputs and outputs and the same functionality as the Vizzie modules you’ve worked with during this workshop. They work the same way, but take up a lot less visual space.
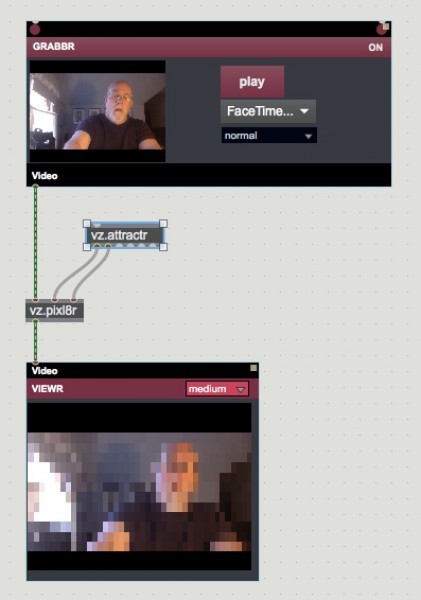
Create a new patch, and start with a single GRABBR and VIEWR
Choose any Vizzie effect from the EFFECT menu section you’d like, and add it to your patch. Be sure to take note of the module name (we’ll use a PIXL8R module for our example).
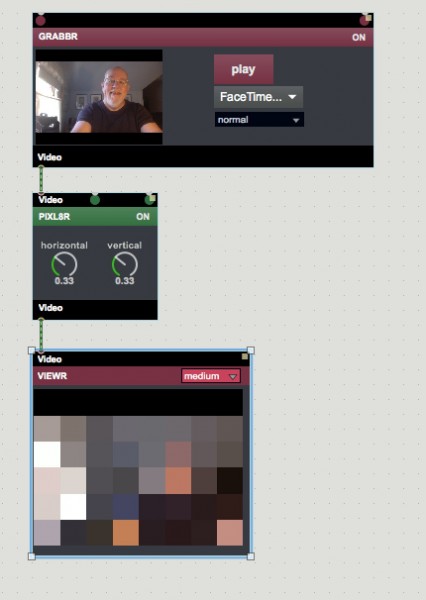
To add a Vizzie module as an abstraction, type an “n” with your patch unlocked. You’ll see an dark box (that’s a Max external object, by the way) with a flashing cursor inside.
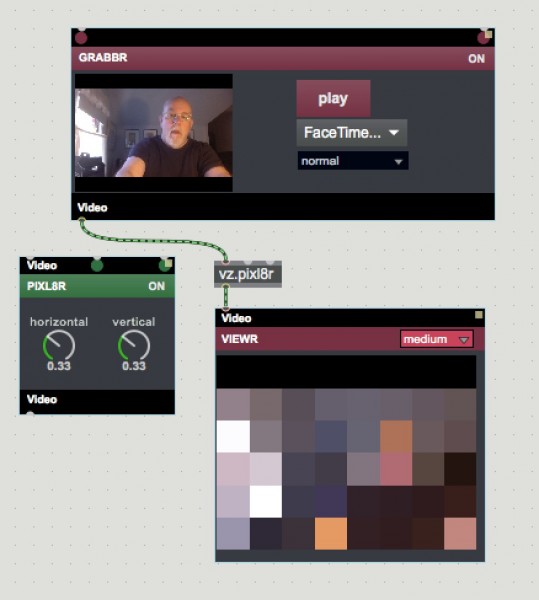
Type the letters “vz,” followed by a period, and the name of the Vizzie module you want to use in lower-case letters (in our example, we would type
vz.pixl8r), and hit the return key.Notice that the object that appears on screen has the same number of inlets and outlets as the Vizzie module you know and love.
Replace the Vizzie module with the abstraction you just created by reconnecting the GRABBR module output and the connection between the PIXIL8R module’s outlet and the VIEWR inlet. You’ll notice that it does exactly the same thing, but takes up a lot less space.
Lock the patcher.
Using abstractions makes for lots more compact patches, but there’s one problem: We can’t see the user interface for the module! In lots of cases, that’s not a big deal once we set the parameters to something we like.
Double-click on the abstraction you replaced your original Vizzie module with. Max will show you your module – complete with the user interface - in a new window.
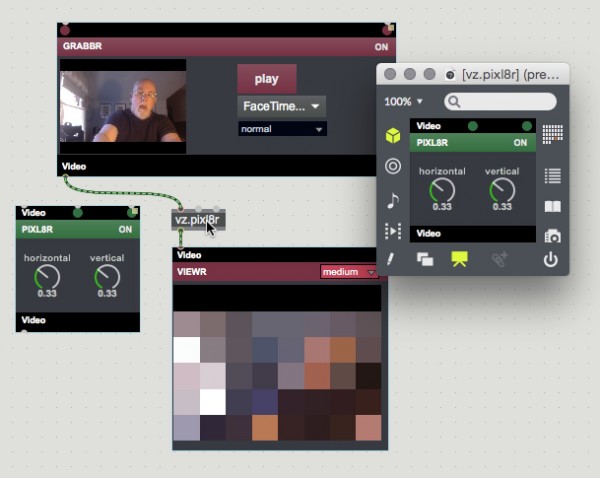
Adjust the parameters until you have something you like. To close the UI window, click on the leftmost dot in the patcher window.
You can add abstractions for any Vizzie module. They work exactly the same way as their Vizzie module counterparts. The inlets and outlets are exactly the same. For fun, add an abstraction version of the ATTRACTR module (Unlock your patcher, type “n” to get a blank object box, type
vz.attractrinto the object box, and hit return) and connect its outlets to the effects inlets of either a Vizzie module or its abstraction counterpart. It’ll “just work.”
Conclusion
This concludes the workshop. I hope that you've enjoyed working with Vizzie, and that you find it useful enough to dig in deeper, learning more about the standard Max objects, and create great work!
by Gregory Taylor on August 21, 2013

