Re-purposing Plug-ins in Max 5
Converting a "pluggo ready patch" into a "poly~ abstraction"
A common concern for many advanced Max users is the ability to load new sound modules into a running MSP patch without causing discontinuities in the sound. Many people worked around this by creating Pluggo plug-ins of their sound modules that could be loaded dynamically inside the vst~ object without breaking up the signal in the main patch. Another feature of the Pluggo engine was that it automatically generated the handy "egg-slider" GUI from the parameters specified in the patch. As exporting plug-ins is not currently available for Max 5, we will look at another alternative in this article based on a new feature of the poly~ object, which allows you to dynamically load new abstractions without recompiling the DSP. To help users explore this new alternative, we will demonstrate different ways to convert a Pluggo-ready patch made with MaxMSP 4.6 into a patch that you can load as a poly~ abstraction. Using the scripting capabilities of MaxMSP, we will also see how to automatically generate a Graphical User Interface for the newly converted poly~ abstraction. As this is a fairly advanced tutorial, you may need to consult the documentation browser for more details about the concepts and techniques involved.
Click here to download the patches used in this tutorial.
What is a "pluggo ready patch"?
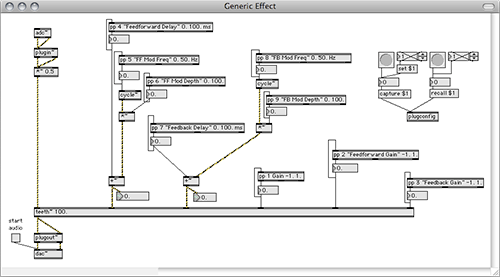
Before starting, it's important to have an idea of how a Pluggo-ready patch (henceforth referred to as PRP) typically looks. It usually looks like a more or less normal MSP patch with three special elements:
plugin~/plugout~ objects represent inputs/outputs of the plug-in (instead of adc~ and dac~ objects for a normal patch)
pp objects declare names and characteristics of the parameters that user can manipulate
plugconfig object stores information about the plug-in, such as the parameter programs (presets)

Click here for a large image of the patch.
What is a "poly~ abstraction"?
The original purpose of poly~ was to load a patcher multiple times to create polyphonic synthesisers and effects. However, there are many features of poly~ that are useful for other purposes as well, especially since Max 5 was released. We will use poly~ in a special way here, to load a single instance of a patcher, taking advantage of the fact that poly~ uses a different DSP chain than the main patch. This means that it is possible to load a different patcher inside poly~ while the DSP is running in the main patch, without causing any interruption in the other processes. A typical abstraction designed to work with poly~ includes special numbered input and output objects (in~/out~ for signal, in/out for max messages).
Before Starting
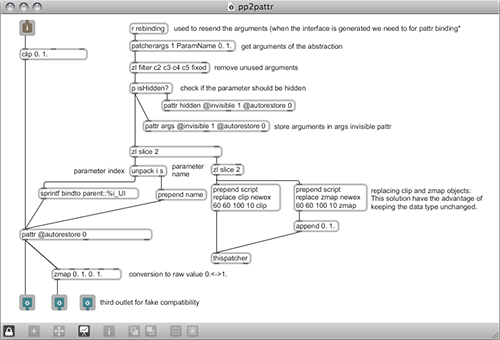
In order to be use our PRP in poly~, a few changes need to be made. To facilitate this work, and to make the process reusable, I've included some abstractions to replace objects like plugin~, plugout~ and pp,which are typically found in a PRP. The pp objects declare parameters of our plugin for the host application. The arguments of pp give the name of the parameter, the range, the unit... With this information Pluggo would automatically create an "egg-slider" GUI for the user to manipulate the parameters. In order to automatically generate our own GUI for our poly~ abstraction, we also need to have access to these parameters. This will be done using the pp2pattr abstraction, which includes three pattr objects, one for saving the parameter (in order to make presets), two others (which use the invisible attribute) to store the arguments of the abstraction and the hidden state (in order to be able to access them from the parent patcher). Using the pattr system will give us a great deal of flexibility of control and allow us to access the parameters in a programmatic way later on.

Click here for a large image of the patch.
#1: Importing, Cleaning
The first step is to import our PRP and clean it a little bit (using the Edit->Scale feature). Newly imported patches from Max 4 may need a little sprucing up to take advantage of the new look of Max 5. See the video below for a demonstration.
#2: Replacing plugin~, plugout~
Next, we will need to replace the plugin~ and plugout~ objects with in~ and out~ objects to expose the inputs and outputs to the poly~ object. You can replace them manually, but a much more convenient way will be to replace the plugin~ and plugout~ with plugin2poly~ and plugout2poly~ abstractions, and then using the De-Encapsulate function from the Edit menu. This will paste the contents of the abstractions into the main patcher while keeping the connection in place, which will save us some time.
#3a: Replacing pp (manually)
Next, we'll need to replace our pp objects with the pp2pattr abstraction. To do this by hand is fairly straightforward, but can be quite tedious if there are a number of parameters to deal with. To do this simply retype the object boxes with "pp2pattr", leaving the arguments intact.
#3b: Replacing pp (regular expression is fun)
Replacing pp by pp2pattr by hand is not super fun, especially if there are a lot of pp objects. One way around this is to use a Regular Expression (aka Find and Replace) in your favorite text editor. One benefit of the new text-based file format in Max 5 is that it's easy to use intelligent text search/replace to alter patches. Let's have a look at what we will need to change first. A pp object looks like this in the Max File Format (it's an extract of the patch):
"box" : {What we want is the following:
"maxclass" : "newobj",
"text" : "pp 1 Gain -1. 1.",
"patching_rect" : [ 478.881042, 294.241638, 86.892197, 19.0 ],
"id" : "obj-34",
"fontname" : "Arial",
"numinlets" : 1,
"numoutlets" : 3,
"fontsize" : 10.623105,
"outlettype" : [ "", "float", "" ],
"save" : [ "#N", "pp", 1, "Gain", -1.0, 1.0, ";", "#PP", "text", "The level of the input signal", ";" ]
}
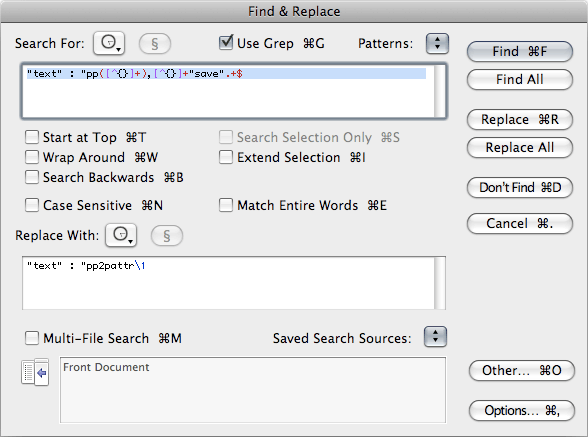
"box" : {In the second example, the name of the object has been changed and the last line has been removed (which also means that the comma at the end of the "outlettype" line has been removed too - otherwise the file would be corrupted). We will now use a text editor that supports Regular Expressions (TextWrangler in this case) to make the replacements. Before continuing, you might want to backup your patch just in case something goes wrong or a mistake is made. Open the "Generic Effect.maxpat" patch with TextWrangler, and choose Find in the Search menu. Here's one magical expression to do the search:
"maxclass" : "newobj",
"text" : "pp2pattr 1 Gain -1. 1.",
"patching_rect" : [ 478.881042, 294.241638, 86.892197, 19.0 ],
"id" : "obj-34",
"fontname" : "Arial",
"numinlets" : 1,
"numoutlets" : 3,
"fontsize" : 10.623105,
"outlettype" : [ "", "float", "" ]
}
"text" : "pp([^}]+),[^}]+"save".+$
This expression means that we will search literally for "text" : "pp followed by as many characters as possible which are not a } followed by a comma, and a certain number of characters which are not }, followed by the literal string "save" and everything else up to the end of that line (.+$). The replacement string is a bit simpler:
"text" : "pp2pattr1
where 1 is the only special pattern, which means replace with the first back reference (the part of the searched text in parentheses).

After hitting Replace All, and saving the file, you can now reopen the patch in Max5 to see the result of this process.
#4: Generating the GUI
In order to construct our graphical user interface, we will need to get the arguments of the pp2pattr abstractions, which define the parameter index, name, range, etc. To see how we accomplish this, have a look at the AutoGeneration and AutoGenerationJS patches for two different methods (see below). In both methods, we will use the getclientlist message of pattrstorage to get the name of all the visible pattr objects in our patch (one per pp2pattr abstraction). From there, we can extract the name of the pattr object which stores the arguments in each pp2pattr abstraction using a regexp object. For instance, the name of the pattr in the abstraction which controls the Gain parameter has a name like: pp2pattr[8]::Gain (the number might be different). From this, it is easy to generate the name of an invisible pattr object which is located in the same abstraction (pp2pattr[8]::args). Then we can query the current state of that particular pattr via the getpp2pattr[8]::args message to pattrstorage. The values received from the argspattr are then saved in a coll object to be used in different places in the patch. In order to manipulate pattrstorage easily, aliases of the pattr object in pp2pattr are automatically created. It is then possible to set the value of pp2pattr[8]::Gain directly using the message Gain. A separate coll object which stores the hidden state of a pp2pattr is created based on the same technique. The regexp object is used to separate messages coming from the outlet of pattrstorage. In order to have a clean interface, we create the objects so they appear automatically in presentation mode.
#4a: Using Scripting Method
In order to create the UI objects, we can send messages to the thispatcher object to create new patcher elements programmatically. We use the script newobject command to create the objects that we need. To integrate the UI scripting into our PRP, paste the contents of the AutoGeneration.maxpat file, as demonstrated on the movie below.
#4b: Using JavaScript
We can also send messages to this.patcher within JavaScript in order to create the objects. One advantage of using JavaScript here is to be able to quickly create and customize the UI. Tasks like generating many objects programmatically are often much simpler to represent using a text-based scripting language than the equivalent patch. The included js code (GUIgenerate.js) has an internal representation of each of the pp2pattr objects, and is able to automatically create UI objects that bind to the appropriate parameter in each case, setting all the necessary attributes as it goes. To integrate the UI scripting into our PRP, paste the contents of the AutoGenerationJS.maxpat file, as demonstrated on the movie below.
#5: Converting Presets
In a PRP, the presets are stored in the plugconfig object. When you double click this object you can see its script. A program (aka a preset) is indicated with the setprogram keyword, followed by the program number, the program index, the program name, the parameter offset and finally the values of each parameter. For simplification reasons, the parameter offset will be ignored. The parameter values are always expressed as a floating point value between 0 and 1:
#C setprogram 4 "White Chorus" 0 0.855 1. 0.855 0.1 0.0282 0.0111 0.1 0. 0.;
The conversion we use consists in a few steps:
copying the plugconfig script
pasting it in a text object, so we can dump it.
extracting only the lines which contains the setprogram keyword, using regexp again ;-)
scaling the parameters to fit the real range of each one (we use the coll which stores the range of each parameter for that)
and save each preset with the appropriate name coming from the plugconfig script.
The patch Preset-conversion.maxpat contains all the items to be pasted in the patch.
#6: Last Details
In order to communicate from the outside of the "poly~ abstraction", we need to create a new input (in 3) and output (out 1). The getSet.maxpat abstraction also contains a subpatcher which communicates with pattrstorage, in order to set / get parameters. This patch is designed to be compatible with the vst~ syntax: get followed by an index returns the value of the parameter, a list of index and value, or a symbol followed by a float value sets the value of the parameter.
In order to make the patcher look nicer after resizing the window, we will change a few options in the patcher inspector:
check "Save Default-Valued Object Attributes" (this is only if you want to make sure that the patch will always look the same, no matter what the default color scheme is).
check "Open in Presentation"
uncheck "Show Horizontal Scrollbar"
uncheck "Show Toolbar on Open"
uncheck "Show Vertical Scrollbar"
Finally, we need to check "Define Fixed Initial Window Location" in the view menu, to save the default position of the patcher window.
#7: Dynamically Loading Our poly~ Abstraction
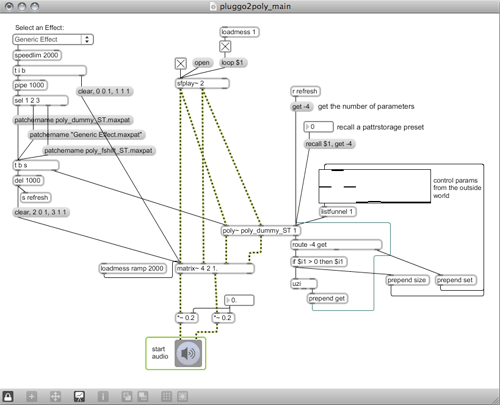
pluggo2poly_main.maxpat shows how to load your "poly~ abstractions" dynamically using the patchername attribute. We use matrix~ in order to change the amplitude of the effect smoothly: we fade out, load a new abstraction in the poly~ object, and then fade back in. This patch also demonstrates a way of controlling the parameters from the outside of the poly~ object, in the same way as with vst~ object (with get messages, and list of {parameter, value}).

Click here for a large image of the patch.
Wanna Go Further?
Here are a few suggestions to go further:
use a more sophisticated regexp in 3b, and you could get the text associated to the pp to display the hint of your sliders.
add randomize and evolve capabilities (would be relatively easy from JavaScript)
add a more vst~ -friendly message to get the parameters and programs name (this would require querying pattrstorage)
add a default value attribute to pp2pattr
Now that we have the tools to convert Pluggo-ready patches into poly~ abstractions, it will be pretty simple to start converting your Pluggo patches for use with poly~. Also, now that you have played around a little bit with programmatic patch creation, you can begin to put these tools to other uses with a little development. Have fun!
by Emmanuel Jourdan on June 2, 2008

