Tools for Creating Devices in Live
This article provides a brief tour of the features we've added to Max for creating Live devices. If you're familiar with our old plug-in development objects, we hope you'll notice the major improvements we've made. If you're new to creating Max content for audio and MIDI processing, we hope this tour will give you a flavor of the tools that will be at your disposal when Max for Live is released later this year.
Please note, the information presented here is preliminary and subject to change.
User Interface Design
With Max, you can design an interface that will appear in Live's device view, a unique advantage over VST and Audio Unit plug-ins, whose custom edit screens appear only in separate windows. This provides immediate access to your device's UI, but the device view is somewhat constrained in terms of onscreen dimensions. This is where Max 5's presentation mode feature will come in very handy. You'll be able to arrange the elements of your interface using a device view template without messing up the patch you've created.
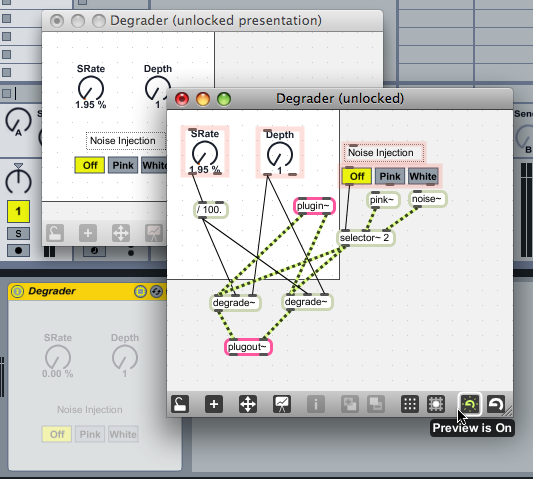
Patching and Presentation Modes in Max and Live. Note the horizontal line that shows the boundary of the Device View.
Max for Live introduces a new set of UI objects specifically designed to emulate the look and feel of the Live interface. But the beauty of these new objects is more than skin deep -- they share the rich set of features built into Live's native UI controls, including:
keyboard input
multiple undo
MIDI and keyboard assignment via simple point-and-click
descriptive text in Live's info view on mouseover
contextual menu for viewing automation for the UI control
automatic color updating when the user changes the Live color scheme
Live-style automation recording and playback, including the display of automation values superimposed on preset value

Some of the new Live-esque Max objects for building interfaces
Since all Live device editing is done "in place" you can save your device in Max and immediately see how it looks in Live. The Max toolbar for a device patcher contains a new button for activating Live for this purpose.
Parameter Management
Devices interact with the host environment by means of parameters. A parameter describes data that represents something about how a device will do its job. For example, if you have a device that uses a live.gain~ object to change the output level and a dial to change modulation frequency, you'll have two parameters, one for the gain slider and one for the dial.
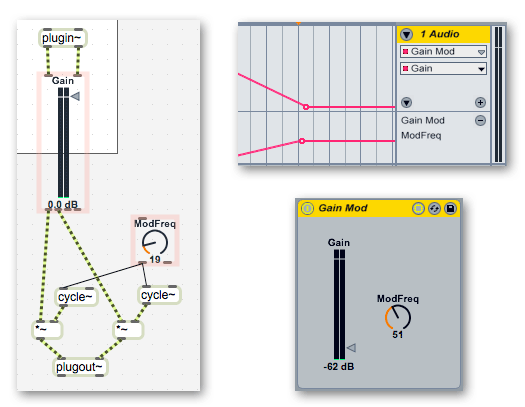
A patch with a gain slider and dial, along with the corresponding parameters displayed in Live's automation editor
One of the primary advantages of the new UI objects is that parameters are built-in, so no patching is required to connect a dial with an object that manages the parameter state for the dial. You can also use classic Max UI objects in your Live device, then bind it to a pattr object if you want the UI object to display a parameter. Since pattr objects can refer to other objects by name, no patching is required in this case either.
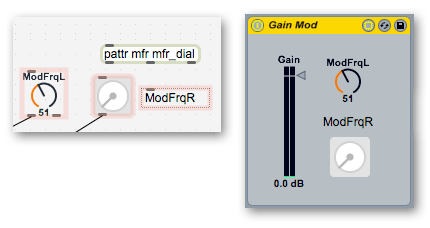
Use a live.dial or a pattr plus classic Max dial? You decide.
Parameters will have a default name (based on the scripting name) and range, but these are all easily changed within the inspector window.
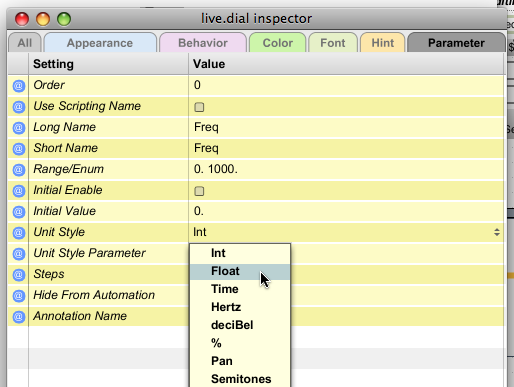
Editing parameter settings for a dial.
Long Name sets both the name that appears below the dial and the name that appears in Live's automation view
Range/Enum sets either a minimum / maximum or a list of possible values
Steps sets the precision of the dial when you drag it (or you can use the keyboard to enter any value)
A number of common unit display styles are built into the parameter system, including exponential, dB, time, and L-R panning. These built-in styles eliminate the need to translate between displayed values and the values you use in your patch. There is also a provision for defining custom unit mappings. To configure parameter settings for a pattr object, just open the object's inspector, check Parameter Mode Enable, and the parameter attributes appear.
The new Parameters Window provides an overview of the parameters currently defined for your device, whether they are built into the UI objects or defined via pattr objects. For automation editing purposes, parameters can be one of four types: integer valued (discrete), floating-point valued (continuous), enumerated, or "blob" which designates a parameter that cannot be automated but will be stored in presets. Parameters that are not automated can be single values, lists, or strings -- any type of data you can store with a pattr object.
If you'd like to receive parameter automation data as sample-accurate audio-rate ramps, you can use the live.param~ object, which refers to any pre-existing automatable parameter by name. With live.param~ you can experience the fun of using automation data for synthesis control.
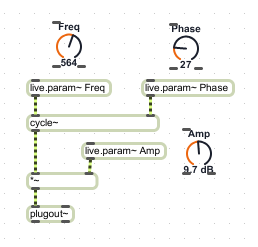
Parameter automation data in a playing Live track is sent to devices you are editing in Max via the preview mode feature.
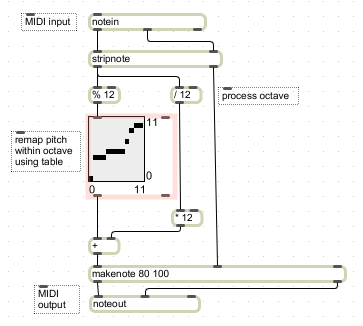
MIDI MIDI input and output in a Live device uses the same set of MIDI objects you're familiar with in Max. You use notein / noteout / ctlin / ctlout etc. for higher-level MIDI message access, and midiin / midiout for low-level access.
MIDI processing in Live should look familiar to any Max user
Using Preview Mode, MIDI input and output continues to work within Live as you edit your device in Max.
Metrical Timing
The Max 5 tempo-based timing objects work seamlessly with the Live transport, simplifying the creation of tempo-synchronized MIDI and audio effects. Here's an example of a simple audio delay that uses tempo-derived values using the delay~ object.
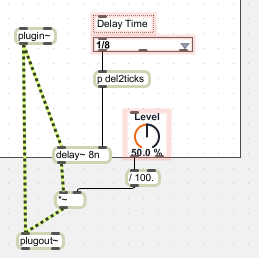
As with MIDI and audio, Live timing information is sent to Max when editing devices when using preview mode.
Step Sequencer Object

The live.step object handles the storage and editing of up to four sequences containing note, velocity, and duration information at each step. Each sequence has an independent time scale specified in metrical time units. The live.step object can be driven by a Live-synchronized metro object, and the step sequencer will output note event values occurring at that time. The editing interface uses modifier keys so all parameters of an event can be edited simultaneously. You'll be able to use live.step in any Max project, not just inside Live devices.
A small part of the preliminary live.step help file
But Wait...There's More
In addition to the objects we've described here, Max for Live will introduce a Max-based API for controlling and extending Live itself through the live.object, live.path, and live.observer objects. We'll preview these objects in a forthcoming article, but we hope the features we've described have you thinking about the possibilities for Live devices you'll be building in the near future.
by David Zicarelli on January 15, 2009

