A Basic Vocoder Tutorial, Part 4
In this tutorial series, we have created the heart of a vocoder using the MC system introduced in Max 8. The vocoder imbues a sound source (the carrier) with the drive of a second sound source (the exciter). We used MC to work with multiple channels of audio (e.g. 2 channels for stereo sound). Then within each channel, we used MC again to process each frequency band of audio for the two sources.
At the end of tutorial 3, we produced the patcher below, which is parameterized using Max for Live objects to make it easy to turn into a device.

In this patcher, and in this whole tutorial thus far, we've used a static "super saw" style synthesizer playing the note "A" for our carrier. While it isn't very dynamic or exciting it demonstrates the potential of the vocoder.
To take our vocoder to the next level, it is time to think about our options for better carrier signals.
This subject could easily fill a volume and is impossible to cover completely in this brief introduction. We will focus on two places to launch your journey...
1 - Classic Vocoder Synth
Max comes bundled with hundreds of example patchers that provide both inspiration and a place to find models for your own work. Many people don't realize what an incredible treasure trove exists in these examples and it is definitely under explored. One of these fabulous examples is the "Classic Vocoder" patch. You can find it in the menu bar under the Help item.

It looks like this:

All of the magic happens in the bpatcher above the ezdac~ object. Opening that patcher, taking it out of presentation mode, and unlocking it to edit, yields this:

The patcher uses send~ and receive~ rather than patch cords for the main audio, but it isn't too crazy to track down if we are patient:
The center section at the bottom is just for outputting lists to display a visualization. It doesn't actually impact the audio.
The area labeled "Excitation Source" is the synth for our carrier. That's what we are here for; we will come back to this in a moment.
The bank of 15 abstractions on the left that are labeled "classic-channel" are the heart of the vocoder. Each channel implements a bandpass filter both the carrier and for the exciter (it actually doubles the filters up to get narrower bands with better separation) and uses the avg~ object for the envelope follower.

About that synth
Now that we have the lay of the land, we can steal the synth out of this vocoder and add it to our own with a quick copy and paste.

In this synth, zerox~ is used as a quick-and-dirty analysis of the input signal. More zero-crossings per period of time means higher frequencies, and really high frequencies are more likely with noisy sounds. An FFT or other analysis method could be more accurate, but this gets the job done and is computationally very light.
If the input signal is deemed to be noisy, then the synthesizer switches to become a noise source. Otherwise, it uses a rectangular wave from the train~ object. If a voice input is used, then the carrier tracks approximately with the human voice to produce noisy sounds for consonants and tones for vowels.
2 - Sidechain Source in Max for Live
A second option with which we may wish to experiment is providing an external synthesizer that is not of our own making. There are lots of ways to patch this up in Max: bring in another adc~, instantiate an instrument plug-in with the vst~ object, or use a Max for Live synth in the amxd~ object. If we want to use our vocoder inside of Live, then we can get the carrier to come in as a sidechain input.
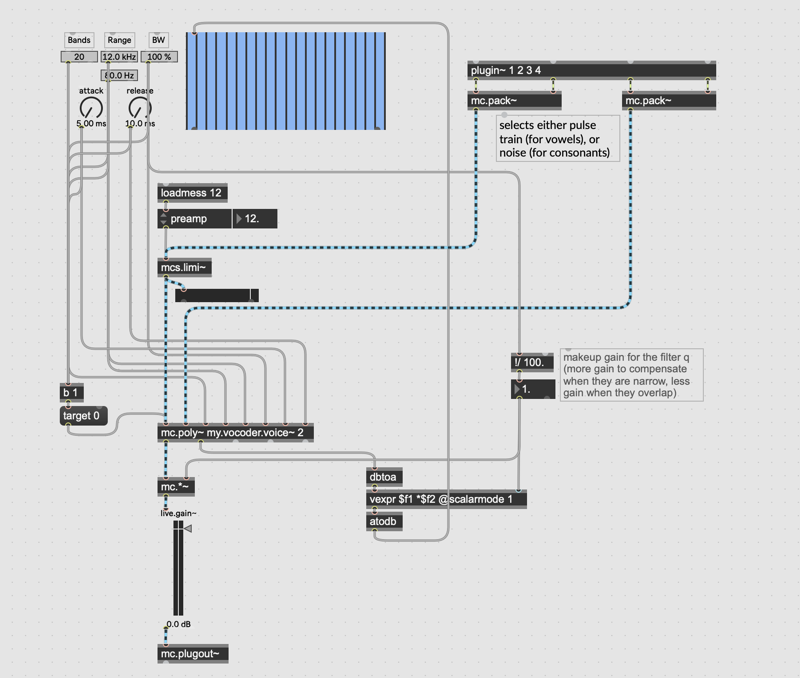
Here are the modifications to our patcher:

We've made 3 modifications to our patch:
We added a plugin~ object to get 4 channels of audio from the Live application — the first two channels are the inputs from the track (which we're using for the excitation source), while inputs 3 and 4 are used for the sidechain inputs (for the carrier source).
We've replaced the ezdac~ object for an mc.plugout~ object. The mc.plugout~ object defaults to stereo on channels 1 and 2.
We've moved all of the interface objects into the upper-left region of the patcher window, which will be displayed in our Max for Live device in Live, and we have also selected all of the other objects and patch cords and selected Hide on Lock... from the Object menu to hide those objects when we lock our patch. (Note: we could also have added the UI objects to the Presentation Layer of our patch, as well).
Then, to make it a Max for Live device, save it as a Project:

In the resulting Project window, you can export it as a Max for Live device:

Now you are ready to load your device into Live and provide any carrier you like; from clips, to the Wavetable Instrument, to anything else your heart desires.
Wrapping Up
In creating a basic vocoder, we've covered a lot of ground. We also have left a lot of ground uncovered. If you want some additional context and some ideas where you might take your vocoder explorations next, this video offers a great history and a number of examples:
I hope you've had as much fun following along as I've had in creating this series. As always, happy patching!
Learn More: See all the articles in this series
by Timothy Place on October 13, 2020

