Ableton Push Programming Tutorials
Introduction
So, to start off this October 2013 Push Development series, I start with a device that does something I like to call frequency mixing. I use frequency mixing a lot during live performance, taking a static track and using some interactive EQ tricks to create a more interesting mix out of a single loop.
What we are going to do is to create an 8-band EQ/mixer, then hook it up to the button matrix of the Push. With a little tweaking, you should be able to use this information to access the buttons for almost any use you can image!
The Basic Max Patch
Download the first version of the device here: 8BandMix-V1.zip
In order to make sense of the patch - and to help you understand the process of making a patch Push-aware - we are going to start with a Max-only patch, then add Push content as needed. So, we have to start off with a basic Max for Live device that provides all of the tools necessary for doing frequency mixing.

You will notice that this device is missing some of the controls seen on the video - most particularly the "smoothing" function and Push device selection. These are specific to the Push itself, so we are going to ignore them for now.
Looking at the basic patch reveals the basic technique. We have slider objects that control the overall volume of each of the EQ bands, controls that allow selection of the band "breakpoints", and the mysterious "8-cross" subpatchers that seen to be affecting the audio. Also, we take some values output by the 8-cross subpatcher and use them to light up a multislider object.
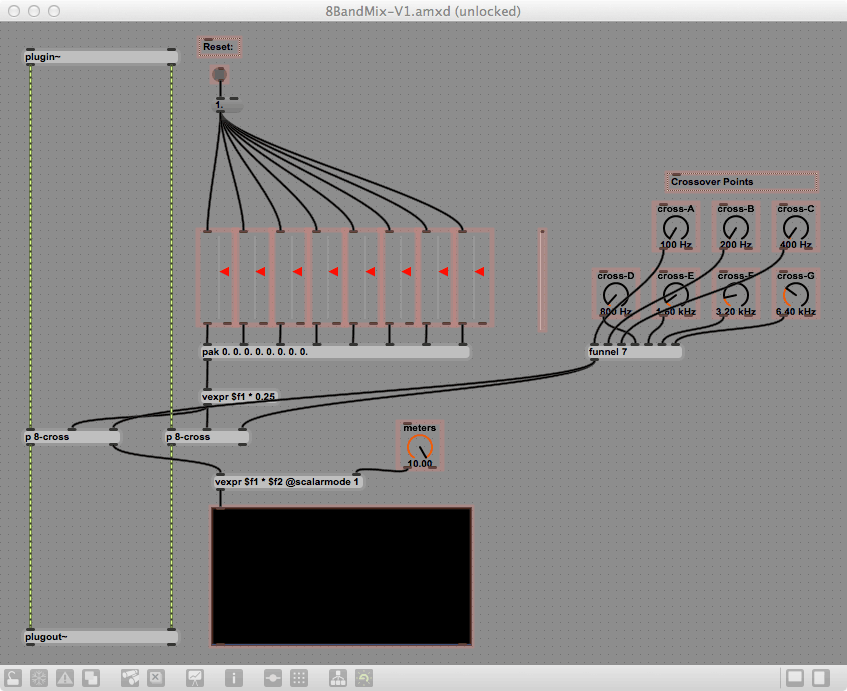
A few details to note. First, if you open the Inspector for the level slider objects, you will see that their range is set from 0 to 7 - a total of eight stages. Convenient, since the Push has eight buttons in the matrix for our use. In order to get a useful volume range (from 0% to 175%), I multiply the packed values by .25 - giving us volume values that allow for a decent cut or boost. The Reset button simply sets everything to 100% as a good starting point.
Also, in order to make our level displays "hyperactive", I have a vexpr object that multiplies the volume levels (reported by the left 8-cross subpatcher) by the value of the meters control. Since that meters control goes up to 10.0, it means that the display might be 10x higher than the actual volume; but as you will see, this is actually a useful way to interact with this particular visualization.
Finally, we can double-click on the 8-cross subpatcher to see what is inside:
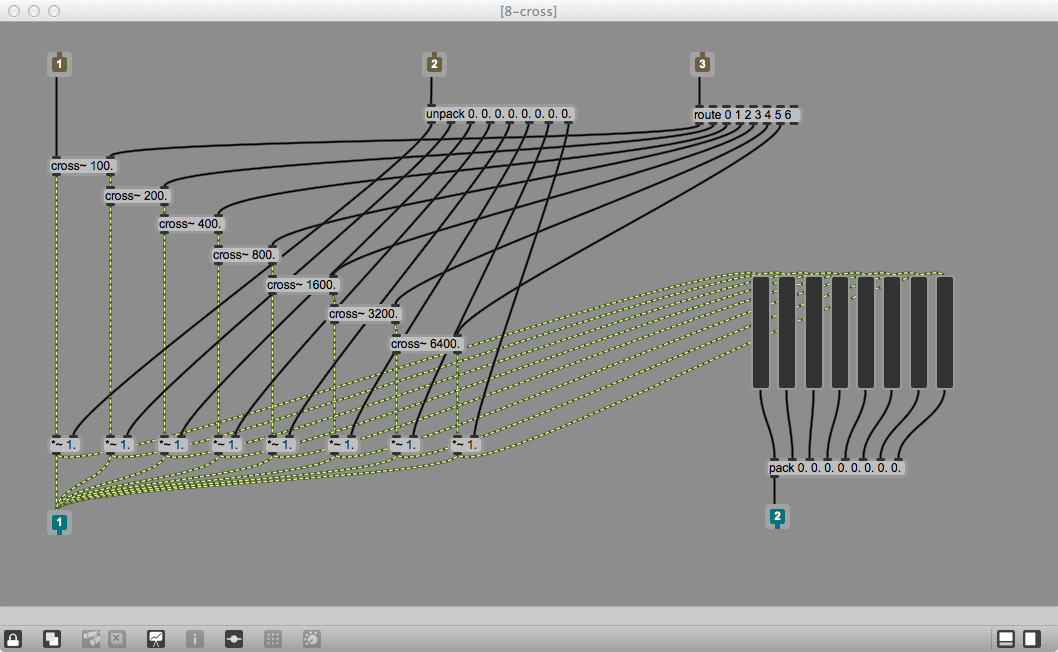
Rather than using a filter or other typical EQ device, I'm using a set of cross~ objects to emulate an eight-stage crossover network. Since cross~ provides a 3rd-order - but fairly neutral - filter, using them in series works out. They also sound right to my ears for this particular application. If you aren't familiar with the cross~ object, you may want to refer to the reference manual or extended ref pages.
With this basic patch, you should be able to manually get some of the results that I achieved with frequency mixing. The next step is to control these changes with our Push device.
Finding our Push
In order to make anything work at all, we need to find the Push among the devices that we have connected to (and recognized by) Ableton Live. While I could dive directly into the Live Object Model (LOM) - and I probably will do so later in the month - I'm instead going to use some Max code provided by Ableton's own Push Guru: Mark Egloff.
Mark has provided me with some code that he developed for his own use, and is willing to share with all of us. This breaks down the connection to the Push into easy, always-available tags, and is going to allow us to get our device going in a hurry.
Here's Mark's code: MFL-Push_Package.zip
When you un-zip the file, you will have a folder that follows the "packages" format for Max 6. Place this folder in the packages folder of your Max distribution and you will have access to the code as a series of clippings. Let start our Live connection by using some of this code to attach to our Push device.
Within our device patch, open the contextual menu (Right-click on Windows, Ctrl-click on Mac), select Paste From... -> Ableton Push -> Global.ControlSurfaceSelector. This will drop the control surface selector code into your patch from the clippings file. This code fires whenever the patch is loaded, and will fill the menu with all of the available control surfaces. From here, we can select our Push.
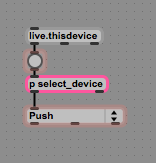
For this patch, the only thing I want to see is the menu, so I remove everything else from Presentation Mode. Now, we have to tie this selection to the rest of the system. Select the Global.ControlSurfaceManager from the same contextual menu. It will take a while to load - this is because all of the "guts" of the system are in the few objects that will be pasted into the patch. Connect the selector to the message box that contains path control_surfaces $1 and you are ready to rock.
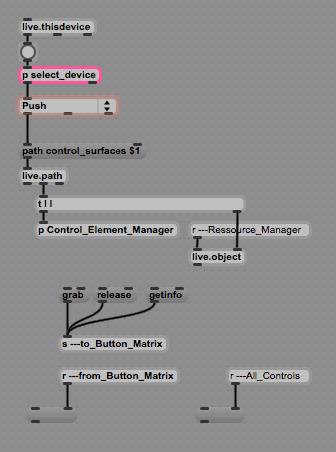
If you want to see if things are working, just hit the button matrix or other control; you should see information show up in the message box connected to the receive objects.
Moving the menu into place (in Presentation Mode) gets us to this point: 8BandMix-V2.zip
Getting Push Input as Control
Next up is input: we have to get the button presses from the button matrix and use it to set our slider values. If we look at the values being received by the r ---from_Button_Matrix object, we can see that any button press creates a four-number list.
The four values are:
First number: The velocity of the button press
Second number: The column of the button press
Third number: The row of the button press
Fourth number: I don't know - but it always seems to be a 1! (Could it be the MIDI channel?)
So, we need to take these numbers, format them to the number range of our slider objects (0. through 1.75), split it out to our sliders and use the buttons to control our device:
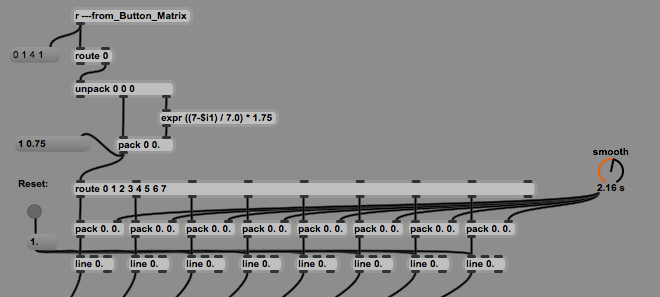
Now, there is also a bunch of extra tooling below our splitter: this is what allows us to change the speed that the sliders move into place. When a value is set, it is combined with the value of the smoothing control, then run through a line object that slows down the value change. Once you connect this to the sliders, you will have the input control necessary to manage the sliders appropriately.
Moving this new patching into Presentation Mode gives us a "nearly complete" device: 8BandMix-V3.zip
Providing a Visual UI on the Push
The next step is going to seem pretty simple, but is actually where a lot of the design work goes. We need to provide a user interface for our process on the "face" of the Push; to do that, we'll take over the button matrix for our purposes.
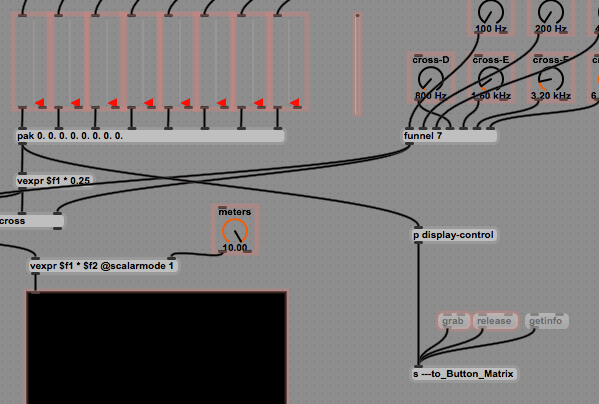
We seem to only have added one object, but it is the core of our interface - a subpatcher that breaks apart the current contents of the volume message, determines what buttons need to be lit up, then sends "light up" messages only if the value has changed. This reduces the number of messages sent to the Push, and keeps our data traffic as low as possible.
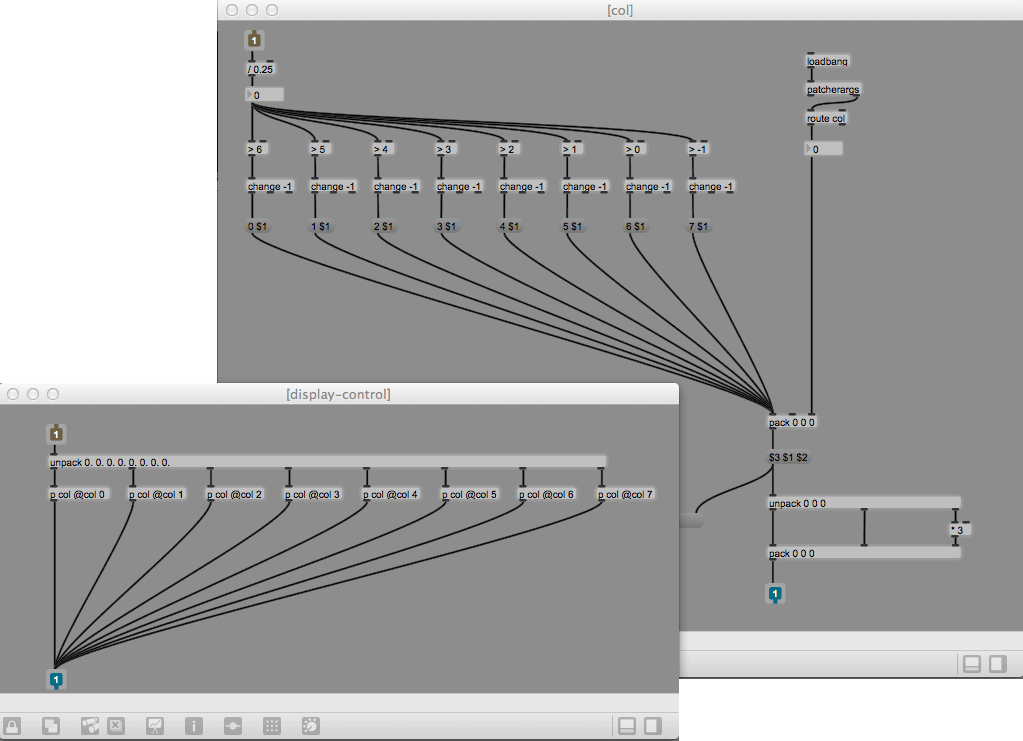
We also have to do one more thing: we have to take control of the button matrix before we can write to it. You do this with a grab message, and you undo the process using a release message. I've added these to the patch and to the panel of the device; now you can grab the Push, use the button matrix for control (with visual feedback) then release it back to Live's control. The end device from this stages looks like this:

Download it here: 8BandMix-V4.zip
Detailing our Work
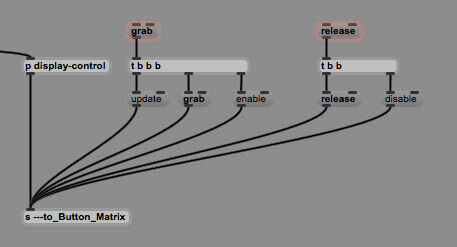
At this point, we only have a few more details to clear up. First of all, we need to properly capture and release the Push device. This means more than using the grab and release messages - we also need to prevent the system from using the buttons when we aren't grabbing it, and we need to refresh the display whenever we enable/grab the matrix. We are going to use a trigger object to manage the order of messages.
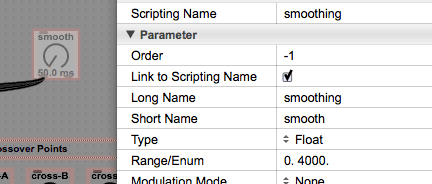
Now we are properly managing our attachment to the device. Another detail we have to work on is the display when our device is in focus. This is done by changing the "order" setting in the inspector for our UI controls. In this case, what we need to do is to make the smoothing control the first available (left-most) control; we do this by setting its order to -1.
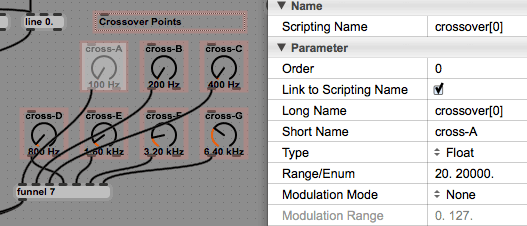
Next, we set the filter cutoff/breakpoint controls to 1 in order to put them to the right of the smoothing control.
The last thing I've done is to expose the menu-loading button to the user interface so that I can get the Push when I've plugged it in after I start Live. This gives me a final device that looks like this:

You can download the final version of the device here: 8BandMix.zip
The Next Level
YouTube viewer "You & We" asked if there was a way to use this as a frequency crossfader. This was a great way to think about the device, and something that I wanted to try. The way we are going to approach is is to make the 8BandMix device into a "Master", and then create a "Slave" device that will receive changes from the Master and either match or invert the results to create either a second mixer or a crossfader.
Altering the 8BandMix Device
The first thing we have to do is change the 8BandMix device. This is going to be pretty easy - all we have to do is to take the necessary data (the slider and crossover values) and send them globally to any receiving device:
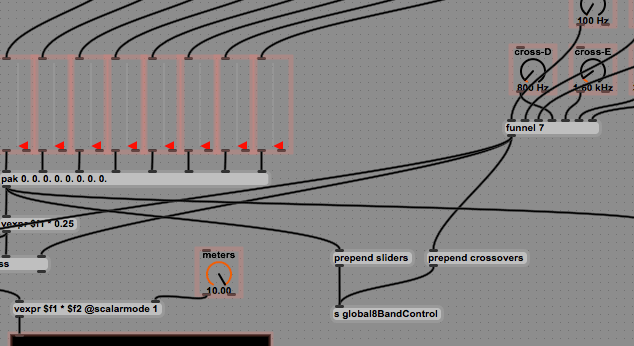
We use the send object with a name global8BandMixControl - without the leading --- - in order to have this named the same for every device in the system. This gives us access to the values that we will use in our slave device.
Creating the Slave Device
Now, we can create a second device that contains much of the "guts" of the 8BandMix device, but doesn't interface with the Push - and doesn't provide access to controls that will be managed by the master device.
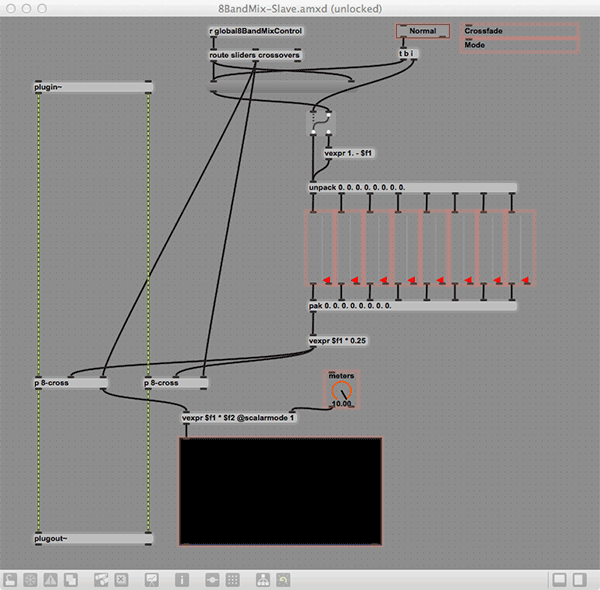
You will notice that we receive the data from the master, then propagate it to the places it needs to go. From there, we have to allow this device to either mirror the master (Normal mode) or flip/crossfade the master (Inverted mode). To accomplish this, we use a ggate object to determine if a calculation occurs, then that result is sent to the slider system.
Other than that, we should be good to go...
Limitations of This Approach
There are a few limitations to using send objects in this way:
There is an undefined delay time between a sending and receiving of a message. So you won't have sample-accurate crossfading.
If you insert a Slave after the Master, but have already changed the crossover points or volumes in the Master, this change won't be propagated until they are changed again.
There can be some performance problems with sending large streams of data over a send connection; this may not be a problem in this case unless you are very active on the Push.
Since this uses a named send object, it means that you can only have one Master device in each Live set.
Hopefully this device is still useful, or maybe you'd like to eliminate some of the problems (using speedlim and metro to resolve some of these issues); in any case, I hope this has been an interesting experiment.
Here are the devices: 8BandMasterSlave.zip (Note: Updated Nov 6, 2013 with proper receive name and slider scaling!)
Conclusion
So there we go - our first basic device for Push, but one that is actually useful in the Real World. Feel free to send me a note with suggestions for improving the Push tutorials. And thanks for watching!
by Darwin Grosse on October 1, 2013

