Best Practices in Jitter, Part 2 - Recording
For our second best practices in Jitter article, we wanted to take a crack at answering one of the most frequently asked questions on the forums and in the socials: How do I record my Jitter output? Seems like a simple question, but as is often the case with Max, simple questions have complex answers. We’ll start with the basics, and work our way to more advanced (and costly) solutions.
What to Record
Before we dive into the many ways to record Jitter output, let’s take a step back and first identify what we’re trying to record. In most cases the answer is: “exactly what I see in my window.” OK, sure – but we need to locate exactly which object or patch-cord in our patch is drawing to the window. If the content is a chain of textures or matrices, it’s simply a matter of taking the output from the last object in the chain. However if the content is OpenGL geometry objects (jit.gl.mesh, jit.gl.gridshape, etc), or a scene post-processed with jit.gl.pass, it’s not always easy to identify. Fortunately the latter case has an easy solution, jit.world. If your patch’s render-context and window is handled by the jit.world object (which it should be), then you simply need to enable @output_matrix or @output_texture, depending on which recording technique you are using (more on that below). This will send the window content out the jit.world’s first outlet as a matrix or texture. Now might be a good time to brush up on the difference between matrices and textures, texture output, or even what is a texture.
Matrix Recording
Basic video recording in Jitter involves sending matrices to a recorder object. Choices include the Vizzie modules RECORDR and AVRECORDR, and the Jitter objects jit.record and jit.vcr. Which object you use depends on your needs. Let’s start with Vizzie.
As with most Vizzie modules RECORDR and AVRECORDR are simply wrappers around Jitter objects, jit.record and jit.vcr in this case. RECORDR is for video only recordings, and AVRECORDR is for audio and video. These objects are designed for simplicity and they succeed in that goal. They handle both texture and matrix inputs from any Jitter object, not just Vizzie modules. Plug in your inputs, set your recording directory (by default, the desktop), hit the record button and you’re off.
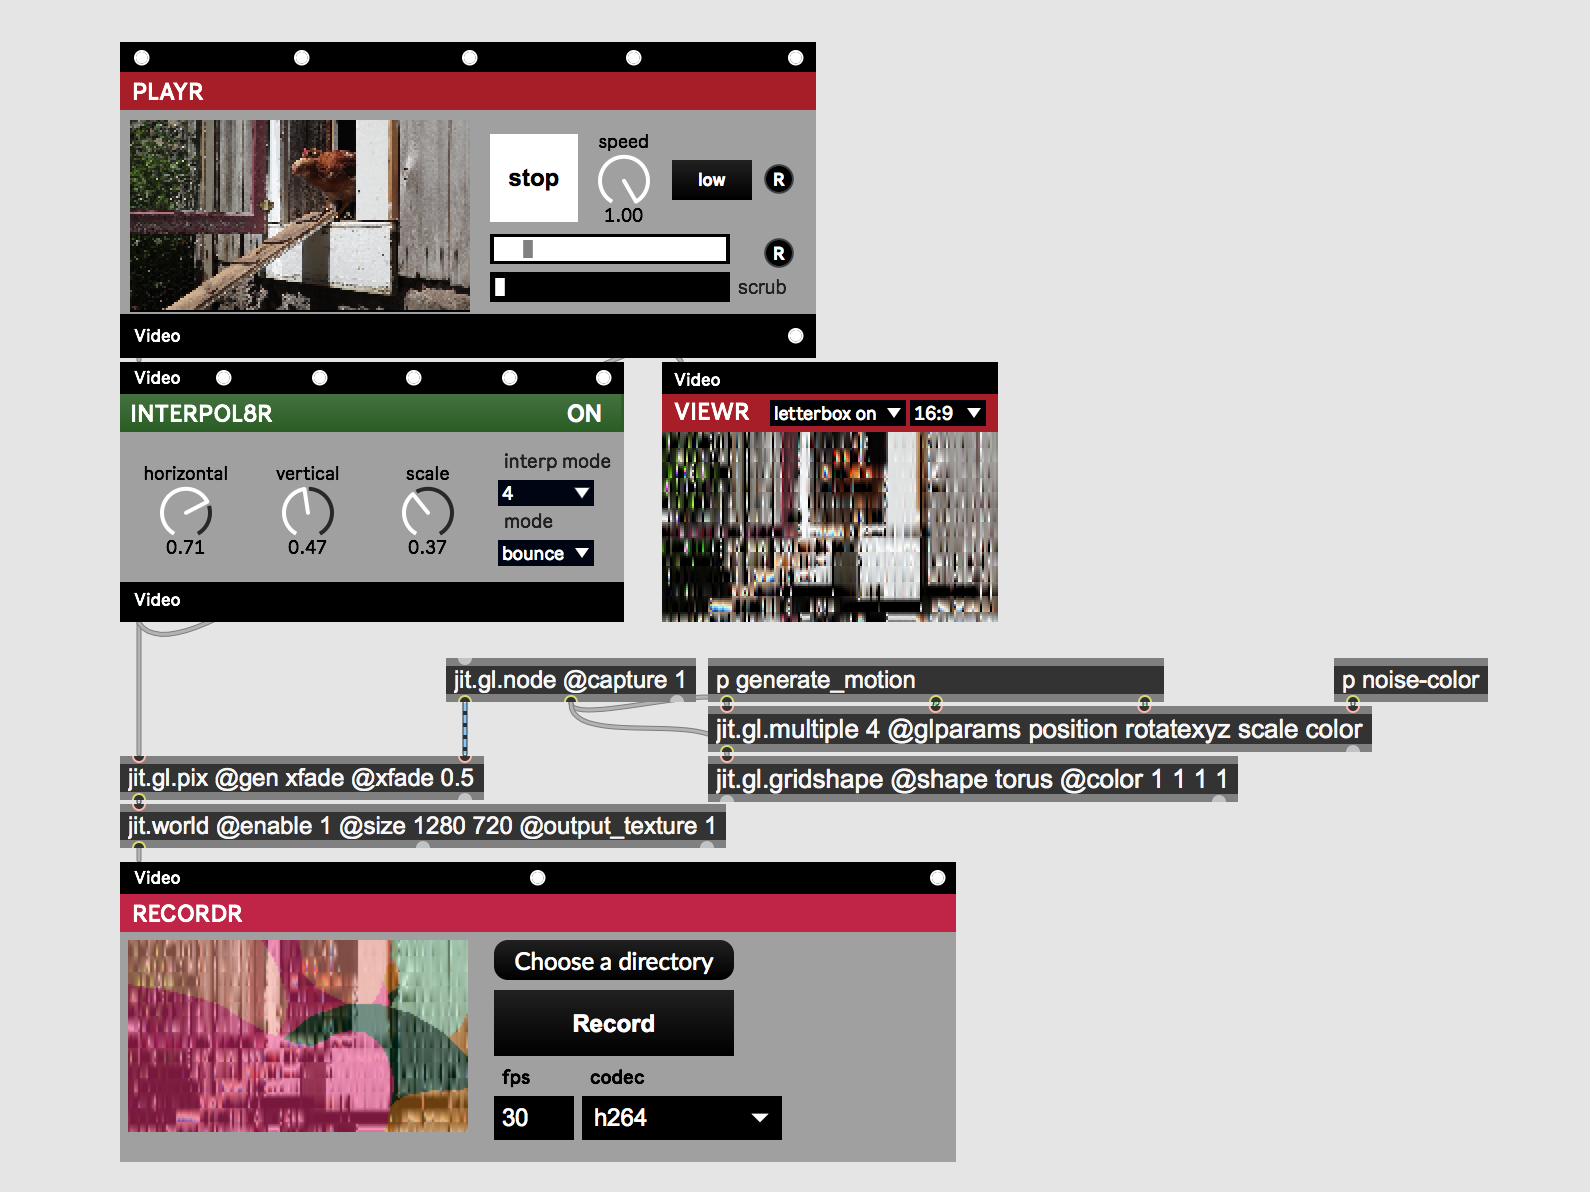
With the Vizzie modules the only user adjustable settings are codec, and if using RECORDR, fps. The codec setting will have a significant impact on the processing power needed and the size and quality of the output file. Mac defaults to prores4444, an excellent choice if quality is of primary importance or if an alpha channel is needed. Switching to prores422 will bring the file size down and lose the alpha channel, and switching to h264 will bring the size down even more at the expense of extra processing and quality loss. On Windows the default codec is h264. For alpha channel support huffyuv and animation are both options, but for high quality and low processing use huffyuv. This codec would be the Windows default but it's incompatible with most movie players and requires using the AVI container format rather than MOV. Converting to a more compatible format is a possibility and the steps to do this are described in the final section of this article.
The Vizzie modules will handle most basic recording needs, but there are some situations where you may want to use the underlying Jitter objects instead. For example to have more control over when and where recordings are written, or to change the video engine used. There are two points to consider when switching to jit.record or jit.vcr. First if your video source is a texture, then you must send it through a jit.gl.asyncread object to convert to a matrix, or simply use jit.world @output_matrix 1 depending on your patch needs.
The second point is understanding the interplay between real time mode, the source fps and the recording fps. If recording in non-real time mode (@realtime 0, the default for jit.record) then in most cases you will want the recording fps (jit.record @fps attribute) to match the source fps (the number displayed when a jit.fpsgui is attached to your video source). If these numbers don't match, then the recorded movie may play back in unexpected ways. For example if you are outputing frames at 60 fps, and recording the output at 30 fps, then the recorded movie file will playback at half speed (although this could be desirable in some cases). Use the jit.world @fps attribute with @sync 0, or the qmetro @interval attribute to adjust your input fps and the jit.record @fps attribute to adjust your output fps. If real time mode is enabled then the fps attribute has no affect on the output file and the recording will play back at the same frame rate as the source material.
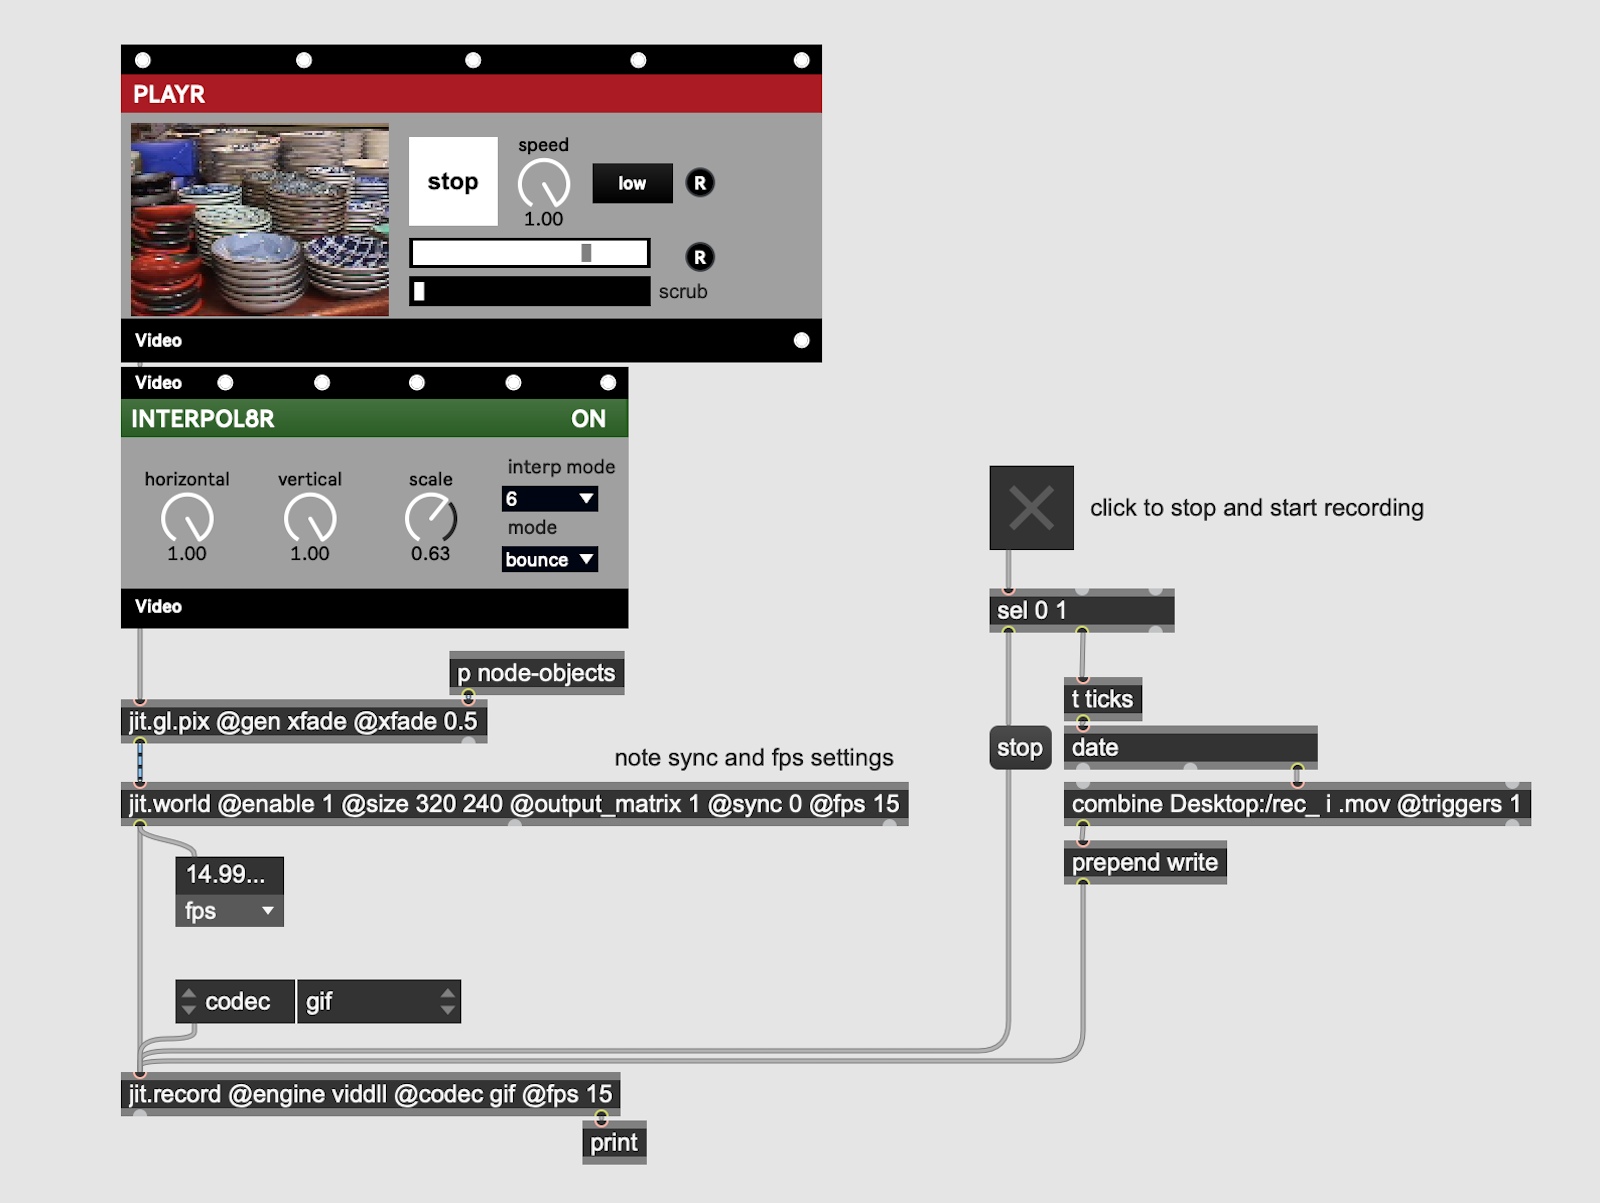
Matrix recording using built-in objects is useful and convenient for many situations. Especially as a means to capture a short video of an idea. As our colleague Andrew Benson wisely says:
There's a bunch of ways to make this just right, but in the heat of the moment, you may just find yourself winging a jit.gl.asyncread into jit.record.
However, problems such as dropped frames, audio and video losing sync, compression artifacts, and sporadic recorder errors can occur due to limited processing resources, or limitations in the recording objects. If so you may get better results by outsourcing to external software or hardware that specializes in video recording.
External Software
Personally, 99% of the time I will use an external software to record my output. This may sound complicated to achieve, but is actually quite simple once you get the hang of it. We’re going to look at two workflows, one for Mac and one for Windows.
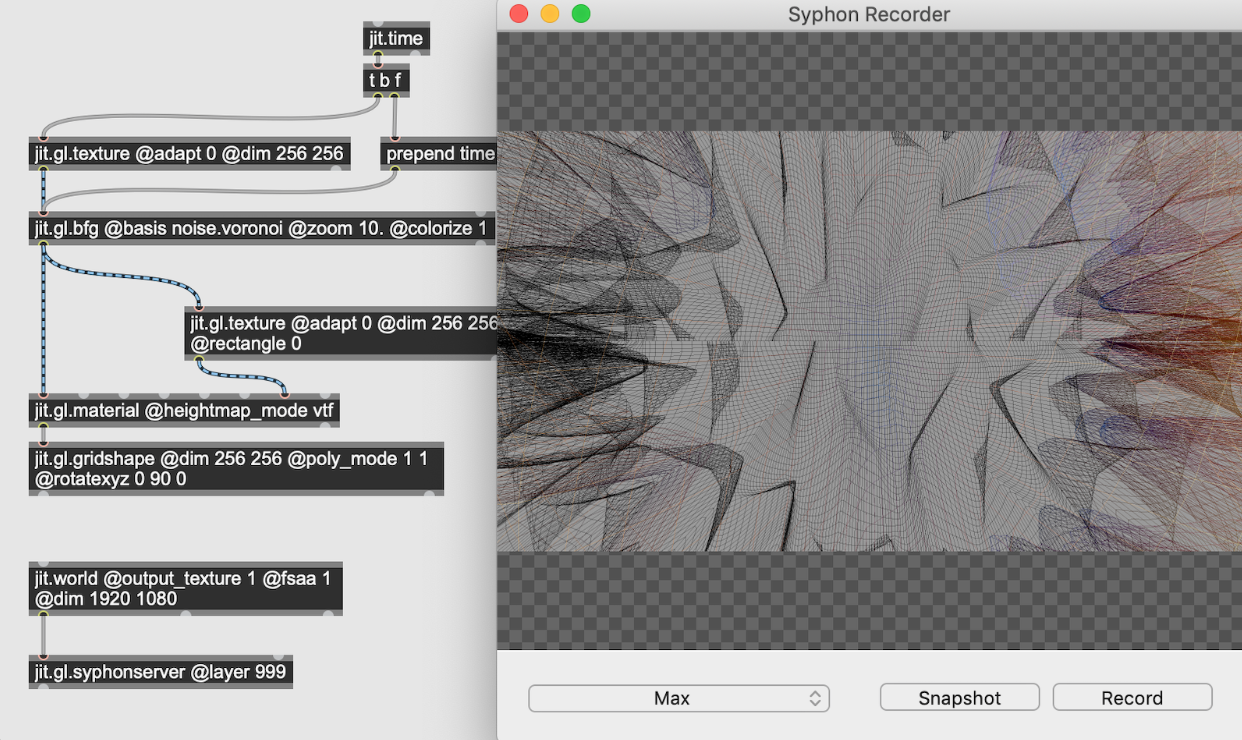
On Mac, the best tool I’ve found for recording is Syphon Recorder. To make recordings with Syphon Recorder you must first install the Syphon package from the Package Manager. With the package installed, you simply create a jit.gl.syphonserver object, enable @output_texture 1 on your jit.world, and connect the world’s output to the syphonserver’s input. You should also set the @layer attribute of syphonserver to some high value so that it draws last, ensuring that it captures all the objects in the scene. You should also ensure that the fps you are rendering at matches the fps in the Syphon Recorder preferences.
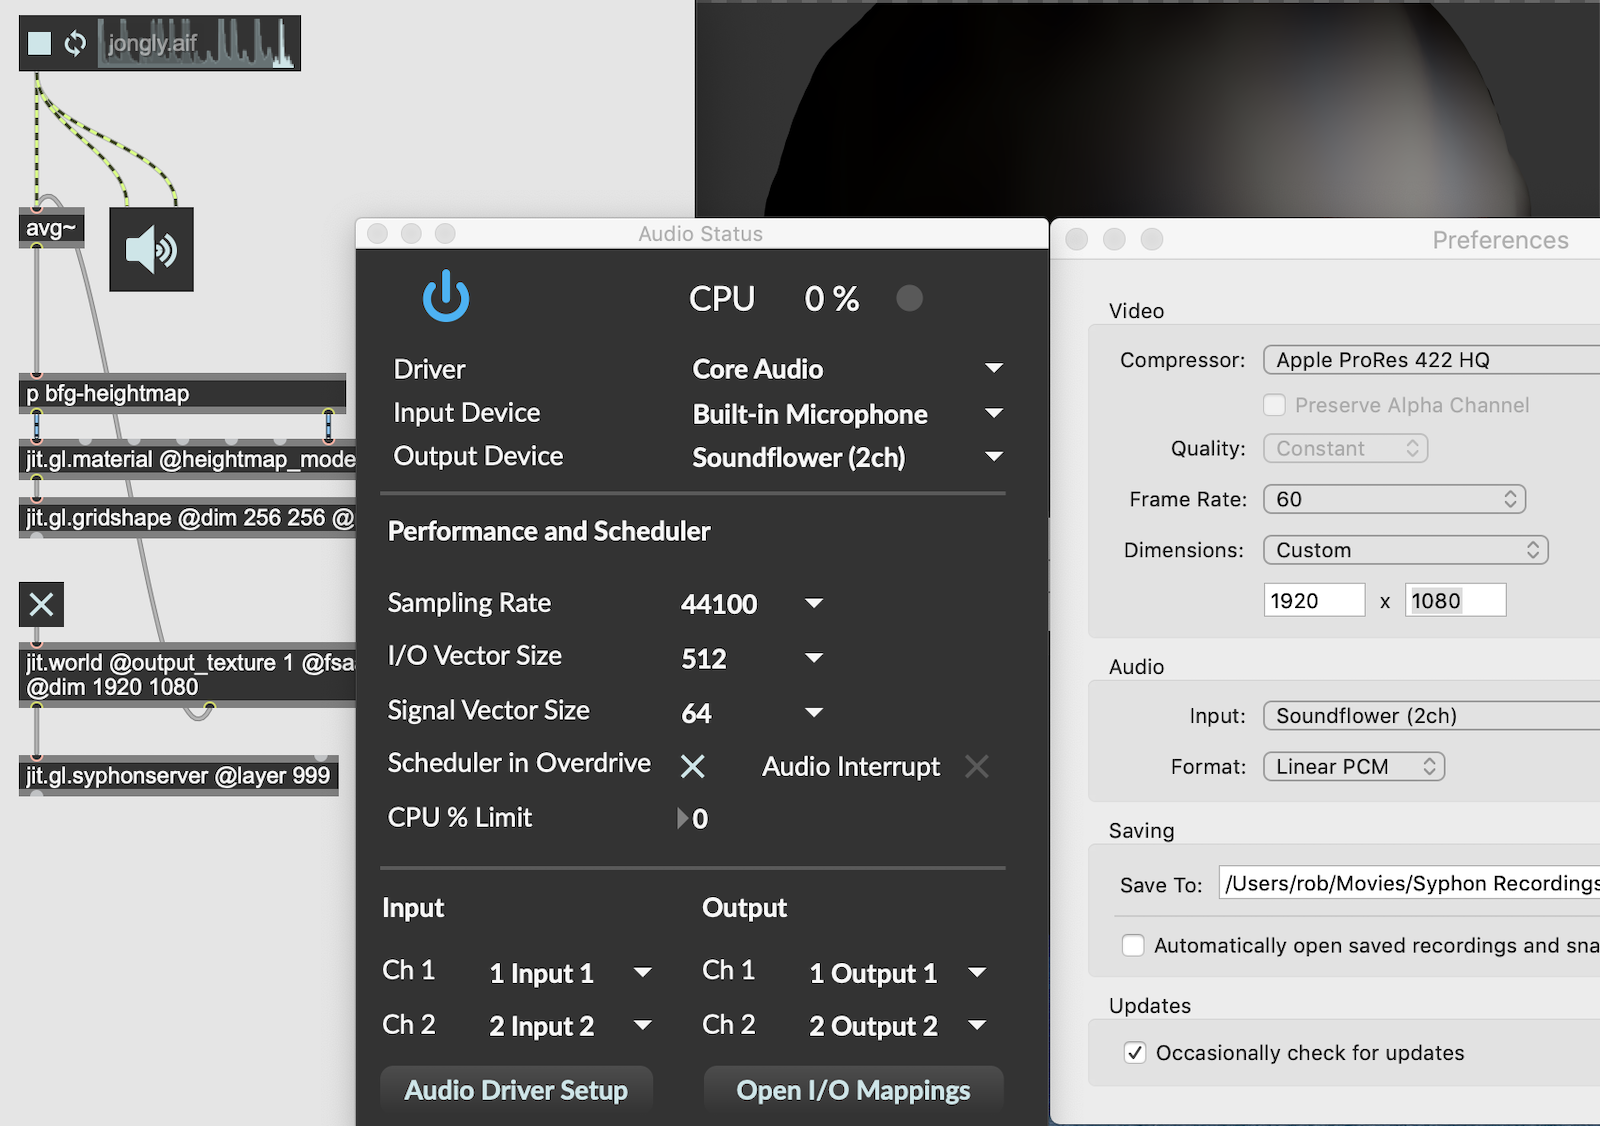
Recording audio from Max with Syphon Recorder requires the additional step of installing Soundflower. Once installed open the Max Audio Status window and set Output Device to Soundflower. In the Syphon Recorder preferences set the audio input to Soundflower.
As an added benefit, both Syphon Recorder and Soundflower are free software. If you require more features, ScreenFlow and Screenflick are two options I’ve seen recommended by Jitter users. With these solutions, the video source is pulled directly from the render window and therefore the syphonserver object is not required.
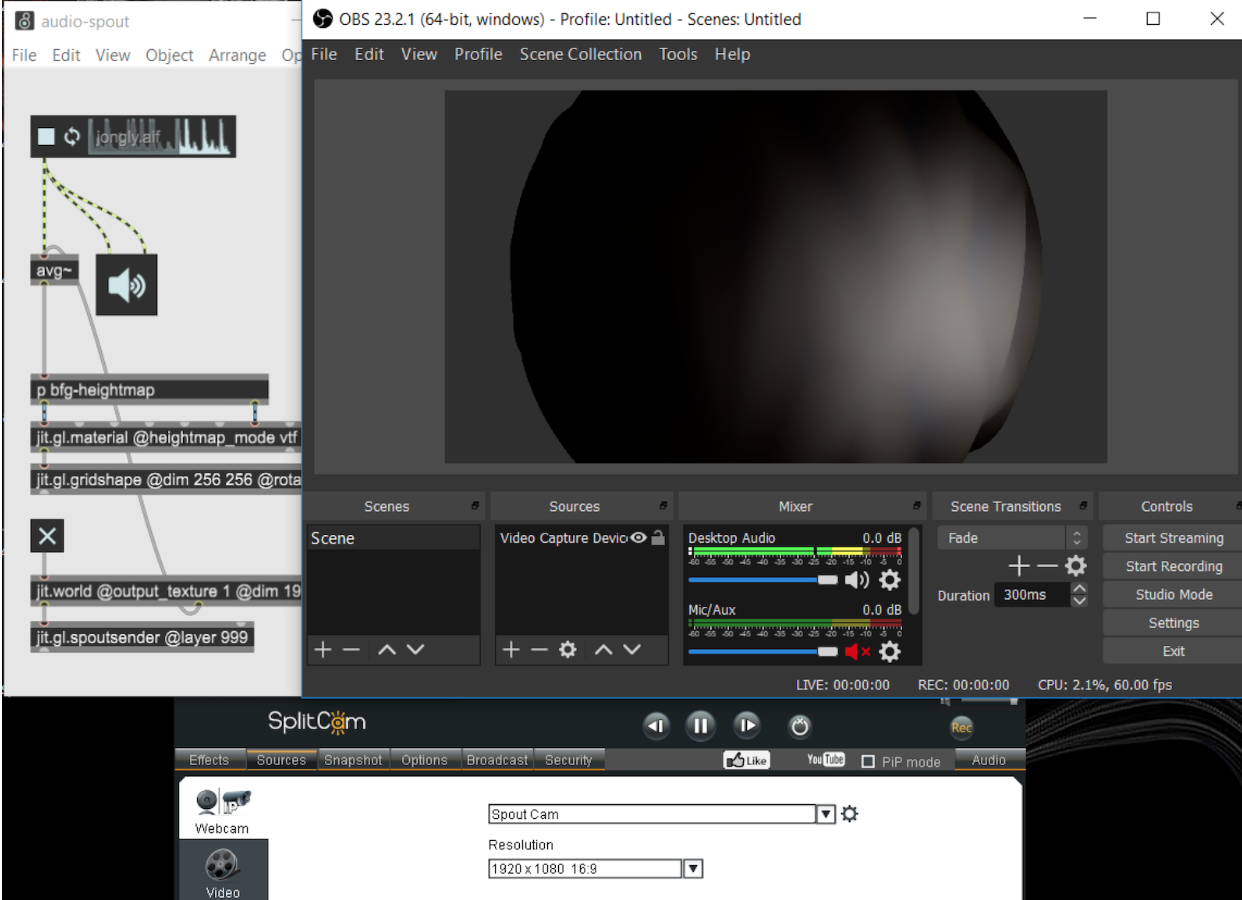
We can trace a similar workflow on Windows. Instead of installing Syphon from the Package Manager, we install the Spout package. Instead of adding a jit.gl.syphonserver to our patch we add a jit.gl.spoutsender. Now here’s where things start to get hairy. There are several software options for recording screen output on windows, mostly geared towards gamers. The one I’ve had the most success with is another free software called OBS Studio.
You can use OBS much the same as the Mac screen capture software mentioned above, but in order to decouple the capture from the render window via Spout, you need one more piece of software called SplitCam (also free). SplitCam will take the Spout source from Jitter, and broadcast it as a Webcam device which OBS can detect for recording. In the OBS Sources window, add a new Video Capture Device source. In the device menu select SplitCam Video Driver, and adjust the capture settings as desired. To capture audio from Max no additional software is needed, simply enable the Desktop Audio source in the mixer interface.
[edit - Install the Spout Plugin for OBS to record Spout texture streams from Jitter ]
[ edit - An astute reader notified me about Spout Recorder, which will record video streams directly from the spoutsender object. This may be a simpler workflow for video only recordings from Spout. ]
External Hardware
If the above workflows leave you unsatisfied, it may be time for a dedicated hardware unit for recording your output. These devices allow your machine to offload the entire process for encoding and writing to disk. Perhaps equally as important, recordings are made directly from the display rather than from a texture capture, thereby preventing discrepancies in visual appearance that often occur between display and capture, especially with line and point drawing. I asked two of my colleagues to provide some insight into this pro workflow.
Here’s Tom Hall on the Atomos Ninja V:
Over the years I’ve used the same setup or similar setup to my colleagues, either directly recording in Jitter or by using syphon. This was until recently, I got a hold of an Atomos Ninja V. The Atomos Ninja V is actually something that gets widely used in the film industry for recording off camera b-roll and the likes, but how does it work with Jitter? - You can think of it basically as a HDMI Recorder (records to attached SSD). It has a HDMI input and a HDMI output (direct loop through from the input) and works just like an external monitor to your computer (albeit a bit smaller), simply take the HDMI output of your machine and connect via HDMI cable to the Atomos Ninja V, it’s that easy. When your jitter patch is all ready to record, drag the jitter window displaying your patch onto the Atmos “monitor” and set it to full screen, hit record on the Atomos and you’re away. You’ll find that because the graphics are off the machine you’re working on you can record at significantly higher frame rates and resolutions, and free up a lot of headroom for other Max work happening concurrently.
It’s not the most cost effective method if you purchase, but it does provide consistent results at showreel level quality. A nice alternative is that you can rent these via Kitsplit or similar for as little as $10 per day (24hrs) so if you have a Jitter piece you need to record in high resolution/frame rate, renting a HDMI recorder might be a good alternative.
Cory Metcalf adds BlackMagic HyperDeck Studio Mini and Intensity to the list:
A lot of my work relies on feedback and live input, making a frame-by-frame capture setup a non-starter. Similarly, the CPU expense of recording in realtime is something I’d rather spend on extra vertices or layers of processing. Probably my favorite way to go is recording directly to an Atomos Ninja or Blade or a BlackMagic HyperDeck Studio Mini. These outboard recorders can handle pretty much any resolution or framerate you throw at them and don’t cost you any more processing than outputting to a second monitor or projector. They even offer loop-through so you don’t have to use an extra port.
An added benefit is that they support multi-channel audio capture (depending on the model) and come in HDMI and HD-SDI flavors. For live performances, all I do is pass my video through to the capture box and send a submix or program out from the sound board and I get a frame-accurate recording of the sound and image, exactly as it appears to the audience. The obvious downside is cost, as most of them cost more than your Max license. Another similar option is to use a second computer with a capture card like a BlackMagic Intensity. You can then capture into Max or directly into your favorite video editor.
If dropping several hundo on outboard gear isn’t in the cards right now, you might be interested in the cheaper options. Typing something like “HD video capture” into Amazon or Ebay will turn up several options, such as this HDMI capture device for $60. You get what you pay for, but these devices should work as advertised and give you many of the benefits described above for a fraction of the cost.
Non-Real Time Recording
In the previous section I described jit.record’s realtime attribute and why it’s useful. For our final workflow exploration we will use jit.record in non-real time mode to write a 4K render to disk. This solution can produce stunning high definition renders without the need for external software or hardware, but it is significantly more complicated to execute.
If your patch is only processing a movie file through some static effects, then non-real time recording is simply a matter of sending the framedump message to a jit.movie. A frame is output, processed, encoded, and saved to the output file, rinse and repeat as fast as the machine can go. However if your source material is generative, or if you want to record dynamic parameter changes, then a different approach is needed.
The basic idea is that we record parameter changes in real time at some fixed rate (e.g. 30 fps). Our output image size is set to some manageable dimensions (e.g. 1280 x 720) that allow the CPU and GPU to process our patch without hiccups at that fixed rate. After the parameter recording is complete, we increase our output image dimensions (e.g. to 4k), enable jit.record with @realtime 0, and start playback on the parameter recording made in the previous step. For each frame in the parameter recording, the parameter data is output and sent to the relevant objects, the image is output, processed, encoded and written to disk, and then the next frame of parameter data is output, rinse and repeat as fast as the machine can go. The end result is an Ultra HD rendering of a Jitter scene with real time patch parameter manipulations.
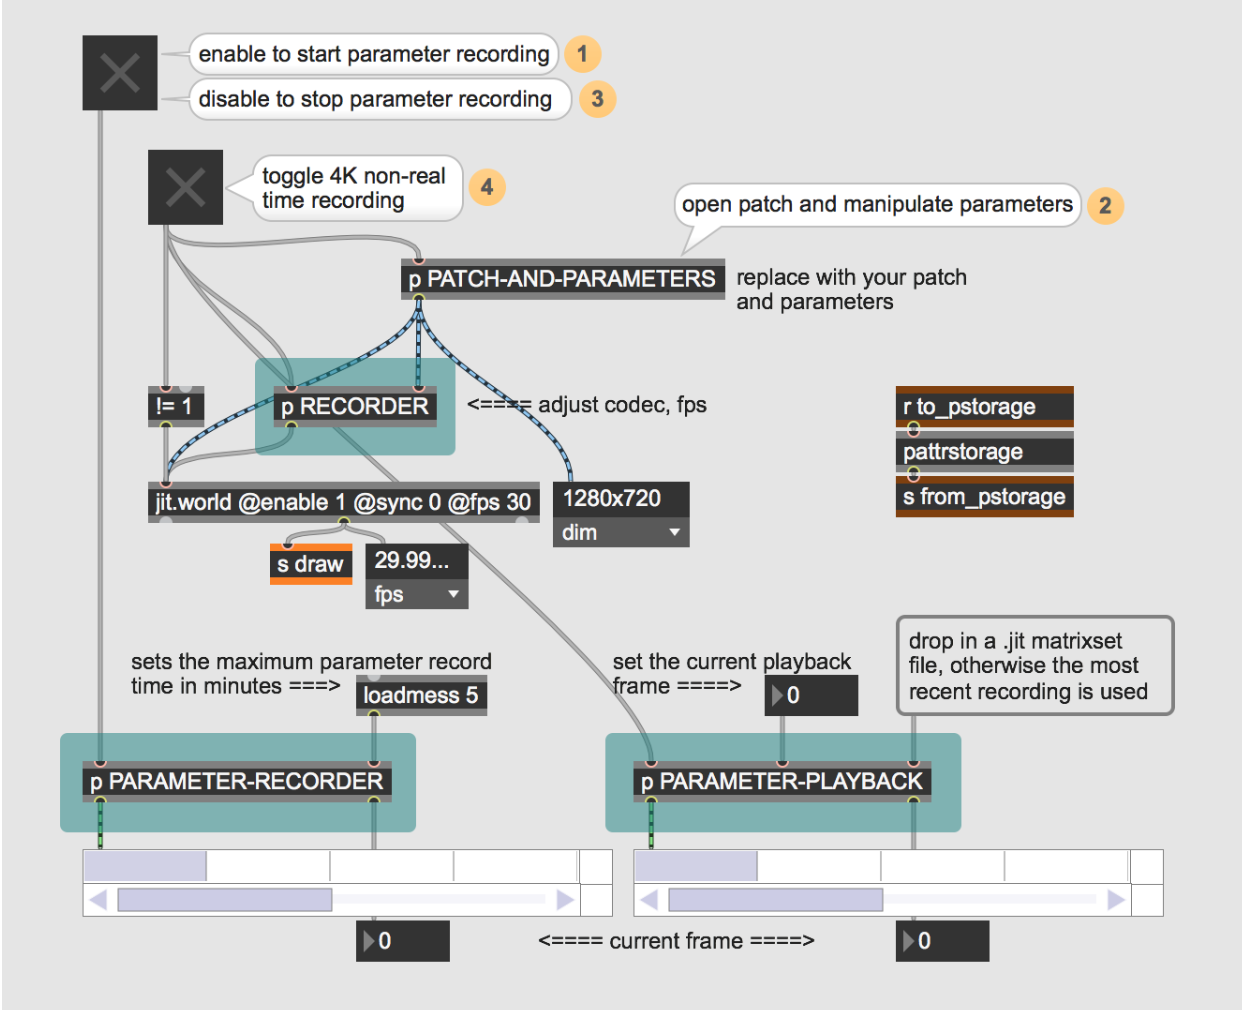
The included patch is intended as a proof-of-concept, and contains 3 modules (RECORDER, PARAMETER-RECORDER, and PARAMETER-PLAYBACK) that can be dropped in to an existing patch. Jit.matrixset is used to record parameter data, and pattrstorage is used to expose parameters for recording. Only single value parameters are supported in the current state (e.g. number boxes, sliders). The patch content is simply an animated jit.gl.bfg. The process for rendering a 4k animated scene is as follows:
Open the PATCH-AND-PARAMETERS sub-patcher to expose the controls. Play around and get a feel for the patch and what you want to record.
When ready to record an animation, enable the toggle on the PARAMETER-RECORDER sub-patcher. Animate the parameters and then disable the toggle to stop the recorder. The patch defaults to a maximum of 5 minutes of recording at 30 FPS.
Click the toggle on the RECORDER sub-patcher. This will do a few things: set the image resolution to 4K, disable the jit.world renderer, and enable playback of the most recent parameter recording.
Once the parameter playback is complete, disable the toggle and your 4K file will write to the Desktop.
Please be aware that the default Mac/avf codec is prores4444 which will create huge files at 4K resolution. On Windows/viddll the default codec is h264. However if high quality renders are desired, I recommend the huffyuv codec (although this will also create a huge file on the desktop). As an optional final step, compress the output file to a more manageable size and codec. To trigger this step from your Max patch, the following steps are needed:
Install the shell external
Install FFmpeg and add it to your path
Send the conversion command to FFmpeg via shell
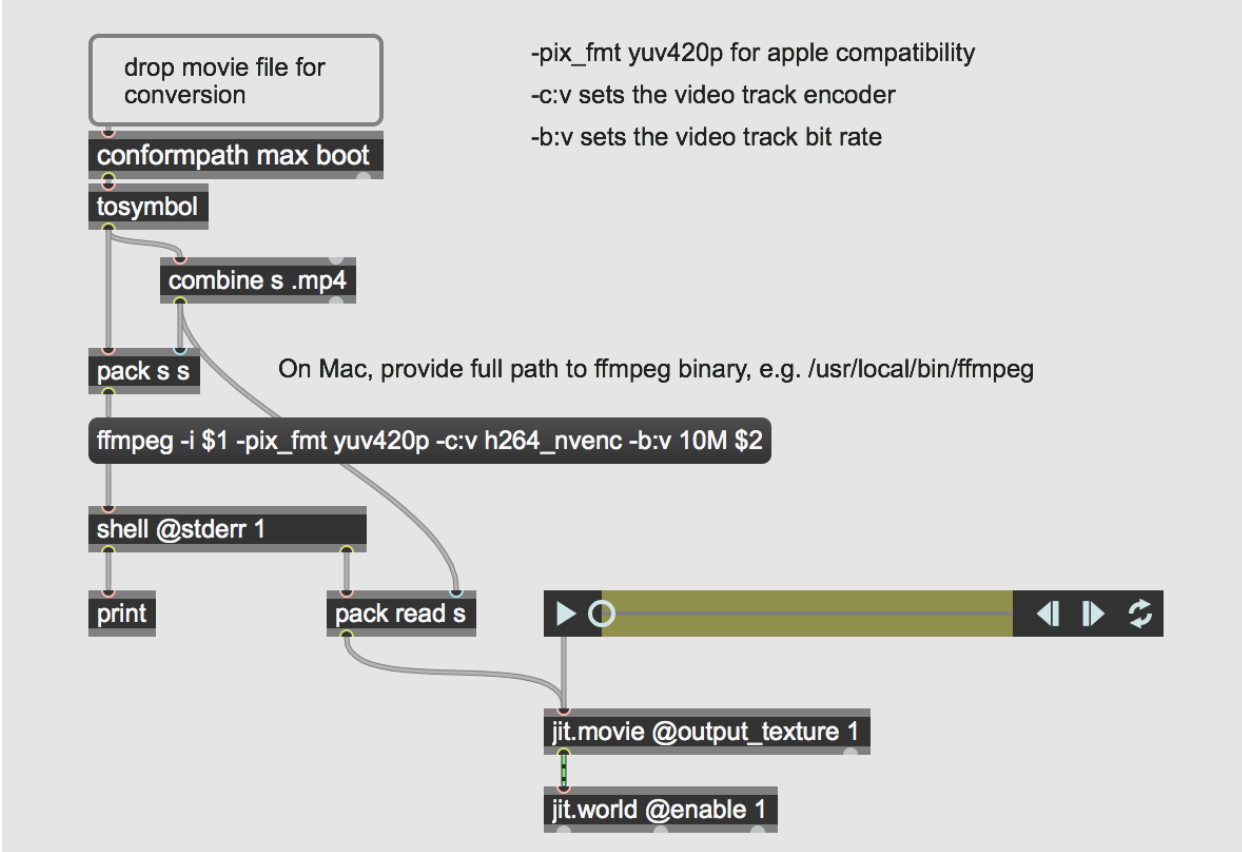
Some form of the following command will convert the source file to an h264 encoded mp4 file:ffmpeg -i source.mov -pix_fmt yuv420p -c:v libx264 converted.mp4
FFmpeg is a powerful tool that will greatly enhance your abilities to manipulate video and audio files. The multitude of commands and options can be daunting, so a cheat sheet is essential. Encoding time can be significantly decreased by using hardware acceleration if supported by your machine. The included patch suggests two h264 hardware encoders to try, one for Mac and one for Windows with Nvidia GPUs.
Learn More: See all the articles in this series
by Rob Ramirez on June 26, 2019


