Synth-Building with Max/MSP #1
This series of tutorials first appeared on my CreativeSynth.com website between 2001 and 2002. Due to their popularity (especially amongst new Max users), I have moved them to the Cycling74.com website. Read the introduction.
I've been using Cycling 74's Max software since 1992 or 1993 (it was Opcode's at the time), and jumped on-board with their MSP software as soon as it was available. Most of the last 8-or-so years was spent reworking some step-sequencers and routers that are important for my music work. However, with recent upgrades to my computers, and a new G4 laptop, I've gotten more heavily into synth building.
Tutorial Series
In reviewing the Cycling 74 discussion forum, I noticed that there have been a number of confused beginners. The Max and MSP manuals are excellent, and have a wonderful tutorial. But when it comes to synth building, the plethora of options can be overwhelming, and some people simply get discouraged.
So, I've decided to create this series on synthesizer building. It's not meant to replace the Max/MSP manuals - in fact, it assumes that you've at least looked through the manuals, and have used them to set up the software for your MIDI system. Also, going through the tutorials will be an important part of your learning process. These tutorials assume that you've been through at least a few of the tutorials, and that you take the opportunity to skim the manual occasionally. The point of this tutorial is to bring focus to a single job - to create excellent software-based synths.
Creating cs.synth_01
Prerequisites for this tutorial:
- You've run through a few tutorials, and know how to select objects and connect them.
- You've set up Max's MIDI system (via OMS).
- You've properly set up Max version 4 and MSP version 2.
- You have a connected MIDI keyboard.
Additionally, you will need the Max object "ddg.mono":
Once you download it, you should place the object and it's help file on your Max search path.
To begin, we will create a simple synthesizer - one that takes our MIDI input and creates a sine wave output. As simple of a synth as can be made. The first step is to get MIDI into our patch.

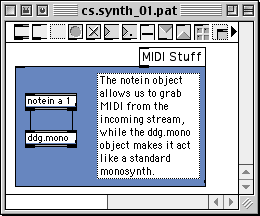
Open a new Patcher (command-N, or File|New|New Patcher from the menu), and add a notein object. The notein object is a convenience object that allows us to pluck MIDI note-on and note-off messages from the incoming MIDI streams. In order to make synth-building easier, I've assigned my primary MIDI controller keyboard to MIDI device "a" (in the Max MIDI Setup dialog). This way, when I'm beginning a new synth, I can simply use "notein a" to use my MIDI keyboard - regardless of what my current setup is.
We will also be limiting input to MIDI channel 1, so the second argument to notein is the selected MIDI channel. Since I prefer to maintain focus on building a synth (and not on MIDI handling), I'll almost always begin a synth-building session with a "notein a 1" object.
Next is a custom external I coded - ddg.mono (get it at the above link). This object simplifies monosynth creation by dealing with last-note priority and note-on/note-off pairing. This one object makes simple synth creation super-easy, and again keeps my focus on synthesis.

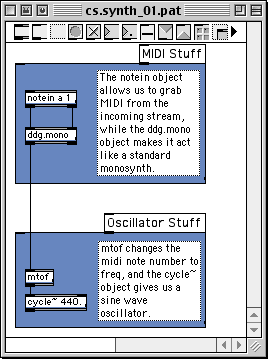
Next, we need to add an oscillator - the sound-generating tool. For this simple synth, we will use a cycle~ object (used for sine-wave generation). We provide it with a default 440Hz pitch, so it will have a valid signal before we send the first MIDI message. While this isn't critical, it's useful for early debugging steps (especially if you are testing oscillators before you have a VCA/amp-mod system).
In order to turn the MIDI note output into a frequency that can control the cycle~ object, we will use the mtof object. This does just what it's name sorta says - it turns "m's" to "f's" (i.e., MIDI note numbers to frequencies). At this point, we really have the most basic of synths - a MIDI controller attached to an oscillator. We need to add audio output, and some way to control key-down and key-up events.

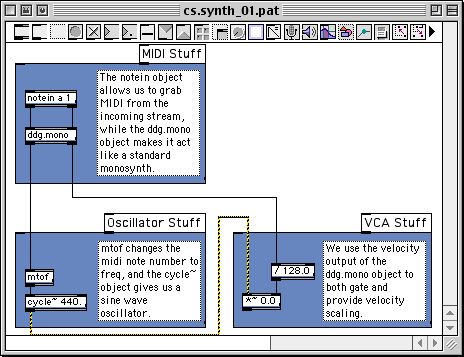
In order to control the synth with keyboard events, we need to scale the output of the synth with the keyboard output control. Since MIDI note-off events are simply note-on events with a velocity of zero (0), we can use a signal multiplication (*~) object to adjust the output level. In audio-world, multiplication serves roughly the same function as mixing - multiply an audio signal by a number and you will change its amplitude.
So, what do we multiply the oscillator output with? Well, the velocity output will run from 0 (note-off) to 127 (full velocity). If we divide that number by 128, we will get a number that ranges from 0 (still a note off) to .9921875 - just under 1.0. Two notes here:
In order to get a floating point number out of the "/" (divide) object, the argument needs to be a floating-point number. That's why we used 128.0 instead of 128.
It's wise to have the output signal never hit 1.0. In my experience, different audio cards respond differently to fullcode output. While reducing the level at this point might be "too early", it is nevertheless efficient and easy. That is why I chose to divide by 128.0 and not 127.0.

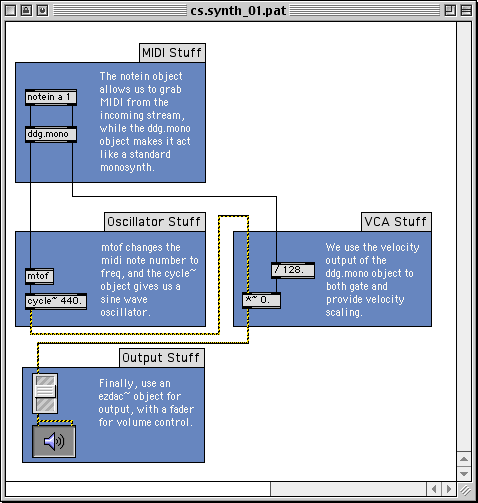
Finally, we need to get the audio signal to the audio outputs. By routing the output of the *~ objects to an signal level fader (the gain~ object), then to an ezdac~ output control, we have an easy output volume and dsp on/off control. To hear the synth, you "turn on" the ezdac~ by pressing the button, turn up the signal volume and play some notes.
If everything is wired correctly, you should now have a simple sine-wave synth with a minimal amount of output control. While this is an exceptionally simple synth, it is the foundation of all the synths we will be building in this series.
To get a complete copy of the above patch (including my cute index-card emulation using panels and message boxes), just download the .zip file using this link. However, I would strongly suggest that you try building this little synth "from scratch". This will help seal these objects into your brain, and you will find that "doing" helps learning much more than "reading".
Next week - better output control using envelopes.
[ddg]
Darwin Grosse
7/15/2001
by Darwin Grosse on August 20, 2007

