Synth-Building with Max/MSP #7
This series of tutorials first appeared on my CreativeSynth.com website between 2001 and 2002. Due to their popularity (especially amongst new Max users), I have moved them to the Cycling74.com website. Read the introduction.
special note: As of Max 5, Cycling '74 no longer supports Pluggo plug-in building. You may be interested in Max For Live, which allows you to build devices for Ableton Live. You could apply many of the techniques mentioned below to build such a device.
Well, in honor of Pluggo 3's brand new release, this tutorial will focus on turning our existing software synth into a full-blown VSTi plug-in. Well, full-blown might be a bit strong - rather, we are going to get it to the point that Cubase, Logic or Digital Performer can host it...
Tutorial Series
The power of Pluggo is quite amazing. I've had to write VST plug-ins in the past - alas, it was so long ago that I've forgotten everything but the pain. While it's a fairly full-featured development SDK, it also demands a high level of programming competency from it's developers. In addition, getting a plug-in to work reliably in Cubase, Logic, Ableton Live (for effects), Digital Performer and RTAS requires a level of commitment that most beginners don't really want to (or can't) take on.
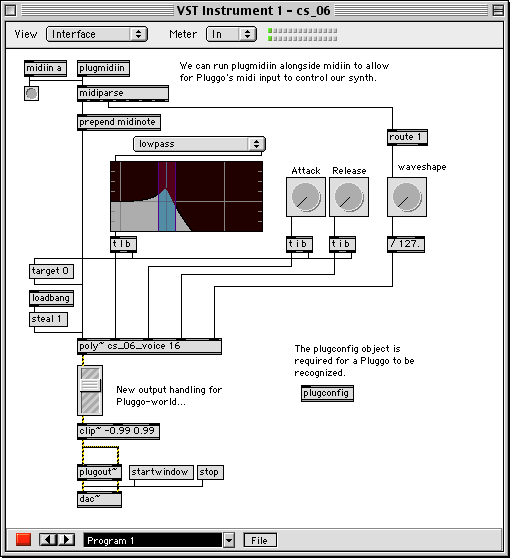
Pluggo opens the door nicely for non-programming-gurus to get into the plug-in game. And, best of all, you can parlay your MSP programming into the VST environment pretty easily. To start with, let's take a look at the new version of our plug-in:
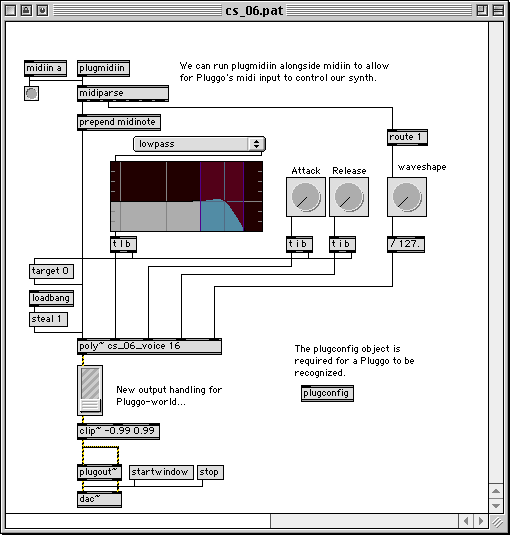
While it looks remarkably similar to the synth from the last article, there are three differences:
The midi input section has changed, with the addition of the plugmidiin.
The audio output section has changed, from an ezdac~ to a plugout~/dac~ combo.
There is an additional plugconfig object just floating there.
Let's take a look at each:
The plugmidiin addition is really quite simple - we've just paralleled the midiin object with a plugmidiin. What plugmidiin does is get midi information from the VST (or MAS or RTAS) environment and translate it to look just like data from a midiin object. So, for our purposes, we just have to feed the output of plugmidiin into the midiformat object and we have MIDI input.
The change to the output section is a bit more complex. First, we traded in the ezdac~ object for a dac~ - this is a bit of a convenience, since we don't want our users poking at a useless button when they are running out VST instrument. "startwindow" and "stop" messages have been added so we can start and stop the audio when we are running this in Max. Next, we've inserted a plugout~ object between the clip~ object and the dac~ output. What does it do? Well, it just acts like a dac~ when we are running the patch as a plug-in.
Finally, that plugconfig object. Believe it or not, this is where all the action lies. If you place a new plugconfig file on a patcher and double-click on it, you will get the following text edit window:
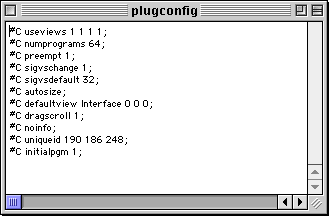
These are your commands for telling Pluggo how to host your patch. While an exhaustive explanation of these messages would be beyond the scope of this article (plus the manual and tutorials do a great job already), we will just look at our "altered" version to see what matters:
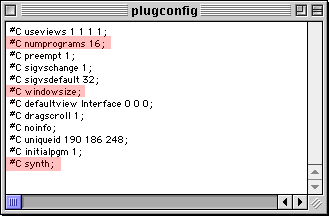
We've changed two lines, and added a third. The first line changes the number of "presets" available from 64 to 16. Why? Because any presets that you list, but don't define, will just be named "Program 1", "Program 2"... When I was beta testing the first version of Pluggo (waaay back when), I was notorious for calling these names "Crap Presets", and that's how most of my C74 friends best remember me. Since we won't be defining presets until the next tutorial, I want to at least limit the number of "Crap Presets" to 16.
Next, we've changed the autosize message to windowsize, so that our definition of the window in Max will be honored by Pluggo. There are other sizing options, but for now we will just use the Max window size.
Finally, we added a "#C synth;" message to the list. This is the key for Pluggo to see this patch as an instrument (meaning that it will see MIDI input) rather than an effect (which will receive audio input). By adding this one line, we are defining our plugin as an instrument, and it will automatically show up in Cubase's instrument panel.
Once we've added the appropriate objects, and edited our plugconfig settings, we need to begin the "Pluggo-izing" of the patch. The first step is to save the patch as a "Collective". Not familiar with them? I wasn't either until I started working on Pluggo patches. Never fear - they are nothing to be afraid of. Just select the "Save As Collective..." menu option and hit the "Make" button. You will get a standard "Save As" dialog, where you name your plug-in.
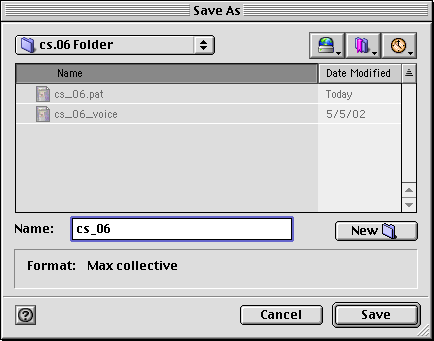
One very critical point here - the name of the collective will be the name that the host application (Cubase, Logic, DP or Pro Tools) will assign to your plug-in. By default, the "Save As Collective..." option appends a ".clct" extension to your patcher name. This wouldn't be good, since a plug-in named "cs_06.pat.clct" would look pretty silly in the Cubase or Logic plug-in menu. So, as I've done above, take off all the extensions so the plug-in will be named simple "cs_06".

Hit the save button, and Max will grind for a minute. When it is done, you will have a Collective file wherever you chose to save it. The next step is to run it through Plugmaker.Plugmaker is a magical program - it does stuff that nobody will discuss, but it does it consistently and well. To make a plug-in, you need to drag your new collective onto Plugmaker. In about a second, a file "cs_06.pi" will be created - a valid Pluggo plug-in! Just wait, though - no celebrating. One of the tricks with Plugmaker is that it is a two-step process. You need to take your new ".pi" file and drag it onto Plugmaker again. This does additional voodoo, and completes the plug-in making process.
The result of these few steps is a completed Pluggo plug-in. Drop the result of this exercise (currently named cs_06.pi) and drop it in the "VstPlugins" folder of your host application; run the app, and cs_06 will appear in your list of available instruments.If you are reading this at work, and don't believe it could be that simple, just take a look:
There you go - a 16-voice polysynth with simple waveshaping controls, runnable within Cubase, Logic, Digital Performer or Pro Tools. Believe me, if you tried to do that with a bit of C++ code, you'd wouldn't be done for several weeks (if ever).
Next time, we will be going over the creation of presets and setting up storable parameters. In the meantime - keep that Plugmaker hopping!
The files for this tutorial are available from the following link: cs.06.zip
[ddg]
Darwin Grosse
5/26/2002
by Darwin Grosse on August 20, 2007

