Synth-Building with Max/MSP #8
This series of tutorials first appeared on my CreativeSynth.com website between 2001 and 2002. Due to their popularity (especially amongst new Max users), I have moved them to the Cycling74.com website. Read the introduction.
As promised, we are going to clean up our previous synth-building patch, create some presets and, well, clean it up some more.
Tutorial Series
Adding storable parameters.
While having a Pluggo-based VST plugin is cool, it isn't quite as cool as having one that can store and recall its settings. For most occasions, the MSP object that you will use for parameter handling is the "pp" object. (No snickering - I'm sure it stands for Pluggo Parameter.)
One thing that is a misconception is that pp's parameters have to exist in the 0.0-1.0 range. Not true - you can tell pp what the range and type of your settings are, and pp will handle all of the translation for you.
So, to use pp, we need to lay them into the patch, connect them to our UI objects, and loop the output back to the input. This seems to violate Max's "don't make loopbacks" rule, but pp is smart enough to stop any unwarranted looping.

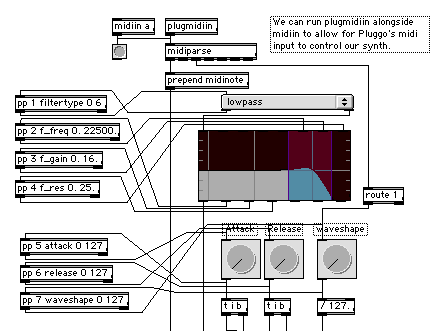
All of our onscreen controls are pretty straightforward except that pesky filtergraph~. What to you connect to what? The best bet is to use the freq/gain/resonance outputs as separate parameters, and loop them back to their appropriate values. Also - don't forget to set the "filter type" menu, otherwise you'll get unexpected results when you restore a patch.
Below is a snapshot of our "pp'd" patch, with the appropriate ranges entered into the pp objects. Note that the filtergraph~ ranges are pretty obscure - you will want to copy these settings for your future use...
Telling plug.config what we want to do.
Now that we have a prepared patch, we need to save some preset. But, um, how do we do that?
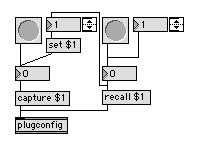
I've created a standard construct that I use in every single Pluggo patch that I create:

This little setup allows me to call up any preset I save, and also lets me save a patch with a single click. This is another one of those "save-it" bits - you will find it in all of my patches, and I'll bet I find it in all of yours!
Creating those presets.
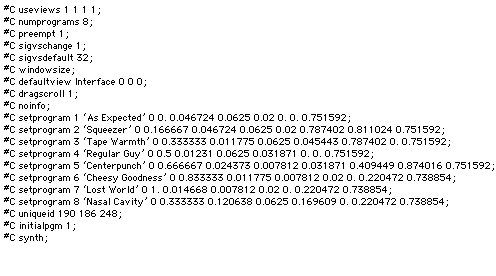
So, we need to go about creating and saving presets. Not a problem - with the above construct, we make patches, hit the button and we are set. Well, not quite. While this will allow us to save the settings, it does nothing to save a patch name. You can actually jam a name into the plugconfig, but there is no way to access and edit it.
There are two ways to name patches. First, you can double-click on plugconfig and hand-enter the names into the patches. This is most convenient. However, there is one downside. If you are using int parameters (which are converted into floats by pp), opening and editing the plugconfig file can change your settings by 1. Why? This has to do with rounding in Max, and also with display precision in the editor.
It's not worth much more talking about - just be aware that extremely fiddly controls (like anything that stores text characters or menu settings) might suffer from plugconfig editing.
The other option requires a) a copy of Cubase, b) a valid Pluggo license and c) the willingness to get it "right". If you save a Pluggo patch with the default names, then open the patch in Cubase, you can edit the names of each of the patches. You can then save the patch bank from Cubase and load it into plugconfig when you reedit the patch. A hassle, but this is the way you have to do it when the settings really matter.

In our current case, we don't have to be that worried about it. So - double-click the plugconfig object and edit away! Make sure that, after editing, you double check all of your patches to make sure that nothing went awry.
Other cleanups.
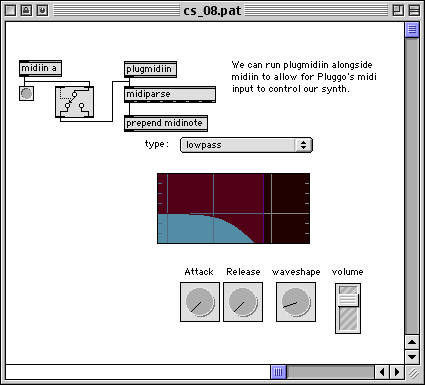
Well, before we call this complete, there are a few bits and pieces to clean up. First, since they don't really work in Pluggo world, we should hide some of the objects in the patcher and make the whole thing more compact. In this case, I've moved the volume slider next to the envelopes and hid all of the "details" below. I've also reduced the size of the patcher, so that we'll only see as much as we need...

Also, I've added a switch to the midiin object. It turns out that some sequencers (Digital Performer in particular) will pass MIDI from both midiin and plugmidiin - so if both are active in a patch, you will get doubled notes. The Gswitch will allow you to turn on midiin when you are playing with the patch (or if you decide you like doubled notes in DP).
Conclusion.
Once these final details are complete, we are ready to fly. Create a collective (again), run it (twice!) through plugmaker and we have a spanking new Pluggo, complete with cool patches.
Hopefully, this helps you tweak your own creations into shape. If you make a cool Pluggo, make sure you let me know (and send me a copy)!
The files for this week's tutorial are available at this link: cs.08.zip
[ddg]
Darwin Grosse
6/13/2002
by Darwin Grosse on August 20, 2007

