The Video Processing System, Part 3
In the last installment of the Video Processing System we left off with the beginnings of a basic live effects chain with basic compositing, blur, and color effects. Now that we've spent time building some basic interface wrappers for the jit.gl.slab object, it's time to start diving a little deeper. In this installment, we'll be working on some more advanced ninja tricks - creating the beginnings of a control/preset structure with assignable LFOs, and building a GPU-based video delay effect. These two parts will bring our system to a much more usable level, and allow for much more complex and interesting results. Ironically, most of what we are really doing in this installment is just an extension of bread-and-butter Max message passing stuff.
Download the patches used in this tutorial.
Download all the patches in the series updated for Max 7. Note: Some of the features in this system rely on the QuickTime engine. Using AVF or VIDDLL video engines will not support all functions. On both engines you may see errors related to loadram or have limited access to file record features.
Tutorials in this series:
Ghost Images
The first thing we'll look at is the GPU video delay. Everybody knows you can use the jit.matrixset object to store and recall matrix frames, but there is not a simple object solution for doing the same for OpenGL textures. Since textures (once they enter into the jit.gl.slab world) reside on your GPU's VRAM, and "readback" from the GPU to Jitter Matrix always comes at some performance cost, it often doesn't make any sense to convert back into a matrix just for one stage of processing. This also makes creating an efficient video delay in a slab-based effects network very difficult. Like any other difficult problem in Max there are a lot of different possible solutions. Here we will use texture capture - a technique that will open up a whole ton of possibilities once you understand how to do it.
Texture capturing means rendering OpenGL graphics directly to a texture, instead of drawing it onscreen. This captured imagery can then be used as a texture to render other things in your scene. You can use the @capture attribute on any OpenGL object to define a texture to capture to. This allows you to do things like create multi-pass rendering chains and is actually how the jit.gl.slab object works internally.
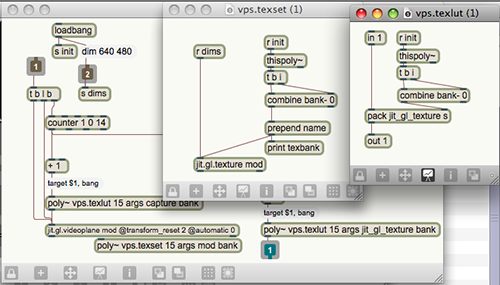
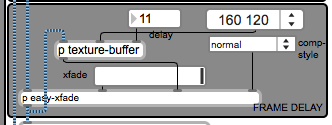
Let's go ahead and open the "texture-buffer" subpatch. Inside that patch, you will see three poly~ objects loaded with the abstractions "vps.texset" and "vps.texlut". The "vps.texset" abstraction just has a jit.gl.texture object and some gadgets to name and set the dimensions of that texture. This will act as our texture buffer. The important thing is that each of the textures loaded up in this poly~ is named something predictable so that it can be accessed elsewhere. The "vps.texlut" patch is the all-purpose reading and writing mechanism for the texture buffer, depending on the arguments. By relying on poly~ "target" messages, and knowing the attributes and messages that I need to send to the involved objects, we can easily patch together a very simple interface for the texture buffer.

The way the delay works is that each frame that comes in gets applied to the jit.gl.videoplane object, which is set to capture to a texture inside of "vps.texset". Each frame decrements a counter that sets which texture is captured to using "vps.texlut". We then add the frame delay amount and pass a delayed frame out of the outlet via "vps.texlut" sending "jit_gl_texure" messages. The modulo operator makes the delay patch function like a circular buffer, similar to tapin~/tapout~. To complete the effect, we have a simplified version of our compositing abstraction that allows us to combine the delayed version with the current frame. This is setup as a simple composited feedback network. More effects could be added to the feedback loop to create more extreme and complex looks.

Remote Control
Still with me? Good. Now, you could spend the rest of your days coming up with cool new video effects, but one of the most powerful tools of both video and audio performance is the ability to change things over time in interesting ways. Creating a robust structure to control your video system will allow you to do more than just apply a series of filters. So how do we create this structure? For starters I would like to review the fact that from the beginning we've been very nitpicky about maintaining a standardized interface to our modules (0.-1. values). This is going to make it a lot easier to create generalized controls for these values. At the center of our control system is the object pattrstorage. This object acts as our hub of communication with the UI objects in the patch and allows us to also save the state of the patch if we want to. In order to get our UI objects talking to pattrstorage, all we have to do is drop an autopattr in our patch and give each of our UI objects a Scripting Name. I recommend using meaningful and unique names for your controls, as you will want to be able to know the difference later.
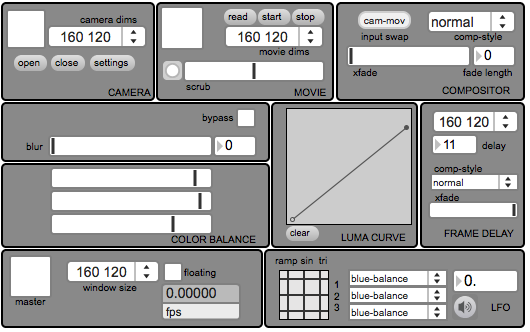
Once we've got these items in place, you can easily "remote control" your UI objects by sending "objectname $1" messages to pattrstorage. The beauty of this is that there is no complicated send/receive network and state saving is also built in to the same system. With this in mind we can now create an assignable LFO using some simple Max tricks. If you peek inside the "menu-loader" sub-patch, you'll see that it's just some objects to send and receive messages and then parse the results. This subpatch sends a clear message to a umenu, queries the pattrstorage for the names of the controls in our patch with "getclientlist", which are then formatted so that a umenu can be loaded with the results. This gives us a menu full of available controls. Now, the cool part is, each time you add a new UI object and name it, the name will automatically pop up when you load the menu again. To generate the LFO waveforms, I just grabbed an abstraction I had lying around. The resulting values are then packed up with the object Scripting Name and sent to pattrstorage. Note that audio must be on for the LFO to function.

Going Further
Both of the modules we have added this installment are things that can be extended in many different directions by just using some Max techniques. The texture delay module could be extended to sequence delayed frames or play them randomly for more unpredictable motion, and any number of shivering and shaking can be introduced. The pattr-based control system can be used to map a physical controller to the UI, to generate any number of LFOs, or modulate things with other data sources. In our next installment, we'll revisit the movie-player and look at options for recording our output to disk.

by Andrew Benson on April 6, 2009

