Working with Hardware: Livid's Code (Part Two)
In part 1, Darwin showed us all the fundamentals behind step sequencing in Max, and extended that from the computer to the controller. With hands-on, real-time, improvisatory control over a sequence, he articulated the technical know-how to experience the joy of Max.
In this article, I'll explore a step sequencer that accesses multiple sequences on different pages, geared towards drum programming, and provides a foundation for growth and room for curiosity.
When Darwin asked if I'd add to his series, I was already in the ecstatic throes of creating a Max for Live step sequencer (for a different Livid MIDI box, the CNTL:R), so it was a natural transition to adapt that device to work directly in Max and with the Code controller. I've been looking at the Code as a nice platform for a step sequencer ever since it came out, and this article was a good kick in my butt to get this project going.
Before I go into my motivations, technical details, and name-dropping of Max objects, let's have some fun and see what this sequencer can do:
In the video, I take you through using the controller to access the four different sequences using the left-side buttons, controlling the sequences using the top 2 rows of encoders (and their buttons), and explaining how the bottom row of encoders work, each of which can act as a different control, depending on the toggle setting of the encoder's button. The patch assumes you have the free and open-source TAL Noisemaker plugin (available for Windows and Mac).
Stick around to the end of the article where there's another video featuring some different sounds from the Aalto plugin, demonstrates some of the other features, and suggests how to get more avant-garde results from the simplicity of a step sequencer.
This is a fairly ambitious patch, and you may experience some pain-on-the-brain. However, I've made a lot of comments and documentation available throughout the patch to help you understand the principles at work. I've also worked hard to avoid presentation mode in the Main patch, forcing it to be neat and explorable. Hopefully, if you read through this article, and maybe try altering some of the assignments to see what happens, you'll become comfortable with making this instrument your own.
Considerations for Controllers with LEDs
It's easy to get carried away with "possibility" and "potential" with all these buttons and knobs on the Code. Before I start hooking up MIDI to my patch, I need to wrangle all these options into sensible, meaningful ways that don't require a lot of patching.
As a Max user, you've probably noticed from the sheer array of button options (textbutton, live.button, button, live.toggle, toggle, pictctl, matrixctl, radiogroup, tab,…did I miss any?), so the term "button" is a loaded one.

There's several modes for this button thing: momentary, toggle, and radio, and they all require their own considerations when patching. The Code itself is a pretty "dumb" controller - it's designed to work with a computer, so it leaves all the hard decisions to the host software, rather than trying to accommodate several different types of button logics in its internal firmware and limited onboard memory. That means when programming in Max, we have some work to do!
Similarly, the encoders add a bit of a kink to what might seem a simple task of sending some MIDI cc's and hooking them up to a UI object. Because we now have four sequences to work with, we want the encoders LED rings to update their displays so they relate to the data in the sequence we just chose. This means when you select a sequence, you want to have all the current values handy to send to the controller instantly so you can keep making music.
For the more casual user of Max, this type of stuff can be a bit overwhelming. Max lends itself to rapid programming, and quickly realizing ideas that come from the thing you just built. This is what makes it fun, but when it comes to "clerical work," like making sure your controller is updated with all the right values, you can sometimes patch yourself into a knot.
Because I deal with a lot of different controllers (I see seven in front of me right now!), I've had to constantly refine my practices to accommodate new controllers, not only from Livid, but from other manufacturers as well. As such, I want to make things flexible enough to take different, arbitrary midi messages in, scale the 0-127 in to whatever I need, control my patch, and take UI data from my patch and be able to translate it back to MIDI so I can send it to update the controller. I also want to be able to redefine these assignments on the fly. The current state of this art is mostly encapsulated in the js midi2mess.js.

As a result of all this work and a centralized communication system, people who have other controllers not named Livid Code (but, hopefully with the word "Livid" on it!) can adapt this patch to their own controllers without ever having to touch a patch cord.
The Big Picture: MIDI in, Message out. Message in, MIDI out.
If I press a button on the Code, this button might need to go to somewhere in the main patch, in a subpatch, or even in a subpatch-in-the-subpatch.
And when I press it, I want the UI on the screen to update.
Similarly, when I press a button the screen (which might live in the main patch, or in a subpatch, I want to know that it happened, and tell my controller that this button has changed.
Many patches often handle this type of inter-patch communication with the send and receive objects. However, pattrstorage provides a much neater, consistent, flexible, and elegant way to deal with all of this data.

As a result, I tend to avoid send and receive as much as possible, and use pattr to provide hooks to pattrstorage. My relationship with send and receive is not unlike my relationship with pets: I have lived with pets, and enjoyed them, however, now that I do not live with a pet, I do not miss cleaning up after them, and I like having an untorn sofa! Take a look in the patch "About pattrstorage" to read more about how I use pattrstorage to communicate in my patch.
I use javascript (midi2mess.js) to handle the MIDI data. While this may have some cost in speed, it creates a very flexible system that integrates in a nice cycle of life with pattrstorage.
Metaphorically, it's like the rain and the earth: pattrstorage rains data on the land of my javascript. The data evaporates on the javascript and floats back up to the pattrstorage, where it rains again. Except it all happens instantly and precisely, no flooding occurs, the streets are still safe to drive on, leaving writers safe and dry to stretch their metaphors to unpoetic lengths.
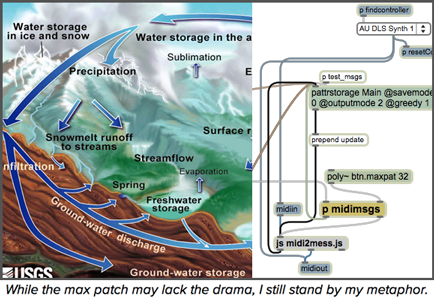
If this system is confusing to you, or you want a "safer" place to wrap your head around it, take a look at this patch.
The Max Patch Overview
I've structured this patch so that it's not too complicated in its structure.

There is some patching to find the Code controller automatically and provide midi input and midi output.

A pattrstorage object in the main patch that provides links to all the parameters in the patch and its subpatches, as well as an output of all the message changes in the patch that can be fed into the...

Javascript "midi2mess.js" takes midi input and matches it up with the "pattrstorage paths" that we've defined with the "latch" message. This is fully documented in the patch itself, so I won't waste valuable blog space boring you with that! Suffice to say, it translates MIDI into a message that pattrstorage distributes to the right place.

A patch that creates "latch" messages for the javascript to link MIDI commands to various parameters.

There is a simple abstraction, used four times, to host VSTs, one for each sequence.

There is another small abstraction to host timbre effects for the resonating bank of filters and the lowpass filter.
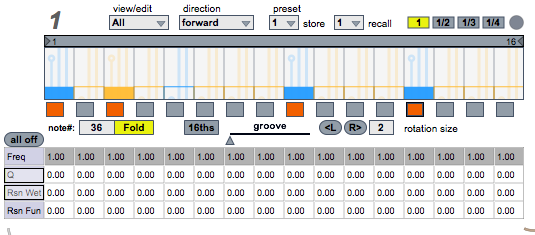
The four sequences are in bpatchers that output notes for the synth plugins and control data for the timbre effects. These are moved around by some simple scripting commands for thispatcher, so your chosen sequence is always at top.
The Stepper: "stepseq.maxpat"
I won't go into the level of detail that Darwin did - he covers most of what is important in creating a stepping system, and I use most of the lessons to create a more feature-rich system. Again, I'll speak more to my goals and some of the challenges these present, and how I worked those problems into something manageable.
Because this project is branched from a Max For Live device, I use a lot of the UI objects that come with Max for Live. While these provide a bit of a different look than regular Max UI objects, the main reason to use them is that their built-in "parameter mode" provides links in to Live's state retrieval system. This made it easier to design something robust that makes it work "as expected" in Live, so the sequencer returns to the way you left it after you saved a set. It also provides a more capable user interface that I would have cared to build from scratch: the live.step provides multiple layers of editing, easy note editing, and sliders and colors to provide nice on-screen feedback from using the Code. Because live.step has a helpfile, I won't go into the details.
However, I had to make some adjustments to get the live.step working in my system of pattrstorage-based messaging, as well as create step "enable/disable" toggles that provide added visual feedback in the live.step UI that a step is "off."

The bulk of this work is handled in the subpatcher "p steps" and the array of 16 live.toggle buttons, paired with pattr objects. This paring of pattr+live.toggle give me messaging connections to and preset storage for pattrstorage. Because live.step uses lists to communicate, I need to break up those lists into their individual components so I can use individual controls on the Code to talk to them. This required a decent amount of objects and connections, but you'll notice that this was mostly scripted into existence, and neatly contained in a subpatch.
Growth (a.k.a. "your turn")
While this patch presents a fun and playable instrument, I definitely leave a lot of room for growth and user-decisions. Here's a video that shows of some of the other features in the sequencer that could be mapped to the controls of the Code or are good for programmatic control:
In the video, I use the "chance" elements to create random variation, loaded a different plugin (Aalto from Madrona Labs) and made a really simple "LFO" to modify the tempo. The result is vastly more avant-garde than the first video, and can help you shore up your academic street-cred.
Here are a few ideas that I have for modification:
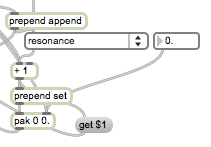
The VST and "timbre" areas are ripe for refinements. In fact, if you have a favorite VST, it would be a worthwhile project to scrap my "timbre" effects and tie the controller directly into the parameters of the plug-in through the vst~ object using the filters, envelopes, and effects that might exist in the plug-in. This would mean you'd have to create some new midi+message definitions, create some new pattr objects in the "ez-vst.maxpat" abstraction, and change the messages sent from the cellblock in the "stepseq.maxpat". Check the vst~ and the "ez-vst" helpfile to see how to send messages to change the parameters in a plugin from your Max patch.
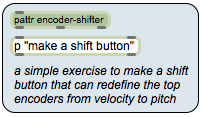
There are also some notes on how to create a momentary "shift" button that will reassign parts of the controller to completely different parameters in the patch. This type of thing is pure gold when working with the finite realm of a controller and the infinite world of software, since you can expand your controller with different pages and modes without adding more hardware.

The Clock subpatch in the "stepseq.maxpat" also has a highlighted area of a project worth finishing up by a curious user. This has some hints on how to create a "fill" sequence - a different sequence that would play every "n" measures that would be different from your main sequence. This would provide some really cool variations in a sequence.
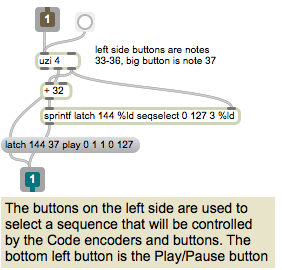
Expand from four to eight (or even 16!) sequences, and move the sequence selectors to the bottom row of buttons. This would entail duplicating the bpatchers, making sure they have the correct scripting name and arguments, and re-defining some of the midi & message assignments.

Because everything is designed around pattrstorage, you can experiment with creating patterns (and using the code to fire those patterns off), and even using the nodes object to interface with pattrstorage for some radical interpolation.
Finally, there's no reason the step interface needs to be so small. Make it bigger so you can put your computer farther away!
I hope this writeup and patch are clear enough for you to dig in and modify. But before you do, spend some time just PLAYING with it and make some music. Feel free to contact me with any questions.
Resources
by Peter Nyboer on January 17, 2012

