Making Connections: Camera Data

Coming up with ways to get information about the physical world into Max is one of the most fun aspects of working with the software. Whether it is for video processing, sound creation, or any other type of output, physical interactions provide a space for much more interesting relationships to develop.
Unfortunately, many ways to get this information into Max require the user to get comfortable with connecting wires to circuit boards and understanding basic (and sometimes not-so-basic) electronics. For this reason, camera-based interactivity can be pretty enticing. There is also a reasonably low startup cost and plugging a camera in is usually a pretty user-friendly process. In this article, I will share a couple of basic techniques for using affordable webcams to gather data in MaxMSP/Jitter.
Download the patches used in this tutorial.
First, You Need a Camera
To get started, you will need a camera that you can access from Jitter using jit.qt.grab (or jit.dx.grab on Windows). A lot of laptops have built-in cameras now, which should work fine to get started. Eventually though, you will want to move on to a higher quality input at some point. Now, I'm often asked which camera I would recommend for use with Jitter, and this is always a really difficult question to answer. You can pretty much figure I haven't tested anything that costs more than $200, but here is a list of features I look for when purchasing a camera for live video and computer vision projects:
1. "Tossability" Factor - If I don't feel comfortable tossing something into my messenger bag and jumping on a bus with it, it will probably never get used. For this reason, an ideal camera should be low cost, easy to protect from damage, and reasonably small.
2. Compatibility with Jitter - On Mac, this means having Quicktime compatible drivers. Firewire cameras are usually supported by the generic DV or IIDC-1394 Quicktime drivers. There is also the open-source Macam driver that supports a wide range of USB webcams on Mac OS X. If you use Windows, you will want to make sure the camera has Direct X compatibility.
3. Control - Don't let the camera make any decisions for you. When shopping for a camera, you want something that allows you to override the automatic image adjustments and gives you the ability to manually focus the lens.
I currently own two cameras that satisfy these needs fairly well. The first is the Unibrain Fire-i Board Camera. This little workhorse connects via FireWire 400, is supported by the IIDC Quicktime driver, and features a standard m12x0.5 screw mount lens holder. The 1394store website has a good variety of inexpensive lenses you can purchase with the camera, and also sells a C-mount lens adapter for use with higher quality lenses. Since focussing is done by manually screwing the lens in its mount, there is a great deal of control over focus. As a beginner's camera for Jitter, it does pretty well.
The other camera is a PlayStation 3 Eye camera. After reading the rave reviews of this camera on Create Digital Motion, I purchased this camera for a recent gallery installation. So far, I admit I have been really impressed by the quality and reliability for such an inexpensive camera. The PS3 Eye is a USB camera that requires downloading the most recent Macam component to get it working on Mac OS X, and there are supposedly some third-party drivers available for Windows as well. There is a lot of discussion about this camera on the NUI Group forums, and there are even detailed instructions for opening it up and modifying it. For the tweakers out there willing to pry open a plastic bubble and install third party drivers, this is a pretty excellent solution.
How Much Action?
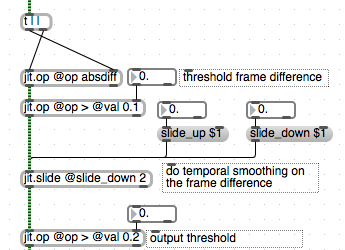
The most simple way to detect motion in video is to do a simple frame-differencing operation. This finds the difference, for each pixel, between successive frames. Combined with a threshold, it is easy to find which pixels have changed between frames and use that as an indicator of how much movement is happening in the scene. The middle (mean) outlet of jit.3m can then be used to calculate the number of pixels that are above the difference threshold. An example of this can be found in the "frame-differences" patch. Since the middle outlet of jit.3m gives the mean of all the pixel values, you can simply multiply that value by the total number of pixels in a frame (width x height) to get an absolute pixel count. For most purposes though, the average value is perfectly useable.

From here, you might want to know if this motion is happening in a particular region of the scene. To do this we can do a very simple masking operation. We simply supply a matrix with white pixels to designate a region of interest and multiply the output of our frame-differencing patch by this mask. This turns the pixels outside of our mask black, so we only see white pixels when there is motion inside of our intended region. Once again, jit.3m can be used to calculate the number of white pixels to give us a useful value.
Yet another approach is to track the location of motion using the jit.findbounds object, which will give you the top-left and bottom-right corners of a rectangle that contains all the pixels in a specified range. Taking the average of these two locations will give you the center of the rectangle (subpatch "motion-location).
Silhouettes
Another classic technique for video tracking is to backlight the foreground subject or position in front of a bright white wall so that there is a distinct contrast between forground and background. By running the video image through a luminance threshold, we get a silhouette image-mask. This can be used for compositing or detecting whether a virtual object is inside or outside of the silhouette. Note that in order for this to work properly, you will need to have a certain amount of control over the environment. The benefit of this, of course, is that the detection algorithm doesn't have to be too smart in order to get useable results. The "silhouettes" patch shows a basic version of this idea, with the ability to accumulate an average background image for to account for slight variations in the backdrop.

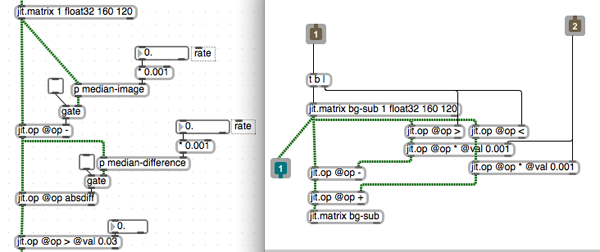
If you don't have access to a situation that provides the necessary luminance contrast for the above method, a technique called "background subtraction" can sometimes be used to detect a moving shape. In essence, frame-differencing is a form of background subtraction, but in a very simple form. A more advanced technique is to take a median of several sampled frames to act as your background image, and compare the current pixels to this image. Rather than collecting bunch of frames to calculate a median, we can create an "approximate median" using the "median-image" subpatch. We also take the median difference to correct for things like noise and background motion.
Luminance keying can also be a very useful for generating silhouette masks, although it often requires some very specific scene preparations as well.
Other Approaches
Once you've exhausted the possibilities of background subtraction, you might find yourself desiring more advanced algorithms for computer vision in Max. For this, I would highly recommend the free cv.jit externals written by Jean-Marc Pelletier. This highly useful set of objects provides a variety of tracking algorithms (blobs, features, optical flow, etc.) in the form of compiled objects and simple abstractions. In addition to that, there is Cyclops, originally written by Eric Singer and sold by Cycling '74, as well as SoftVNS by David Rokeby. There are also many resources available online for further study.
by Andrew Benson on October 26, 2009

