
Expand Your Guitar, Vol. 1
An introduction to using Max/MSP for guitar processing
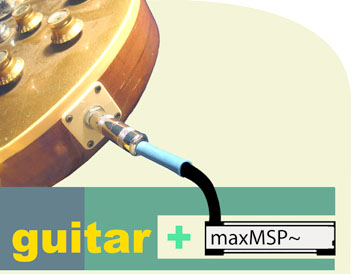
Max/MSP can be a very powerful tool for expanding the sound of a guitar (or any instrument for that matter), and for performing some truly unique processing on your guitar sound. I've teamed up with Ben Bracken for this simple tutorial that will get you shredding your shreds faster than you thought possible. This article will address the essential hardware concerns and introduce some basic concepts in designing guitar effects in Max. If you want to do more with guitar processing in Max, check out Darwin's series Max 5 Guitar Processor which has been updated for a more recent version of Max - Max 8 Guitar Processor.
Hardware
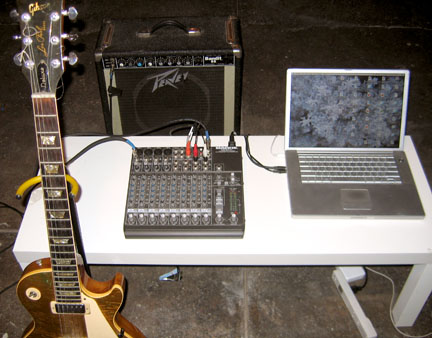
The first step in creating our guitar-processing rig will be to gather and assemble all of the necessary hardware. Depending on your existing setup, there are a few possibilities for hardware configuration. The basic theory is that you need some piece of hardware to accomplish each of the following roles:
Guitar - If you are reading this, you probably already have one of these. For this tutorial, any electric guitar will work, or for that matter, an acoustic guitar with a pickup (but watch that feedback!).
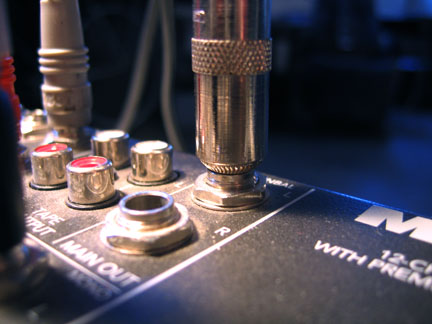
Pre-amp - We'll need something that takes the rather weak output from the guitar and amplify it to line level. You can use any device that provides some gain to your signal. If you are using an external audio interface, it may have at least one gain-enabled track for this purpose. There are also several affordable options, including basic mixers and amplifiers, available at your favorite music gear supplier. For our example, we'll be using a small mixer with AUX sends to do this work.

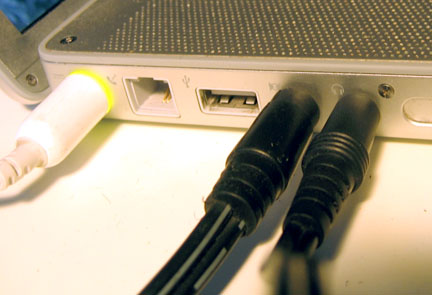
Analog/Digital Interface - We need some way of turning the analog audio signal into a digital one that Max/MSP understands, and then sending our audio back out into the analog world. The easiest one is just to use the built-in audio jack on your computer. Although this may not have the most pristine quality, this should be sufficient for our uses. For those of you with more exacting standards for audio fidelity, there are a number of higher quality audio interfaces available.
Output - If you are just playing for yourself, and recording to disk, any old pair of headphones will probably work for this. If you are performing for others, or don't like wearing headphones while you play, you'll need some sort of amplifier or PA. Once again, if you are reading this, chances are you've got a guitar amp lying around that will serve this purpose.
Connectors - You will probably need a small collection of little adaptor plugs, depending on the types of connections provided by your hardware. For example, your audio cables probably are mono 1/4" plugs and the built-in jack on your laptop is probably a stereo 1/8" jack. Audio adaptor plugs are usually pretty cheap, and are the type of thing you always need more of. Stock up on some common ones for good measure.
Once you've got all this gathered into a room with your computer, you are ready to hook things up. Here is a diagram of the basic setup:
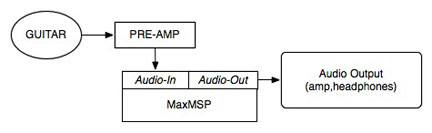
In this diagram we're using a preamp to boost the signal to the computer, and then sending the audio outputs from the computer to headphones or a guitar amp.
Ben suggests a more flexible and possibly more cost effective setup, involving a small multi-track mixer that features Aux Sends. What makes this setup more effective is that you can bring the computer output back as another channel in your mix, so you can mix the clean channel with your processed sound. A multi-track mixer also offers the possibility of incorporating other sound sources like vocals to your rig. Here is a diagram of the mixer-based setup:
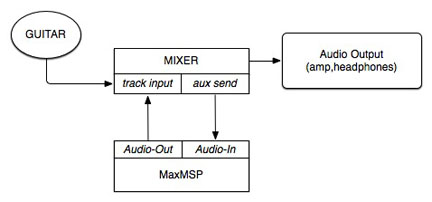
In this setup, the guitar is jacked into a gain-enabled track on our mixer. The signal can be turned up by using the 'trim' pot usually located in the top of the channel strip. Set your channel fader at 'unity' (right in the middle) and then adjust your trim to the desired level. Many mixers also feature at least a basic tone control, which helps to reduce the amount of signal-conditioning we need to do in the digital realm. The Aux Send is then routed to the Audio Input of the computer. If you have a mixer that offers a pre-fader Aux Send, this is useful in order to control how much is being sent to the computer regardless of the channel's volume level. Pre-fader Aux Sends takes the signal from the channel just before the channel fader, and post-fader takes it just after. The volume of guitar signal going to the computer is controlled by the track Send knob. The Audio Output of the computer is then routed back to another track on the mixer. Many small mixers feature a stereo track pair that can be used if you will be doing stereo effects in Max.
The master output of the mixer is then routed to our amp or PA system, or headphones can be used if desired. If you are going directly into a mono guitar amp, you will want to make sure that the guitar and computer input channels are hard panned to either the left or right and that your line out is coming from that output channel. If you are sending to a stereo setup, you can leave your guitar panned in the center and your computer input either coming into a stereo channel, or pan one input to the left and the other to the right.
Getting Into Max/MSP
Download the Max 4.6 legacy patches and the updated Max 5 patches used in this article.Once we have our hardware connections sorted out, we're going to get into Max to see about getting a signal from the guitar. For a quick sanity check, we recommend opening up the AudioTester patch available in the Extras menu. This provides a quick and easy interface for testing that your connections are all working. If you are using an external audio interface, you will probably need to get into the DSP Status window to make sure that your device is configured properly. For more info on setting up and troubleshooting audio hardware, see the Fundamentals PDF that comes with Max/MSP.
Once you have verified that everything is working properly and the levels on your preamp or mixer are correct, it is time to get patching! The first thing you'll want to do is plop an adc~ or ezadc~ object into your patch. The ezadc~ object is nice because it provides visual feedback that the audio is turned on. This object provides our audio input to Max/MSP. From there, I would recommend using a gain~ slider to provide input level control. Go ahead and route the output of the gain~ slider to a dac~/ezdac~ object, and voila! We have the most basic signal path possible. Now once you are done rolling your eyes, turn on your audio and listen to see if you hear your guitar signal. This should sound like a clean guitar signal. If you hear any clipping or distortion, it means that the levels are too high and you need to turn down the levels on the preamp stage. Congratulations, you just made your first guitar patch.
Building a Simple Effect
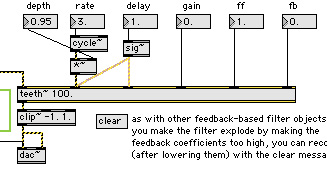
Now that you have got the basic structure of your rig in place, it is time to start playing with some effects. A good exercise to begin with is to replicate some classic stompbox effects, many of which can be implemented with just a few MSP objects and very little effort. To see what I mean, drop a teeth~ object into your patch and bring up the help patch. Now, since all help files are Max/MSP patches themselves, there is nothing stopping you from opening that help patch and copying out all the good parts for your own patch. To grab yourself a readymade chorus/flanger effect just select the stuff in the lower portion of the help patch and Copy. Now you can go into your simple I/O patch and add this stuff to your signal path by pasting the contents of the clipboard and making the proper connections. Try playing with the parameters of this little patch snippet to get different sounds.
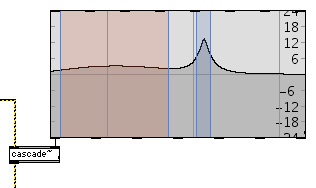
You may decide that this effect is nice, but you really want to filter the sound a little bit to alter the tone. MSP features a number of useful filtering objects such as lores~,svf~,onepole~, reson~, and cross~, all of which come in handy in different situations. I recommend looking at the reference and help patches for each of these for a better idea on how to use them. For our example, we're going to use the filtergraph~ object connected to a cascade~ object. This combination of objects allows you to manipulate a graphic representation of a number of different filter styles. The cascade~ object allows you to set up multiple filters within your filtergraph~ object. To try this out, open up the patch 01.Filter. To alter the sound of your filters, try moving the filter bands around with your mouse. Dragging on the edges of the band will change the bandwidth of the filter.
The Great Stutter Effect
One of the great strengths of creating effects in Max/MSP is the ability to analyze the incoming signal and make logical decisions based on various qualities of the sound. In this patch, we'll measure the amplitude of the guitar signal against a threshold, and use that to trigger a "stutter" effect using the, er, stutter~ object. Open up the patch called 02.Stutter.
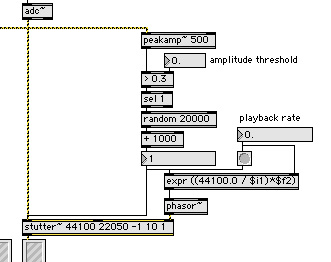
You will notice the incoming signal is routed to both the stutter~ and peakamp~ object. The peakamp~ object here measures the amplitude of the signal every 500 milliseconds. We then use some basic logical operations to determine if the level is above the threshold value (0.3 by default), and if so pass a bang. This bang then triggers a new random number, which is used to set a new length for stutter~'s playback memory and trigger it to save the last snippet of audio. The phasor~ frequency is automatically calculated to maintain a constant playback rate. For more info on using stutter~, check out the help file and reference page.
Envelope Following
Another way to use the input signal for control is to do what is called "envelope following", which involves smoothing an average amplitude value over time to measure the dynamic changes in your signal. This envelope signal can then be used to drive the parameters of other MSP objects. In our example, we'll be using the envelope to change the center frequency and Q of a reson~ filter object. Open up the 03.AutoFilter patch. In the Stutter example, we used peakamp~ to follow the amplitude of the signal. In this example, we need a signal-rate MSP object to do the envelope following.
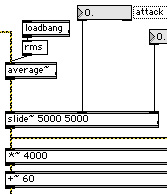
In this case we use the average~ object in "rms" mode to calculate a running average of the amplitude. The signal coming from average~ is most likely going to be fairly noisy, so we need to use slide~ or rampsmooth~ to smooth out the transitions in the control signal that we are creating. We then scale and offset this signal to send on to the frequency and Q inputs of the reson~ object. In this example we use two cascaded reson~ objects to give the filter extra resonance. The effect is finished off with a tanh~ object to provide a little soft-clipping for a slightly overdriven sound. Increasing the gain on the filter will intensify the distortion of the output.
Many of the signal-processing objects in MSP take a signal input as a parameter, so this technique of envelope following can be used with any number of effects and processes.
Further Investigations
Using the basic techniques presented in this article, you should be able to get started exploring the almost limitless potential for new guitar sounds available to you in Max/MSP. The MSP Reference Guide and object help files will be invaluable tools as you explore different objects to accomplish various signal-processing tasks.
by Andrew BensonBen Bracken on March 13, 2008

