
Max 5 Guitar Processor, Part 1
In an earlier article, Andrew Benson and Ben Bracken went through the process of connecting a guitar to a Max-based processing system, and creating a few guitar-oriented effects patches. In this series of articles, I will be building a Max-based guitar processing "rig", and will give you the opportunity to look over my shoulder as I design and implement this system.
Download the patch used in this tutorial.
Tutorials in this series:
Designing the System
The first thing I did was to plan the processing chain that I would create. I wanted a rather typical guitar rig, with the addition of a looping delay line. I decided on the following functional graph:
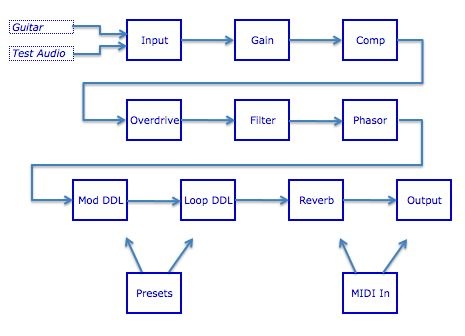
I also made a few decisions about general program functionality. Since this will be a stand-alone program/patch, I wouldn't worry about limiting system usage; therefore I wouldn't wrap subpatches inside of poly~ objects (to reduce their CPU load when unused). Also, I decided to take full advantage of the Max 5 Presentation Mode layout, allowing me to code in a convenient way and worry about the performance layout in a separate step.
Since I am a dyed-in-the-wool tweaker, I wanted to structure the code in such a way that I could manipulate it easily - even during live performance. This means that I needed to create an easily-to-follow patch that was well-labeled, and I needed to encapsulate at a level conducive to on-the-fly changes.
Finally, in order to build this quickly, I decided to beg, borrow or steal as much of the programming as possible without resorting to the use of VST plug-ins (which would reduce tweak-ability). Throughout these articles, you will see me reuse older code, appropriate from other applications and use third-party objects whenever necessary. I also take full advantage of some design patterns I've developed that allow for quick coding of more complex patch routings.
Input and Gain Handling
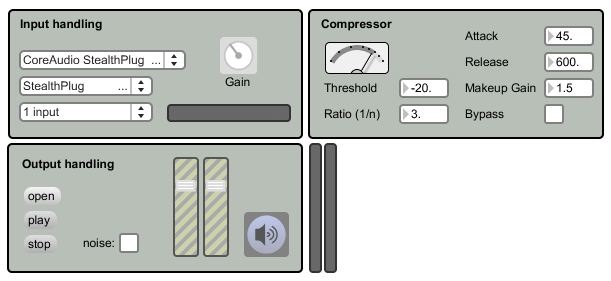
Since this is a stand-alone patch, we need to control our own input and output. Let's start by creating an input section. If you open the patch GtrProc-1.maxpat, you will see that I have discrete patch segments that correspond to the individual functions described in my processing graph. Place the patch into Presentation Mode, and you will see that these segments jump into a "rack style" package that is easy to follow during performance.
Move back into Patching Mode, and look at the top-left section of the patch. It is labeled "Input", and includes several controls connected to an abstraction named "input_handler". Double-click on the input_handler subpatcher to see its contents.
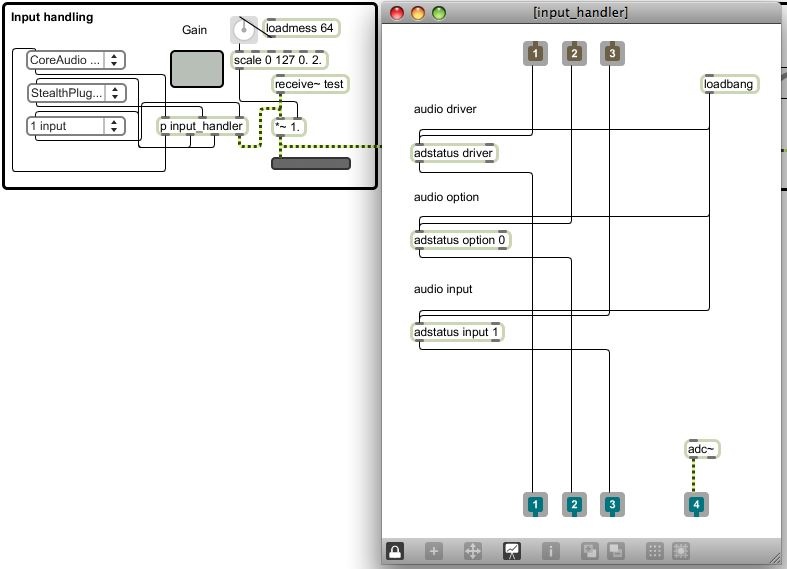
This subpatch is pretty simple: it contains a number of adstatus objects that allow my controls to display and alter the audio settings used at runtime. The function is similar to using the DSP Status window, but exposes only those items I considered important for realtime performance. Since I don't use the adstatus object very often, I don't know the functional arguments by heart. While I could have used the documentation to learn about the object, I decided to steal the functions from the help patch instead!
By viewing the help patch, I can learn about the function of an object. However, all help patches are also functional Max patches. In this case, I was able to unlock the adstatus.maxhelp patch, copy the functional objects that I needed, then paste them into my subpatcher. By connecting a few inlets and outlets, I'd created the small and efficient input setup handler that I needed.
In addition to setting the DSP Settings, I also want to control gain at this point. This is especially important with an instrument-driven patch, since different input hardware will provide vastly different levels. In my case, I may be using an IK Multimedia StealthPlug, a mixer with an audio interface, or even a direct connection into my Mac's audio input - so I want good control of my front-end gain. I did this by adding a *~ object to the input section, then routed the input into this control. By using a scale control, I'm able to change the normal range of the gain knob (0-127) into a range that goes from 0.0 (silent) to 2.0 (double-volume).
Compression
The next stage of the patch is a compressor. Since compression can have a very significant effect on the sound of the instrument, I wanted detailed control over its parameters. Therefore, I am using number boxes (rather than knobs) to control the values; this gives me precise control over the compressor's operation without having to guess at a knob's output value.
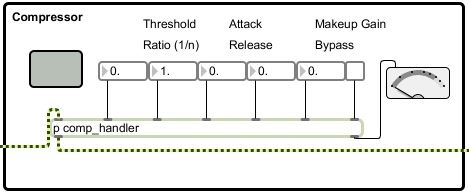
Again, this section is mostly a set of controls connected to an abstraction named "comp_handler". Double-click on this subpatcher to view its contents. This is a very simple subpatch; I've just borrowed the komp subpatcher (found in examples/effects/kompressor/lib of the Max folder) without change. I set a one parameter (lookahead) directly with a loadbang, but mostly expose the functions directly to the main patcher. Since this subpatcher is so simple, why didn't I just use komp directly in my main patch?
In the future, I may want to develop my own compressor system, or I may choose to implement the omx-based compressor included with MSP. I may even break down and use a VST compressor. In any of these cases, I would want to change the compressor "engine" without having to disturb my main patcher. By placing the compressor in a subpatch, I can change the underlying compression engine without ever having to change the top-level patch or the user interface.
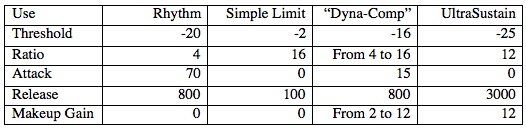
This is a "high detail" compressor, giving me the kind of control I want for a flexible rig. If you aren't that familiar with compression, though, it may seem a little intimidating. Here are a few settings that I've found useful with this processor:
(Sidebar) In each of the processing areas, you will see a small grey panel - it doesn't seem to do anything. However, when you switch into Presentation Mode, you should see these panels expand to become the background of the individual processing sections. This is an example of using the Presentation Mode's ability to change an object's geometry to keep my patching view clean, but give me an attractive user interface.
Output Staging
The final processing section for this tutorial controls the output. This section will be familiar to any Max/MSP programmer - it's the basis for audio output in almost any audio patch. The output of the compressor is sent to the two faders, which provide left/right volume control. The signal is then routed to an EZDAC~, which is also our DSP on/off control. If you have your guitar (or other instrument) plugged into the computer, you can check the settings on the input module, turn on the DSP, turn up the volume and hear your instrument through the patch.
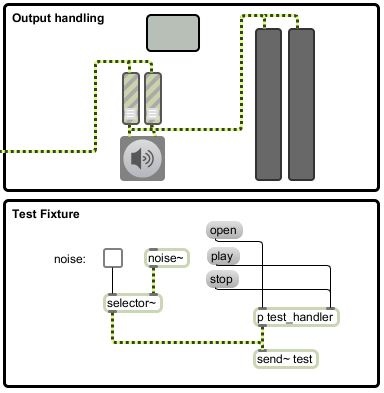
However, it's not always convenient to test with an actual instrument. For example, some of this patch was done while I was waiting in an airport. The last thing the PSA wants to see is for me to pull out a guitar and start wailing. What I've done is to include a "test fixture" - some standard audio generating code - that I can use to test the patch as it is being built. You will notice that this section (labeled "test fixture") gives me the opportunity to load and play a file or to generate noise. This is a small bit of code I've copied from another patch of mine - I use it as a test fixture for almost every audio patch I write.
The output of this fixture is routed to a send~ object labeled "test". This audio is received in the input section, at the same point that my patch would see an instrument from the audio input. This way, I can test patches without having an instrument plugged in, helping me to be productive when the guitar isn't easily available.
Conclusion
We've created the basic I/O blocks for our performance patch. In the next article, we will expand it by adding a good-sounding distortion/overdrive system and a highly controllable filter/EQ. In the meantime, work with this basic patch, learn to understand the routing between the objects and explore the use of the compressor. Until next time - have fun!
by Darwin Grosse on July 28, 2008

