
Building a Synthesizer Editor with JavaScript, Part 2
Welcome back! I hope you had a chance to review the scripts we worked on in Part 1 of this series (and if you haven't read Part 1 of this series, you will probably want to do so).
In this installment, we're going to:
Review the "finished" version of our script from Part 1, which is somewhat more complex than the simplified version we workshopped over the course of that article. We're going to take a quick look at the 'require' mechanism in js, as well.
Introduce the 'jsparamlistener' JavaScript extension as a way to get and set values in Max patchers from your js script without using patchcords. This will allow us to create user interfaces which don't require any additional plumbing to communicate with our Model.
Generate an interface for our editor (our View) and hook it up to the scripts (our Model).
When we're done, we'll have a more-or-less working CC/NRPN editor for the KORG minilogue xd.
In Part 3 of this series, we're going to add System Exclusive capabilities to the editor in order to be able to parse and transmit complete voices at once (instead of one parameter at a time) and solve a few lingering problems.
JS Require
You may have noticed that the "extended" version of our project is no longer a single file. It has been split up into 4 sections: a CC section, an NRPN section, a utilities section and then the main file loaded by the js object. I've done this to keep our main file small, clean and easy to read and maintain, and also to better organize the code based on functionality. Code which only applies to CC messages goes in minilogueXD_cc.js, code for NRPNs in minilogueXD_nrpn.js, and common utility code in minilogueXD_utils.js.
To use those other files from our main file, we can use the "JS require" extension to the js object. This allows us to import code from a specially structured external file and use it from the main script. If you're familiar with Node.js, you've probably seen the use of require in other contexts. The Max implementation of require is similar to Node's, and serves the same purpose: loading external code modules.
Using require is as simple as setting a variable to the result of a require statement:var cc = require("minilogueXD_cc");
Now, the variable cc has the exports of the file minilogueXD_cc.js as properties. If you look at that file, all the way at the bottom, you'll see how those exports are defined:
exports.init = postProcess;
exports.generateRandomValues = generateRandomValues;
exports.findName = findName;
exports.findIndex = findIndex;
There, we've assigned some file-local functions as properties of the exports object — that is, the function postProcess() is defined inside of this file, and is being assigned to the init property of exports. We can also assign simple variables or constants (numbers) to exports, but most of the time, it's useful to assign functions. For now, we can ignore the implementations of those functions, but running this in my main file:
var cc = require("minilogueXD_cc");
cc.init();
will call the function postProcess() from the minilogueXD_cc.js module.
One advantage of using require is that you can encapsulate all kinds of functionality which isn't directly called in your main file. That way, you can dedicate the main file to responding to Max messages and sending output into the patcher. You can also reuse modules in different top-level .js files and avoid having to write identical code over and over again, like abstractions in Max.
Review
The two main required modules for CC and NRPN have identical exports: an init() function, functions for locating a parameter by name or by index (findName(), findIndex()), and a way to generate a random value for the parameter, taking into account its range or some other criteria (generateRandomValues()).
For instance, I've decided that some parameters shouldn't be randomized at all: randomizing PROGRAM LEVEL, as an example, often leads to patches which are too quiet. Some other parameters might only be randomized within a certain range: for instance, MULTI TYPE won't be randomized to include user oscillators, because you, dear reader, might not have any installed.
In any case, we can customize the generateRandomValues() function to take into consideration the details of the way we're keeping track of CC or NRPN parameters.
Let's quickly step through the life cycle of our script to better understand how all of these exports are being used. When the main script is loaded, it sets up the require modules at the top, the variables cc and nrpn. Then a few functions are defined: anything(), bang() and incoming() are responding to messages from Max, and the functions which follow are in place to support those public functions (when the local property of a function is set to 1, that means the function is private and can't be called via a Max message). Finally, at the very end, init() is called on both the cc and nrpn modules. You'll recall the init() causes the function postProcess() to be called inside of the module, so let's see what that's doing inside of minilogueXD_cc.js.function postProcess() {I've abbreviated the function a bit in order to show the ideas more clearly (the details aren't important right now). As in the scripts we worked on in Part 1, we're iterating through an array of parameter objects. A few of those objects have grown a bit in scope to handle special cases, like randomization, but not much has changed about them since Part 1. There are just more of them.
for (var c in cctls) {
var cc = cctls[c];
if (cc.enum || cc.enumFn) {
cc.getEnumIndex = function() { ... };
cc.getEnumString = function() { ... };
}
cc.getOutput = function() {
if (this.max < 128) { // 7-bit value
return { cc: [ [ this.cc, this.value & 0x7F ] ] };
}
else { // 10-bit value
return { cc: [ [ lsbCC, this.value & 0x7 ],
[ this.cc, (this.value >> 3) & 0x7F ] ] };
}
}
}
}
First, we check if the parameter represents an enumerated value (it has cc.enum or cc.enumFn properties). If so, we add a couple of functions to the parameter — getEnumIndex() gets the currently active enumerated value (the index into the array of enumerations), and getEnumString() gets the name of that value. These are necessary because some parameters have a range independent from the number of enumerations — the MULTI TYPE parameter, for instance, has a range from 0-127, but only has 3 enumerations. Values 0-42 mean "NOISE", 43-85 mean "VPN" and 86-127 mean "USER". If we want to display the parameter in a menu (and we do...), we need to know how the parameter's value corresponds to the list of enumerations.
All parameters then get a getOutput() function. That's used to convert the parameter's value into MIDI data for output. By adding this function to the object itself, the main script doesn't have to know how to perform this conversion — it can just ask the object! That we're attaching this function to the object itself, rather than exporting it from the file, is a matter of preference, but it also means that the caller of getOutput() doesn't need to know whether the parameter is a CC or an NRPN parameter — it gets any information it needs from the data structure returned from getOutput().
The NRPN parameters have a similar postProcess() step which you can look at on your own. The main difference is the addition of special handling for the parameters responsible for the voice name.
Moving along, let's see what happens when sending a bang message to our script.
function bang() {
var params = cc.generateRandomValues();
params = params.concat(nrpn.generateRandomValues());
for (var p in params) {
doOutput(params[p]);
}
}
Now our exported generateRandomValues() function comes into play. Here's the CC implementation:function generateRandomValues() {
var params = [];
for (var c in cctls) {
var cc = cctls[c];
if (cc.randomize === false) continue;
cc.value = randomInt(cc.min, cc.randomMax ? cc.randomMax : cc.max);
params.push(cc);
}
return params;
}
This function returns an array of randomized parameters. We get that list by iterating our array of CC parameters, skipping over the ones with a property called randomize that's set to false. For each remaining parameter, the result of the function randomInt() is assigned to the parameter's value property. The parameter is then pushed onto the array returned by generateRandomValues().
In case you are wondering: in JavaScript, objects are passed as references (if you're not familiar with the concept of references, you can think of them as akin to aliases or symbolic links on your OS's file system) so pushing them onto the output array doesn't remove them from the cctls array or cause a copy to be made. If we needed to be 100% sure that the caller of generateRandomValues() can't change the data we're storing in the model, we'd want to make a copy. In this case, we trust ourselves to not cause mayhem.
Back in the bang() function in our main file, we combine the arrays returned by generateRandomValues(), then iterate the resulting parameter array, outputting the randomized values into our patcher and then to the instrument via doOutput().function doOutput(param) {
// retrieve an object containing a cc array, an nrpn array, or both
// first process the cc array, if it exists
// then process the nrpn array, if it exists
var op = param.getOutput();
if (op.cc) {
for (var o in op.cc) {
outlet(1, op.cc[o]);
}
}
if (op.nrpn) {
for (var o in op.nrpn) {
outlet(0, op.nrpn[o]);
}
}
}
doOutput.local = 1;
And here, we can see that getOutput() function we added to our parameters in actual use. We always process the cc property of the object returned from getOutput() first — it might contain the low bits of an NRPN value, for instance. Then we can handle any nrpn output property.
Everything else in the main file is pretty straightforward. If you browse the other files, most of the code is similarly easy to understand. There are a few additions to the CC and NRPN implementations to manage special handling for parameters with non-standard implementations. For example, the MICRO TUNING NRPN enumerated parameter responds to values between 0 and 22, and then between 112 and 123. Values between 23 and 111 are ignored. As a consequence, we need special functions to convert between values and enumerated indices. For the most part, though, there shouldn't be anything too unfamiliar.
Adding the View
Enough review, let's move on to the real meat of this installment: the View. If you've ever designed any patcher of any complexity in Max, you're aware of the challenges involved in hooking up UI objects to not only to external gear, but also to Max objects like coll. In particular, you need to ensure that changing the value at any point in the patcher doesn't cause feedback and an infinite loop, and it typically means unwelcome, extra work.
If you don't know what I'm talking about, maybe something like this will jog your memory:
In any case, what if I told you that with the js object you can eliminate much of this extra work? "Prove it!", I hear you say? With pleasure — please allow me to introduce the JS Parameter Listener.
The JS Parameter Listener
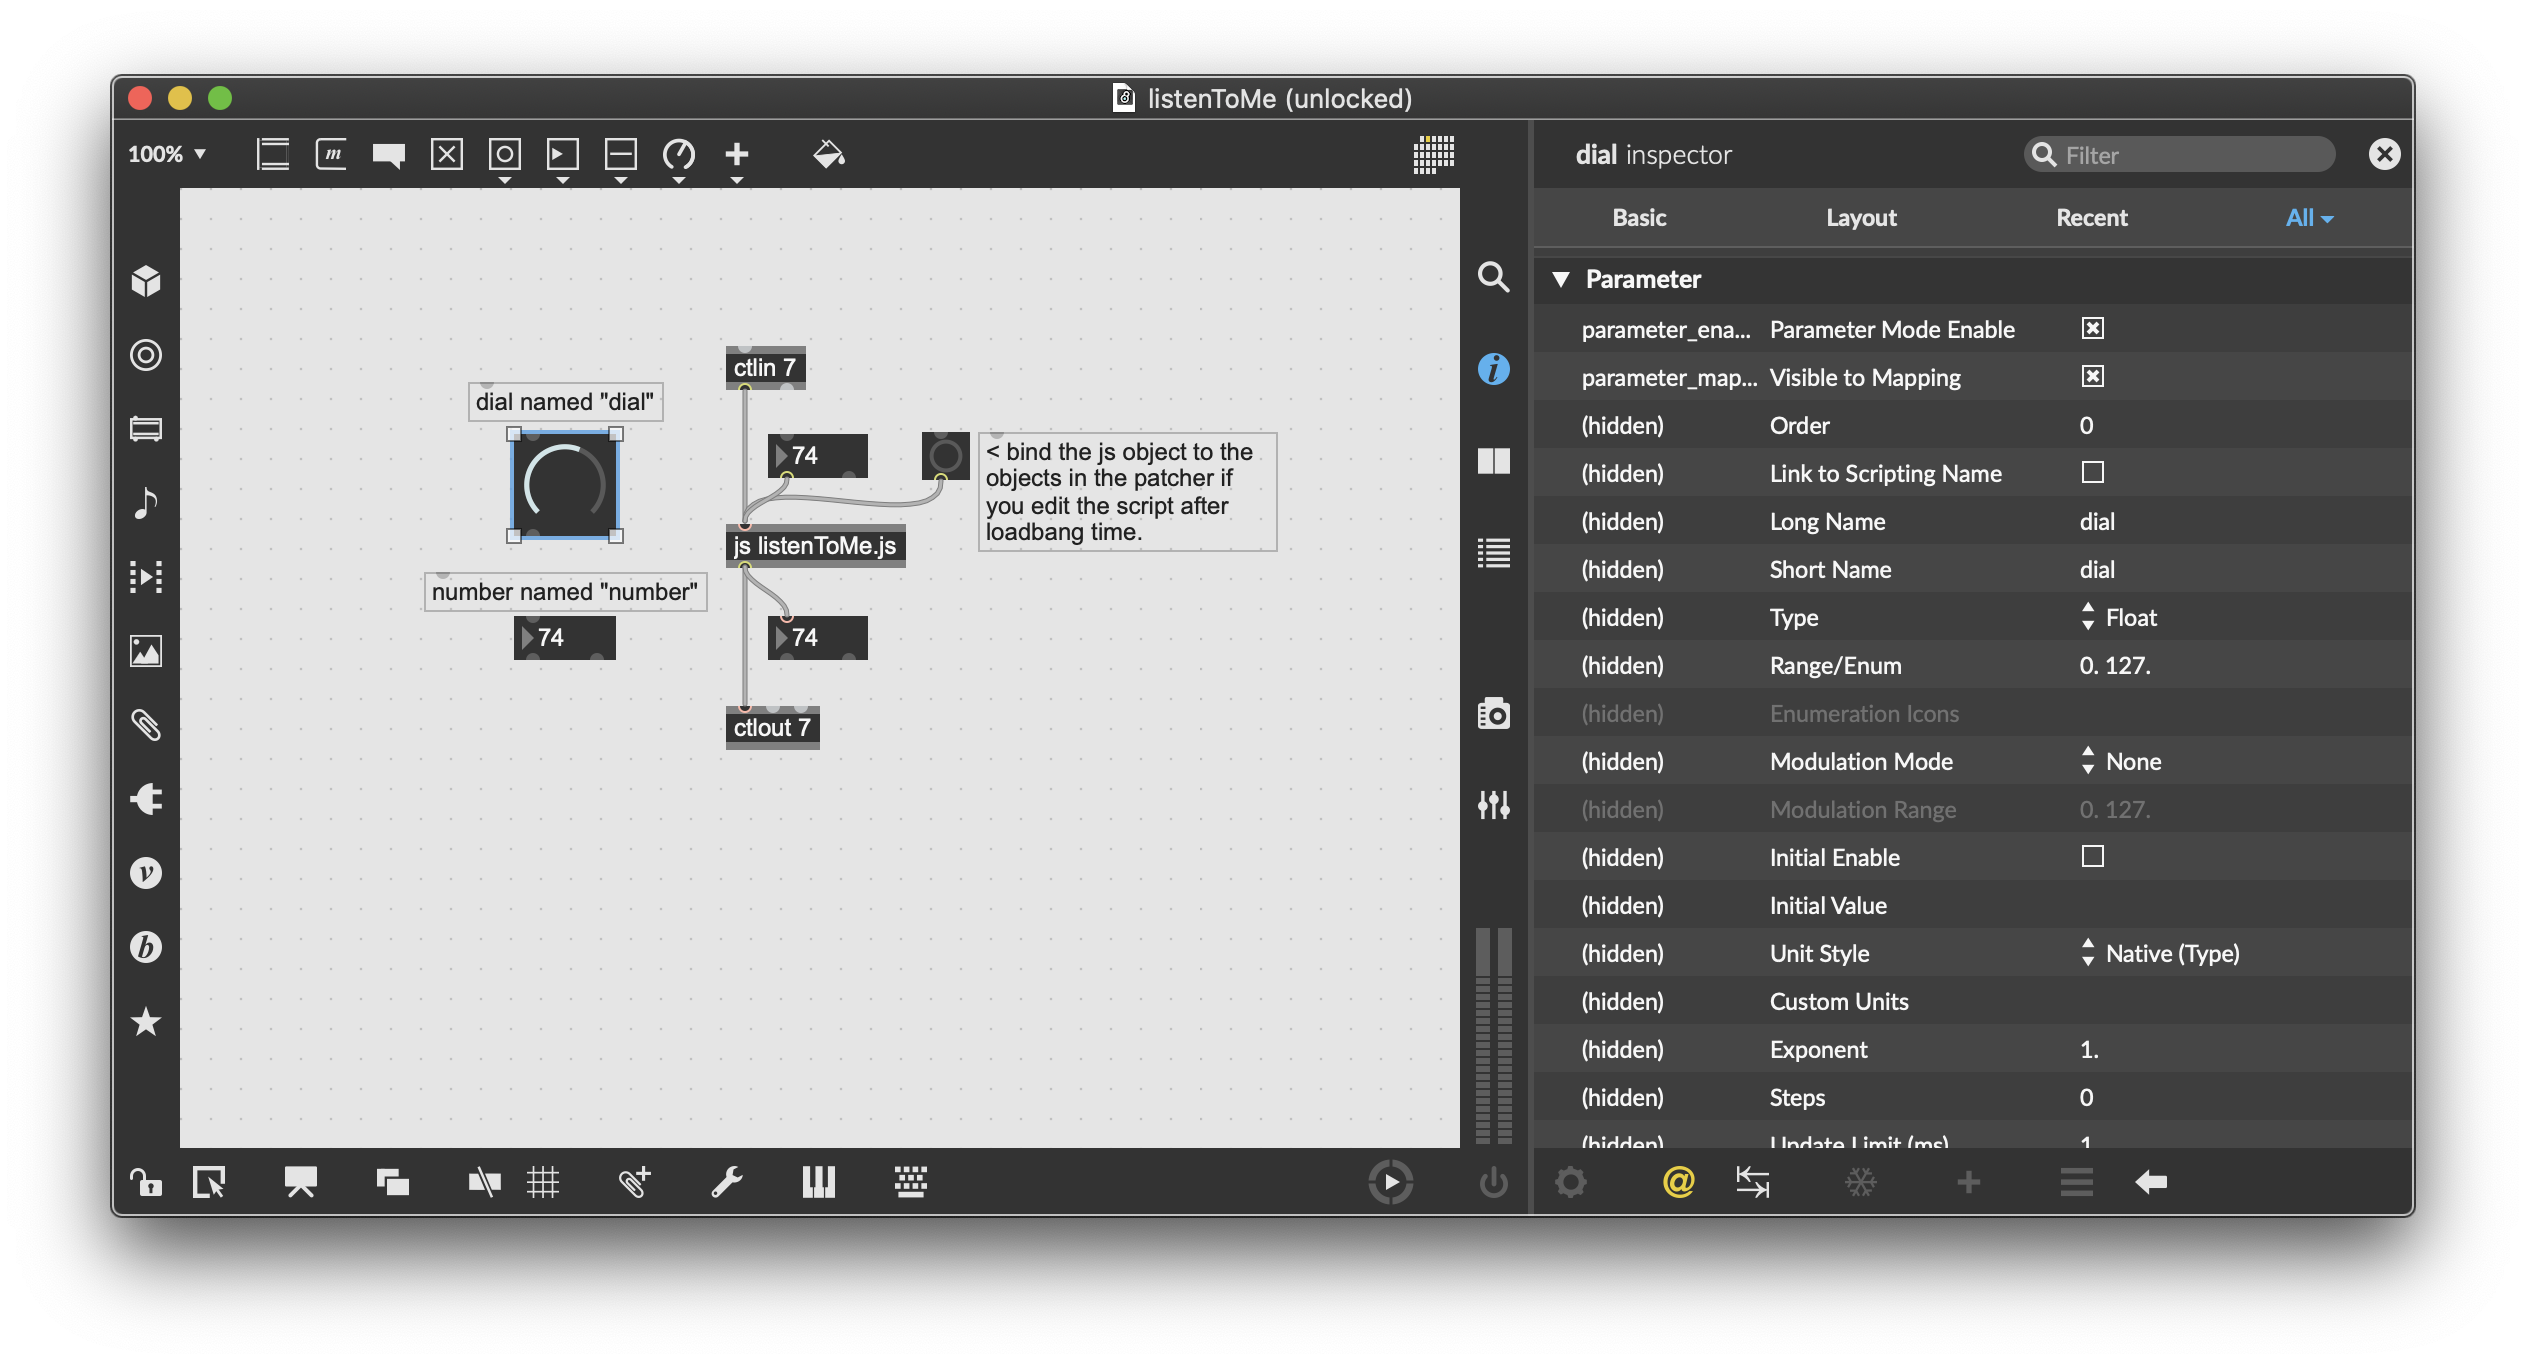
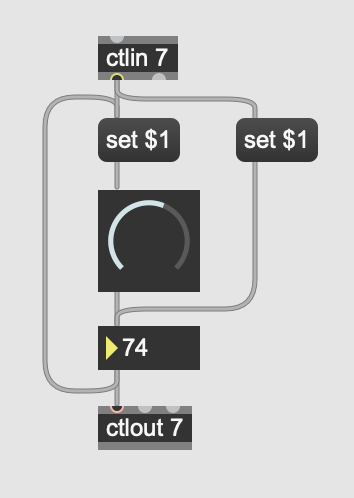
As its name implies, the JS Parameter Listener is based on the Parameter system in Max — that's what you use when you're building a Max for Live device, or using the keyboard/MIDI Mapping feature, or when using Snapshots. In the patcher above, there are two Parameters— a dial named "dial" and a number box named "number". They aren't connected to anything, but any change to one's value will cause the other one to update, and will cause a message to be sent to the ctlout object in the patcher (and the number box below the js object). Any value arriving via the ctlin object (or the number box above the js object) will similarly update the UI objects. No mess, no fuss. The script to manage this is similarly clean:var dialListener = null;
var numberListener = null;
function setup() {
if (!dialListener) {
dialListener = new ParameterListener("dial", valueChanged);
dialListener.silent = 1;
}
if (!numberListener) {
numberListener = new ParameterListener("number", valueChanged);
numberListener.silent = 1;
}
}

function msg_int(v) {
dialListener.setvalue(v);
numberListener.setvalue(v);
}
function valueChanged(data) {
if (data.name === "dial") {
numberListener.setvalue(data.value);
}
else if (data.name === "number) {
dialListener.setvalue(data.value);
}
outlet(0, data.value);
}
valueChanged.local = 1;
The setup() function can be called from loadbang() or a bang message to the js object (not shown) and hooks up the ParameterListener objects to the named Parameters in the patcher. The second argument to the ParameterListener's constructor is a function, to be called whenever the value of the Parameter changes from Max. We can use the same callback function for both ParameterListener objects, valueChanged(). We also set the silent property of the ParameterListener objects to 1, which means that any changes we make to the Parameter value from this script will not cause the valueChanged() function to be called. That's how we avoid feedback problems.
The rest should be fairly self-explanatory: receiving an int (msg_int()) sets the value at the UI objects; changes to the value of the UI objects update the value at the "other" UI object and trigger output.
This technique permits us to separate the UI from everything else going on in our data processing, which is necessary to implement the Model-View-Controller programming discussed briefly in Part 1. If nothing else, it's a refreshingly clean way of designing interfaces in Max patchers.
Integration
Let's see how we can apply what we've learned about the Parameter Listener to our editor-in-progress. We don't need to change much in the main file of our project:
We need to add a couple of new functions:
function bind() {
var param = getParamForName("VCO 1 PITCH");
if (param) {
param.listener = new ParameterListener("VCO 1 PITCH", paramChanged);
param.listener.silent = 1;
}
}
function paramChanged(data) {
updateAndOutput(data.name, data.value);
}
paramChanged.local = 1;
function updateAndOutput(name, val) {
var param = getParamForName(name);
if (param) {
param.value = Math.round(val);
doOutput(param);
}
}
updateAndOutput.local = 1;
bind() is going to look for a parameter in our model called "VCO 1 PITCH". If it's found (and it will be, it's in the CC section), we add a new ParameterListener object as a property (called listener) of the parameter and tell it to called paramChanged() if the value of the Parameter called "VCO 1 PITCH" changes inside of Max.
paramChanged() calls updateAndOutput(), which does exactly what the function name describes. You'll note that we're rounding the value which arrives before assigning it to the parameter. This ensures that the parameter is always an integer, even if a floating-point number arrives from Max.
That's all we need for handling changes from Max. What about changes from the instrument? For that, we just need a minor edit to our incoming() function:function incoming(val, index) {
...
param.value = val;
if (param.listener) {
param.listener.setvalue(param.value);
}
...
}
That's all we need for handling changes from Max. What about changes from the instrument? For that, we just Here, we check for the existence of that listener property we just added to the parameter. If it's there, someone is listening, and we can set the Parameter's value in Max, updating the UI. That's it. We now have fully-implemented two-way communication with a Parameter in Max.
Now it's time to add a Parameter to Max called "VCO 1 PITCH", like this:
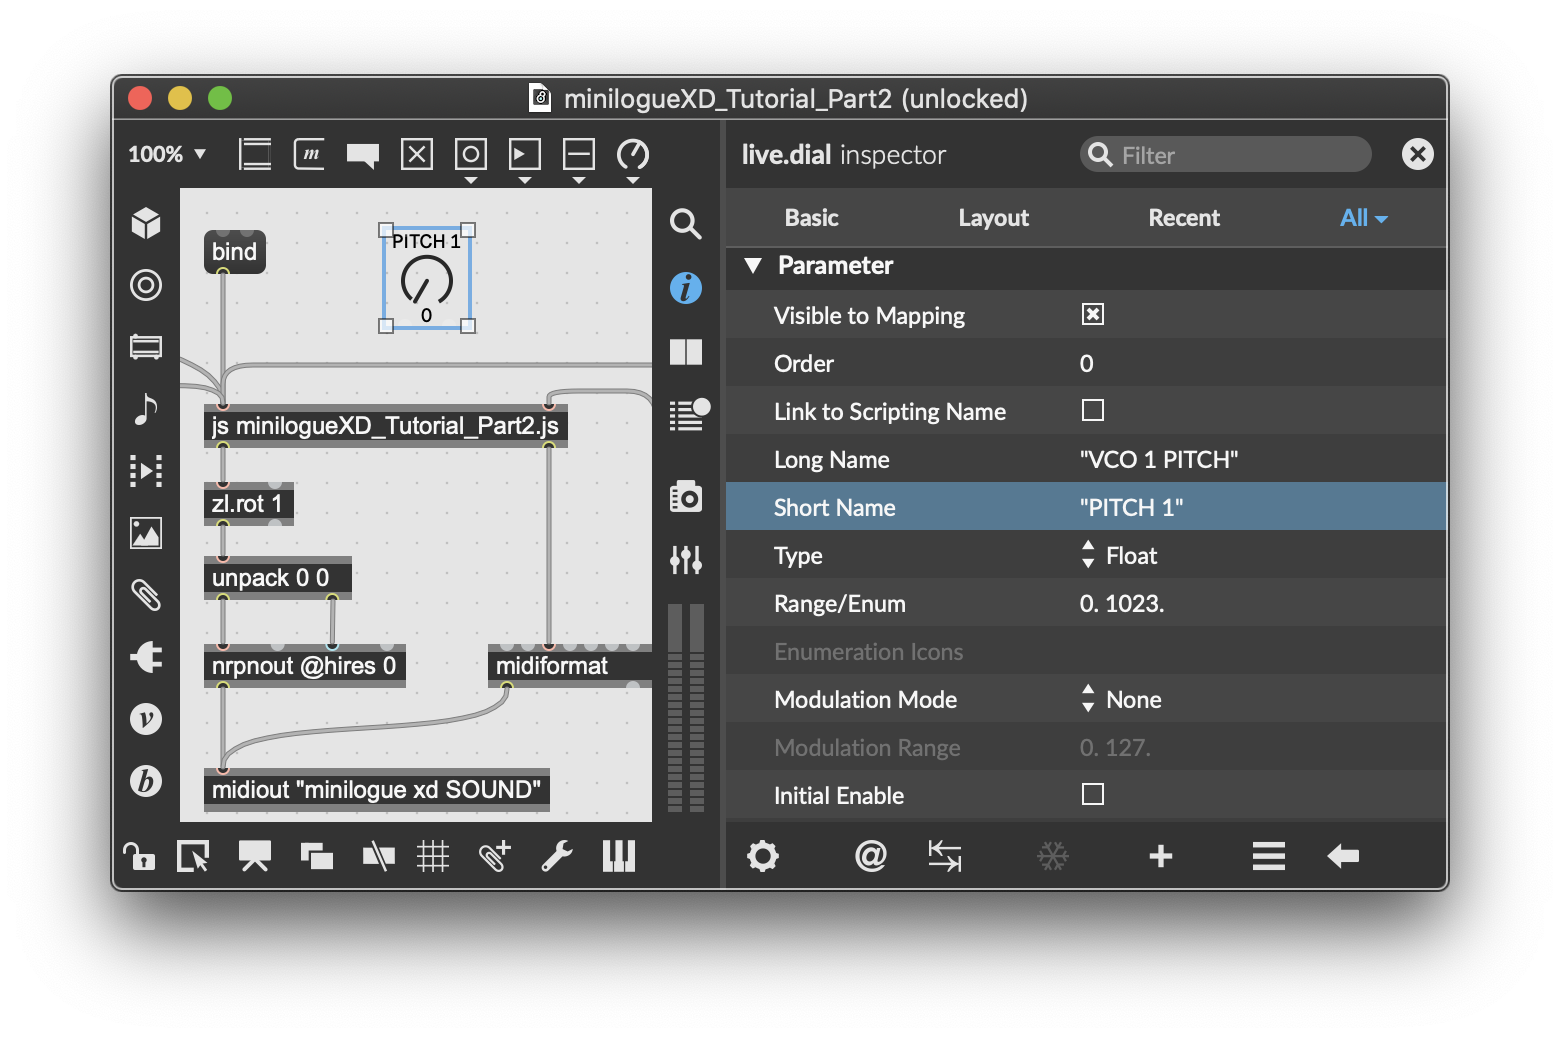
I've used live.dial here, but you could use a normal dial or a slider or whatever you want. Most importantly, you need to make sure that Parameter Mode Enable is checked in the Inspector of whichever object you choose. The Live UI objects have this on all the time, so the option doesn't appear in the Inspector shown above.
To hook the live.dial up to our script, simply change the "Long Name" to match the parameter name in our Model: "VCO 1 PITCH", and change the "Range" to "0 1023". I've left the Type as "Float" because the "Int" type is limited to 256 values, and we have 1024 values here. We've ensured above (in updateAndOutput()) that any floating-point numbers are rounded to integers before sending them into the patcher.
Now, if you send the message 'bind' to the js, the script will take care of the rest. Try it out!
For extra credit, we can update the definition of anything() to use our new updateAndOutput() function. That's a non-functional change, but eliminating repeated code is good practice.
function anything(val) {
if (arguments.length) {
updateAndOutput(messagename, val);
}
}
In the interest of full disclosure, the above is going to work great for non-enumerated parameters, but enums are going to cause some problems. That's because the value in the patcher will be different from the value at the instrument. Consider a menu with 3 items: you might want item 0 to mean "0", item 1 "43" and item 2 "86" when sending data to the synth. In Max, you might use the zmap or scale object to convert from the UI scale (0-2) to the synthesizer scale (0-127). We'll solve that problem in a similar fashion, but without requiring additional boxes in the patcher for each special case.
Another potential source of complication involves parameters which depend on other parameters. Take something like the Modulation Effect section. There's a main type ("Chorus", "Flanger", etc.) and then there's a subtype: when the main type is set to "Chorus", you've got subtypes for "Stereo", "Light", "Deep" and so on; when the main type is set to "Phaser", the subtypes are "Stereo", "Fast", "Orange", etc.
All of these problems can all be solved (and in fact, solving problems like this will be significantly easier in JavaScript than in Max). In the interest of space, I'm not going to delve into those solutions here, but I've taken the liberty of addressing these complications in the linked scripts.
Why patch when you can generate?
We could now manually place a bunch of Max UI objects in our patcher and hook them up as above. But that sounds like boring work that could be eliminated through programming. Remember: embrace laziness, let it inspire you. Let's write a little function to generate all of the UI objects we need. We can move them around and fine-tune their appearance by hand, but creating them and setting their ranges and initial labels is work for our scripting fu.
I've added a new export to the CC and NRPN modules called getInterfaceParams(), which returns an array of parameters we'd like to display in the interface. Just as we don't want to randomize everything, we don't necessary want to see everything in the UI. There's also a new isEnum() function for every parameter object, so that we can easily determine which parameters are enumerated. Parameters for which isEnum() returns true also got a getEnum() function to retrieve the enumerated values.
Here's the generation code:
function generate() {
var params = cc.getInterfaceParams();
params = params.concat(nrpn.getInterfaceParams());
var patcherobj = this.patcher.newdefault(276, 39, "p", "View");
var subpatcher = patcherobj.subpatcher(0);
for (var p in params) {
var param = params[p];
var objcls = "live.dial";
var isEnum = param.isEnum();
var e = isEnum ? param.getEnum() : null;
if (param.max === 1 || (e && e.length <= 2)) {
objcls = "live.toggle";
} else if (isEnum) {
objcls = "live.menu";
}
}
}
Let's break here and examine this function so far. After getting an array of interface parameters, we make a new patcher object in the main patcher called "p View" and get the contained subpatcher. Then we iterate our parameter list and determine what kind of object we want to create for each parameter. By default, we'll create a live.dial object, but if the parameter only has a value from 0-1, we'll make a live.toggle object. If the object is an enum (with more than 2 values), we'll create a live.menu object.
var x = 10 + (72 * (p % 8)); var y = 10 + (70 * Math.floor(p / 8));
var o = subpatcher.newdefault(x, y, objcls);
And then we create the objects inside of the subpatcher with the newdefault() function. The x and y coordinates are calculated so that we generate 8 columns of objects with adequate spacing around them.
Finally, we use some "hidden" Parameter attributes to initialize the new objects with reasonable values, derived from our Model. The Parameter's name will match the name in our Model (so that we can bind to it with the Parameter Listener), the range will be generated from the minimum and maximum values of the parameter range (or the length of the enumerated values array), and the type will be set to either Enum (2) or Float (0). If the generated object isn't a live.dial, we also create a comment object so that we can easily see which parameter is associated with which UI object:
o.setattr("_parameter_longname", param.name);
// generate a shortname
var words = param.name.trim().split(" ");
var sn = words.map(function(i){return i[0]}).join('').slice(0, -1);
sn += " " + words[words.length - 1];
o.setattr("_parameter_shortname", sn);
o.varname = param.name;
if (objcls !== "live.dial") {
subpatcher.newdefault(x, y + 20, "comment", "@text", sn);
}
if (e) {
o.setattr("_parameter_range", e);
}
else {
o.setattr("_parameter_range", param.min, param.max);
}
o.setattr("_parameter_unitstyle", 0);
o.setattr("_parameter_type", objcls !== "live.dial" ? 2 : 0);
// 2 = enum, 0 = float
}
}
A note about the "hidden" Parameter attributes. These have been banned from Max's interface to make it harder for them to be set at run-time, but as you can see, they haven't been completely removed from the objects. Inside of Max for Live, changing the name or type of a Parameter while it's in use could have unwanted consequences or even lead to crashes. In this specific case, an edit-time operation which doesn't involve Ableton Live, there's no reason not to use them, but keep in mind that they're hidden for a reason!
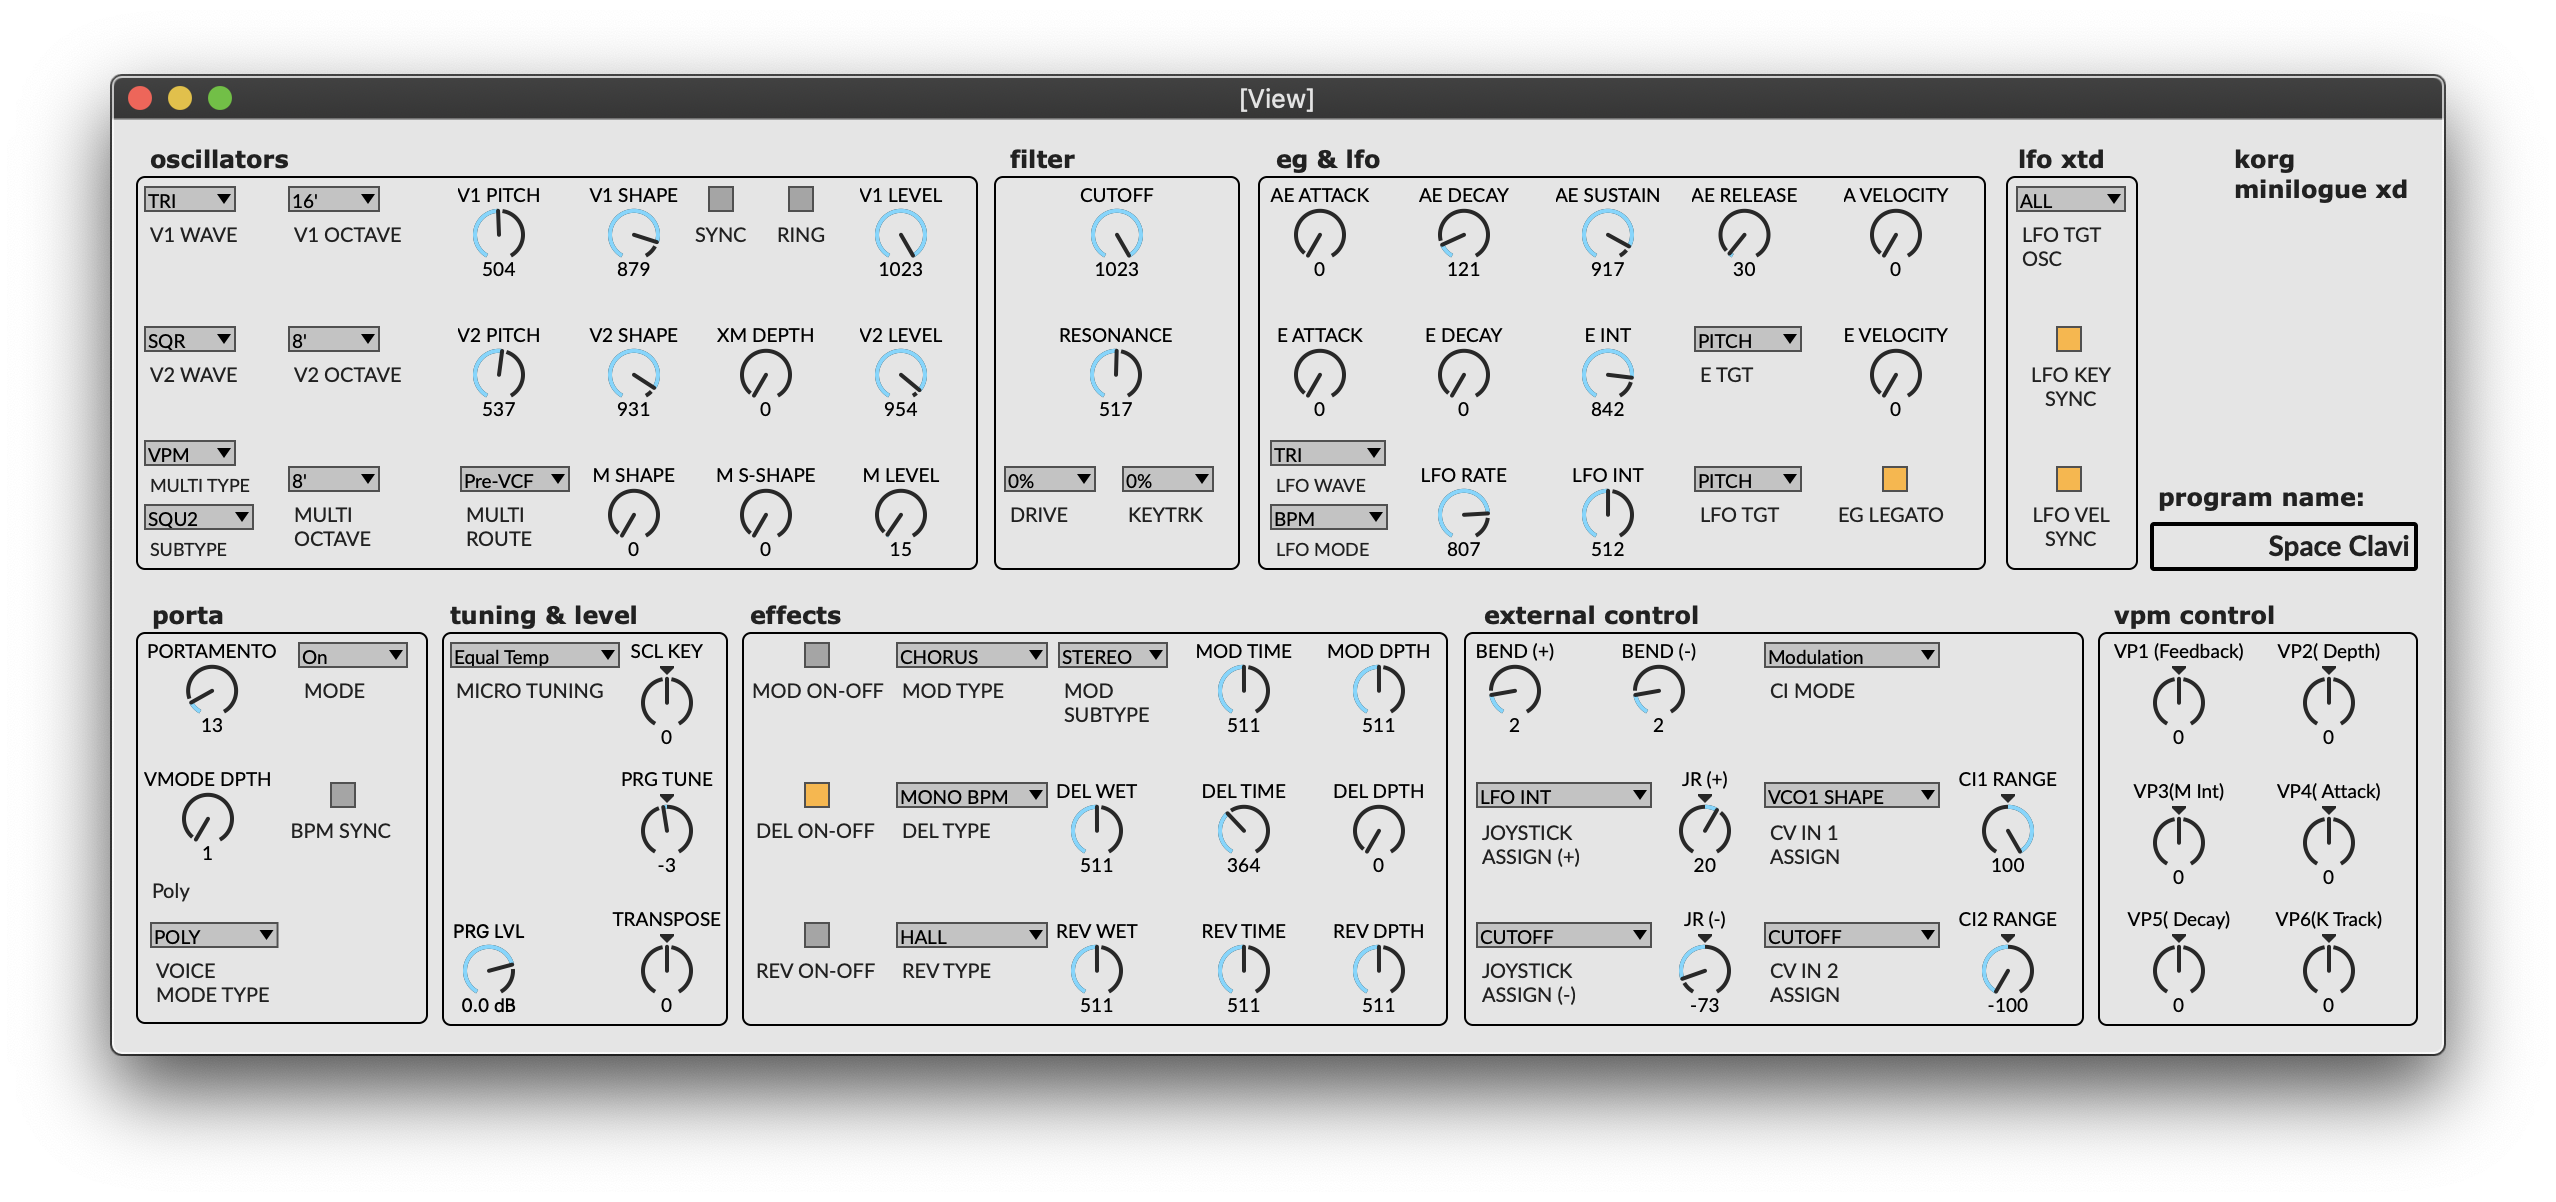
Open up the patcher in the folder 2_3_minilogueGenerate and click on the 'generate' message box in the patcher. You should end up with something that looks like this:
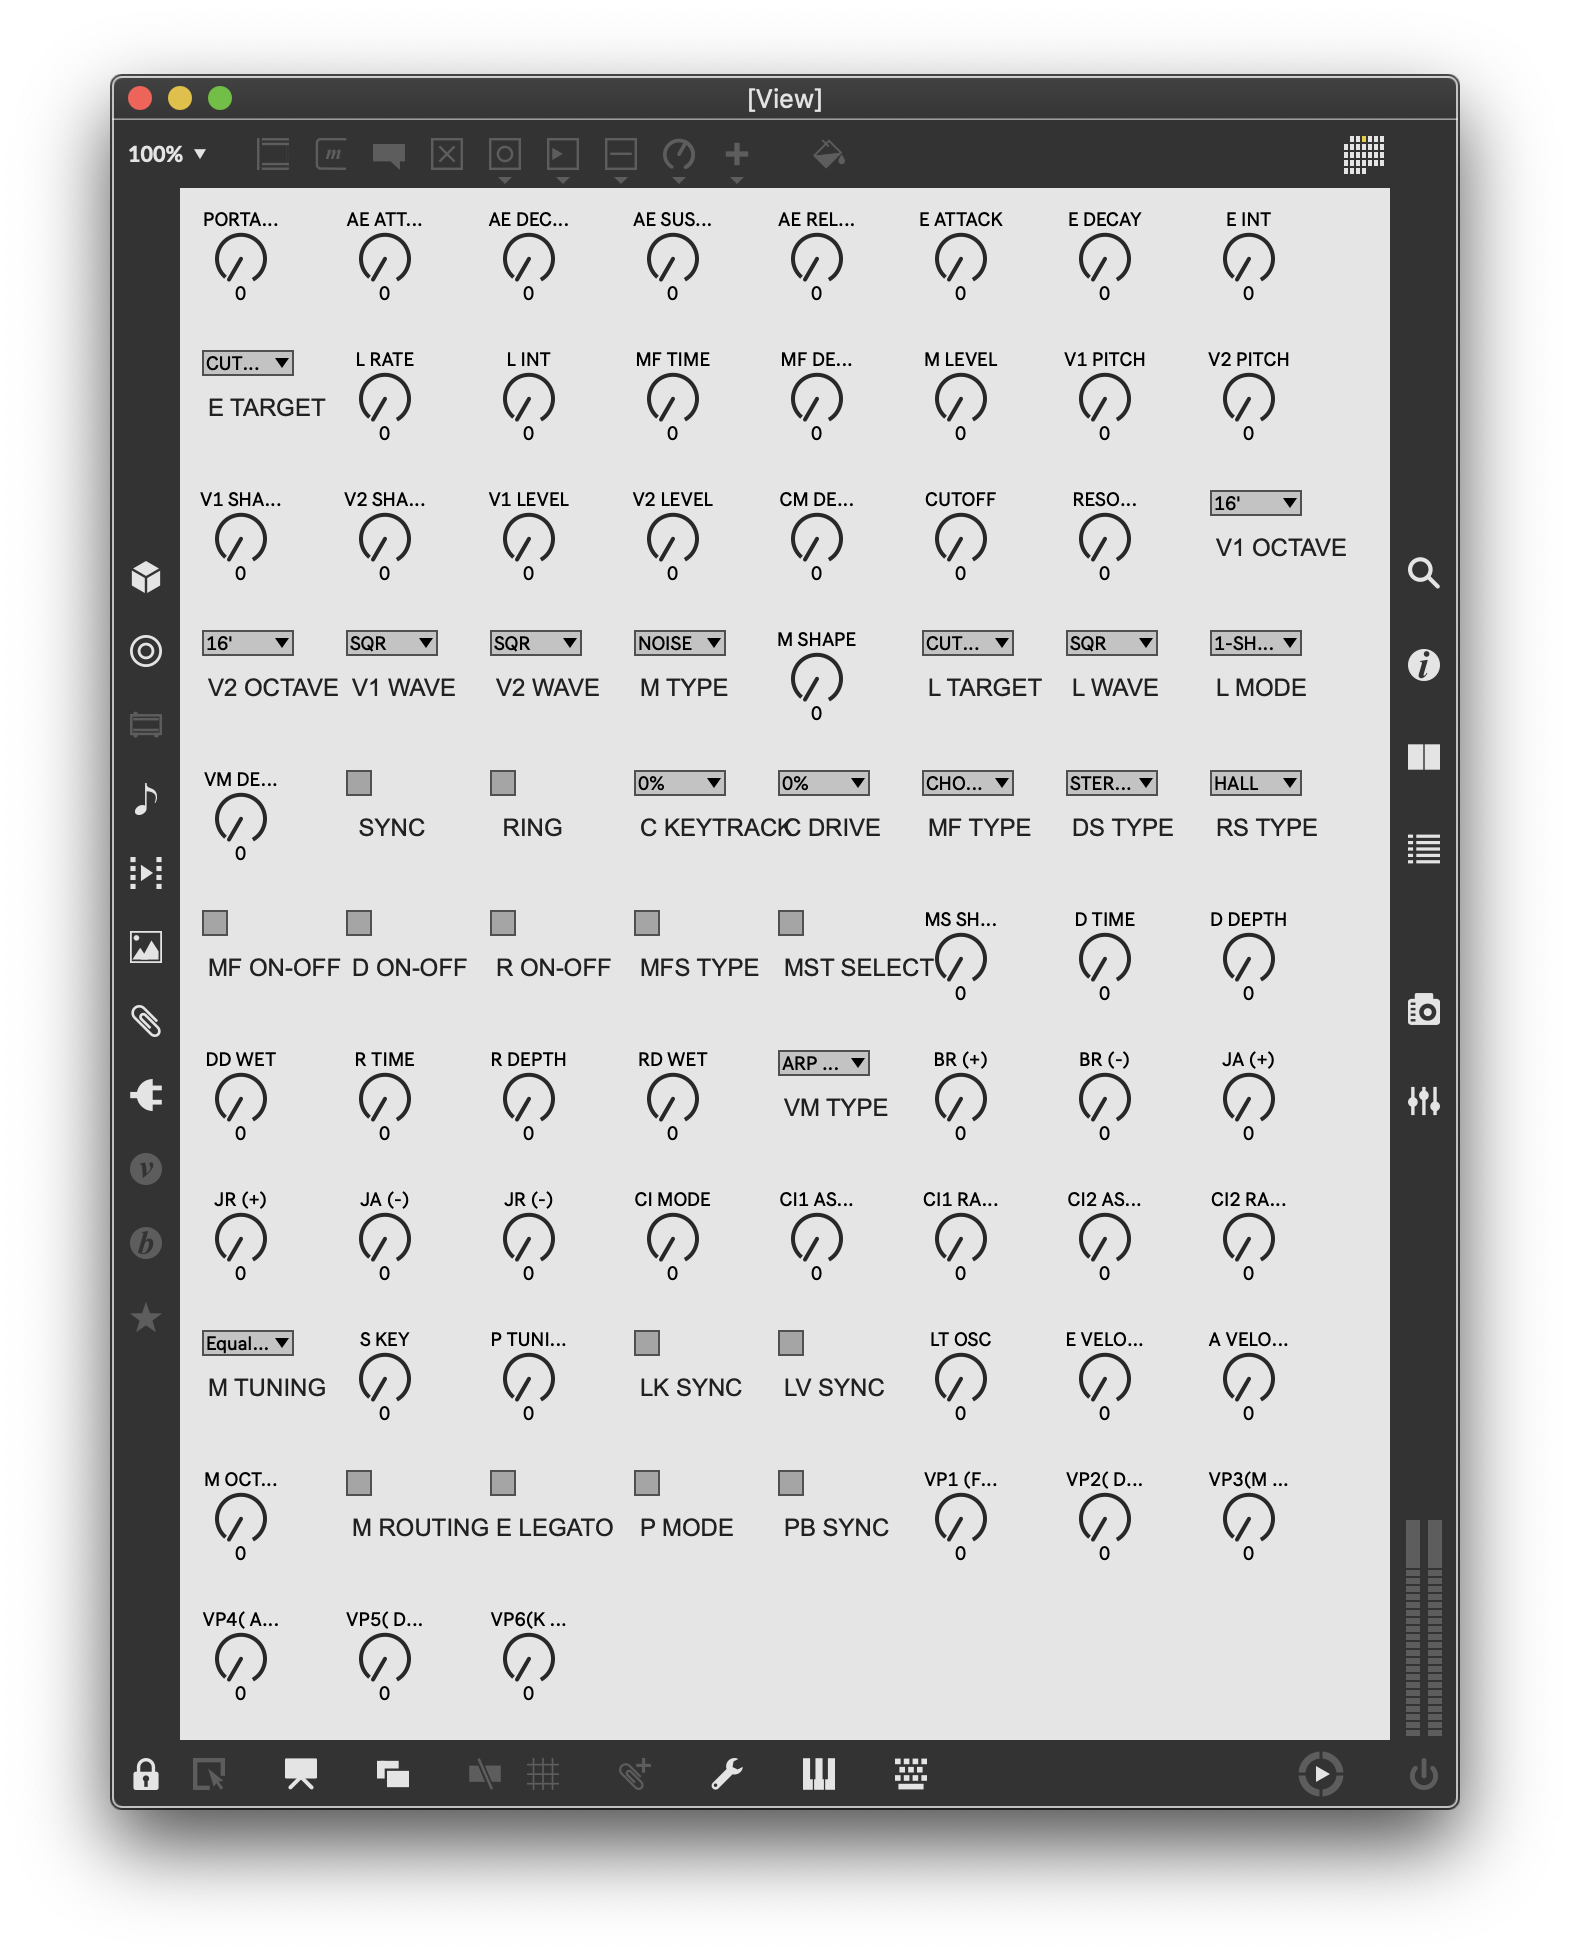
Pretty cool, right? Now click 'bind' and start changing some of the values in the UI. You should immediately start hearing changes at the instrument. Here's what bind() looks like now:
function bind() {
var pip = new ParameterInfoProvider();
var names = pip.getnames();
for (var n in names) {
var name = names[n];
var param = getParamForName(name);
if (param) {
param.listener = new ParameterListener(name, paramChanged);
param.listener.silent = 1;
}
}
}
Except for the name iteration, this is very similar to the previous implementation. When putting this example together, there were two ways to go about binding — we could iterate the parameters in our Model, or we could iterate the Parameter objects in our patcher. I chose the latter so that I could mention the JS Parameter Info Provider.
In the code excerpt above, the ParameterInfoProvider is being used to get an array of the names of all Parameter objects in our patcher, which is pretty handy. It can do a few other things, including notifying you when Parameter objects are added to or removed from your patchers. If that sounds enticing, check out the documentation in Max. For now, it's just a means to an end — for every Parameter object name in the patcher, we search for a corresponding parameter name in our Model. If a matching parameter is found, we attach a ParameterListener for the Parameter object in the patcher and store it in the listener property.
Our View cleans up quite nicely:
and now we can remove the 'generate' message from our Max patcher: we'll never need to run that code again.
What's still missing?
We've come pretty far and already have a respectable piece of software. But it's not finished. The most glaring problem with our editor is that it isn't able to reflect the current state of the instrument. So we need to initialize (or randomize) the state of the instrument to match our interface. In an ideal world, we'd be able to ask the instrument to report its state back to us.
It would also be nice to be able to save the current voice in a format which can be sent directly to the instrument in a single operation, without needing to transmit each parameter individually.
Luckily, there is a way to do all of this, using System Exclusive messages. But you'll need to wait for the next installment to see how we'll incorporate those into this project.
Learn More: See all the articles in this series
by Jeremy on January 19, 2021


