Creating a Vizzie Effects Module

Ever thought about making your own Vizzie modules? With Max 5.1.8, you get the Vizzie Kit and below you will find detailed instructions on how to use it, including how to make existing patches into a Vizzie effects module.
The response to the appearance of Vizzie has been really exciting and rewarding – people all over the place are finding it to be a quick way to start working with Max, and more seasoned users have found it a useful source of "quick-start" modules they can plug into their regular workflow. We've even had the occasional tale of live performances rescued after some horrible patching disaster by a judiciously linked set of Vizzie modules, as well. (Don't worry. Our lips are sealed - you know who you are….)
Download the incremental update in addition to Max 5.1.8.
Several users have asked about how to go about creating their own modules. Since there are people out there who aren't necessarily "power users" who've expressed an interest in module creation, we've tried to make these tasks simpler for you by creating the Vizzie-Kit – a collection of Max patches intended to simplify the process of creating your own Vizzie modules.
The Vizzie-Kit consists templates for Vizzie effects, generator, and controller patches that contain commented examples of nearly everything you'll normally need to do when creating a new module. In addition, the patches also contain user interface objects pre-colored to match the Vizzie color scheme that you can use when creating your module's front panel. You can find the folder (VIZZIE-KIT) that contains the Vizzie-Kit template files in the VIZZIE-EXAMPLES folder, located in the max-examples folder in your Max application folder.
For this tutorial, I'm going to take a Jitter patch and using it as the basis of a Vizzie module. The patch you use doesn't have to be anything particularly complicated – in fact, the source for the module I'm going to make in this tutorial is a Jitter help file. Jitter help files provide a good starting point because they're clearly labeled and they also show the basic messages that the object uses. While I could probably choose one of any number of Jitter externals and make Vizzie effects modules from their help files, I'm going to create something I'd like to have - a color mapping effects module. When it comes to creating interesting color mappings in Jitter, nothing beats the jit.charmap object.
The jit.charmap object lets you replace the standard linear mappings used for the colors in a frame of video with a different set of values in the same 0-255 data range. You can replace the linear map with a list of random values, or different kinds of mapping functions to create interesting effects.
The helpfile for the jit.charmap object shows how this looks in action.
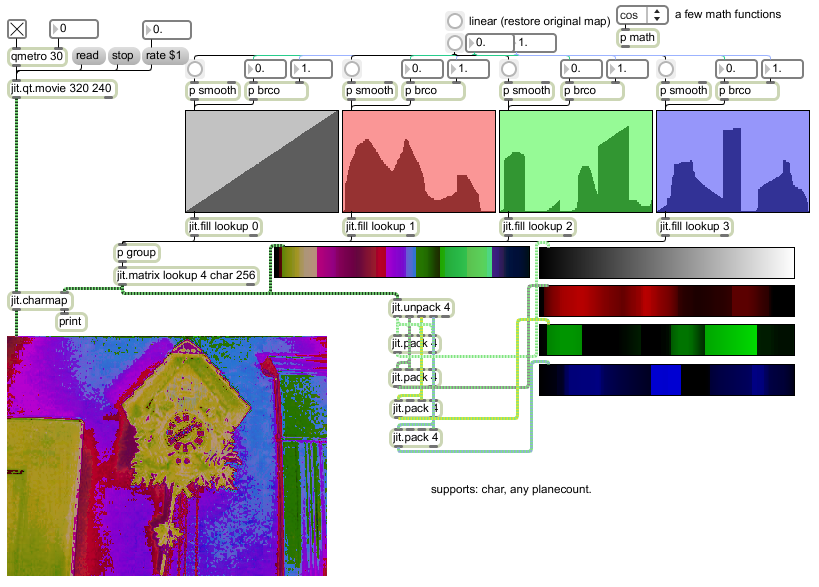
You might want to take just a minute to fire up Max, open the jit.charmap helpfile and play with it a little. Draw your own curves, and experiment with different mapping functions using the umenu object in the upper right-hand part of the patch.
This tutorial will use the Vizzie-Kit's effects template patch (effects-example-patch.maxpat) as the basis for our module. Before we open up the template patch, let's take a look at the Max help file patch we want to use as the basis of our module.
Note: Instead of providing a downloadable file from which to begin when constructing a Vizzie module, this tutorial uses a file you already have - the jit.charmap helpfile - as a starting point. If you'd like, you can download a zip file containing a finished and fully functional version of the device described in this tutorial .
To follow along in this tutorial, open the helpfile for the jit.charmap object, unlock the patcher file, copy its contents, and save them to a new file that will be the basis of your work – you don't want to edit the original help file!
The Three Question Method
Creating a Vizzie effects module from an existing patch isn't as difficult as you might imagine – while there are a few simple guidelines about the way that Vizzie modules work to keep in mind, the procedure involves a sequence of things that you'll do over and over again as you create new modules.
Whenever you create a Vizzie module from a Max patch, there are a few simple questions about the patch you start with that you'll always need to ask yourself:
Is there anything in my patch that I can simplify?
Sometimes, porting an existing Max patch means thinking about the things you want to do and making sure that the patch concentrates on those things. Let's take the jit.charmap help file as an example. In practice, you'll have your own answers that are specific to the patch before you.
After playing with the patch, I decided to simplify things and modify them a little. The value and angle and curve smoothing stuff in the original help file was fun, I decided that I wanted to restrict the module to a specific set of functions (including a few functions that weren't in the help file). I also decided that I would rather be able to apply different mappings to the red, green, and blue values individually instead of using one single mapping for all three of them.
What kinds of inlets and outlets does my module need?
Max users are always thinking about inputs and outputs. Vizzie modules use separate inlets for video and data input and outputs to keep things simple for patching. Nearly every Vizzie module you make will have (at least) one video input and one video output, and this example is no exception. In terms of data inputs, let's look at the original patch - it lets you select functions from a umenu object and optionally draw your own mapping functions using the Max multislider object. What part of the patch would it be useful to set using data input? I think I'd like to use input data to choose mapping functions from the function menu, and I also think that my module won't produce any data output – it'll be video only. My module will have one video inlet, a video outlet, and three data inlets - each one of which selects the mapping function to be applied to the red, green, and blue portions of the video image (I'm not going to do any alpha channel mapping in my module).
What ranges of data will my Max patch work with?
By convention, all Vizzie module data inlets accept floating-point number values in the range 0. – 1.0 (in addition to the messages "on," and "off"). Using a standard numeric range for all data outputs and inputs in Vizzie means that you can connect any Vizzie controller module or generator module's data outputs to the data inputs of any effects module and it will "just work." That means we need to think about how to convert the data in the patch to and from the 0. – 1.0 range.
Since I want to use input data to select mapping functions from the umenu objects in my patch, I'll need to devise a way to use the standard data input range to make menu selections (and that will depend on the number of possible mapping functions I use). Mapping that input data range to perform a task for you is going to be a regular process as you make your own Vizzie modules.
Each and every time you create a Vizzie module, you'll be asking yourself those same three questions. Now that we've got our answers, let's go to work on the first part: streamlining our basic color-mapping patch.
Streamlining (an overview)
The act of simplifying Max patches is an art as much as a science. Each patch presents different challenges, but there are a few things that you can say in general.
First, remove all the things you don't already need to do that task at hand.
That may involve removing visual elements that aren't crucial. It might also include removing non-essential functionality in your patch or modifying the patch so that it performs the specific task you want more efficiently.
The task involves visually arranging your patch so that parts of your patch associated with Vizzie module inputs and outputs are clearly laid out and ready for you to drop into the template patch. As ever, clean and clear patching will make your work easier when you start, and easier when you return to modify a module later on.
A Case Study (Extra Credit Reading)
In this section, I'm going to show you what that streamlining process looks like for creating our example Vizzie module. I'll specifically describe the process of creating the Max patch that I'll integrate with the Vizzie Kit's example effects module. If you're more interested in the general procedure for creating Vizzie modules, feel free to skip ahead to the next section of the tutorial.
You're still here? Okay - let's get going:
The first step in simplifying our helpfile patch is to remove the stuff we don't absolutely need from the temporary working file you created by copying the jit.charmap object's helpfile.
Max helpfiles usually contain a collection of basic things you might want to do when using an object, and may contain some patching that demonstrates some feature that you don't need in your effects module. That's certainly true of the jit.charmap object's helpfile. It contains some helpful visual aids that display the result of summing the different character mapping planes together and a lot of logic for initializing functions. I'm going to eliminate all of the visuals except for showing the mapping functions, and trying to simplify the patch as much as I can and still keep it clear.
Here's what I get when I'm done pulling things out and rearranging:
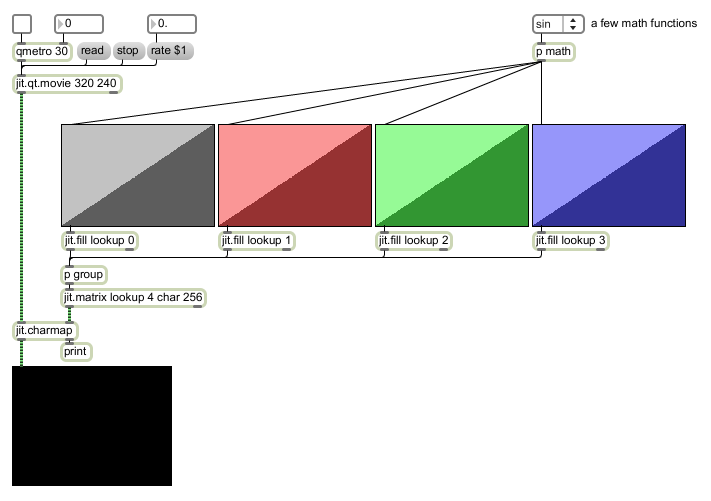
(Note: If you're really observant, you'll notice that I've removed the part of the helpfile that produces the straight linear color mapping. Don't worry – it'll make a return appearance real soon….)
Apart from the removal of objects, almost all of the modifications I'm going to make to the patch concerns the part of the patch that creates function mapping curves - the math subpatcher that contains the logic that generates those functions. If you double-click on the subpatcher to view its contents, you'll see a lot of patching that is actually more straightforward than it might appear at first glance.
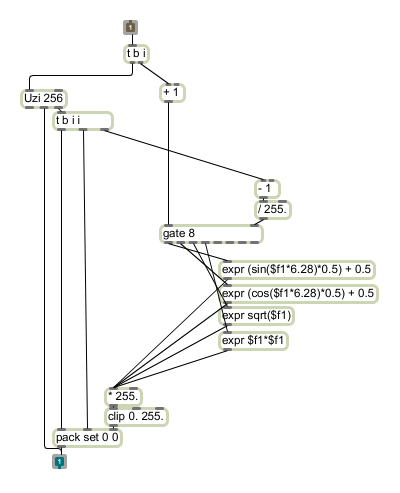
The math subpatch from the original help file starts with input in the form of an index number from the umenu item's output in the main patch to select a function to fill the multislider object that acts as a display and provides a matrix for the character mapping. The patch uses an uzi object to iterate through all 256 possible values (remember that RGB colors are specified using integers in the range 0 – 255), calculating the function for each one along the way. Calculating the selected function is done using Max expr objects for each different kind of mapping function.
There are a few things I want to do for my Vizzie module. The original help file used controls for linear functions that set line angle and a horizon. To keep it simple, I want a simple pair of ramps – one forward and one reverse. I also want to be able to select them as menu items like the other functions.
I really like the various math functions that the expr objects provide. I like them so much that I'd like to have inverted versions of each one of them. Although the arguments to the expr object look a little daunting, I don't need a lot of math skills to know that I can invert a functions output by multiplying it by a value of -1.0. I can just copy and modify each expr object to make its evil twin.
After a little quality patching time, I came up with my own variation of the math subpatcher which I'll call functions.
You'll see that I rearranged things to make them a little easier to read in addition to adding those extra expr objects. Feel free to compare each function and its inverse to see how I did the inverse calculations. Feel free to marvel at my stunning expertise in crafting linear function output, too.
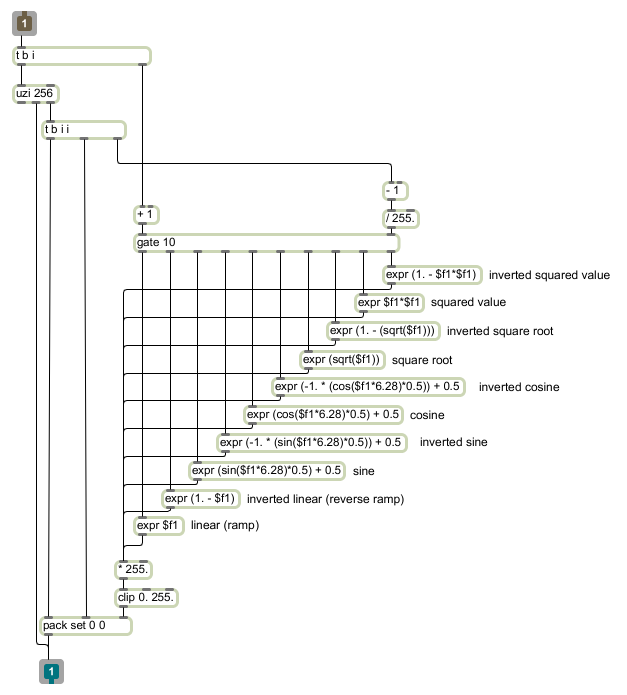
The result? I've now got ten different mapping curves to use.
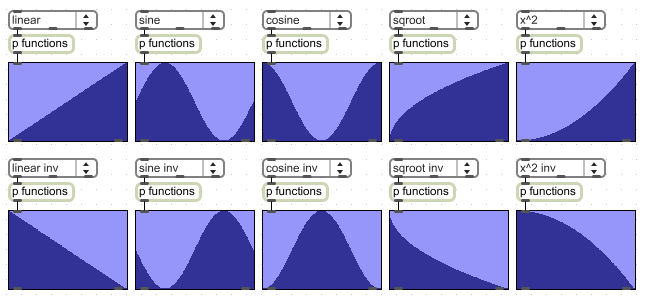
Since I have more functions, I need to add a few more entries to the umenu object by typing in the new names (in order) into the Value column of the Menu Items attribute using the umenu object's Inspector.
An additional advantage of including linear mappings as part of the functions subpatch is that adding a reset button is a simple matter of sending a zero to each of the umenu objects.
But what about the alpha channel? Well, I really never want to do anything other than to provide a simple linear map, so I've made a special subpatcher that's a radically reduced version of my functions patch (feel free to open the alphafunc subpatcher in the finished Vizzie module patch and see what's inside).
Here's the final modification of the jit.charmap help file, nicely streamlined and given some nifty new features.
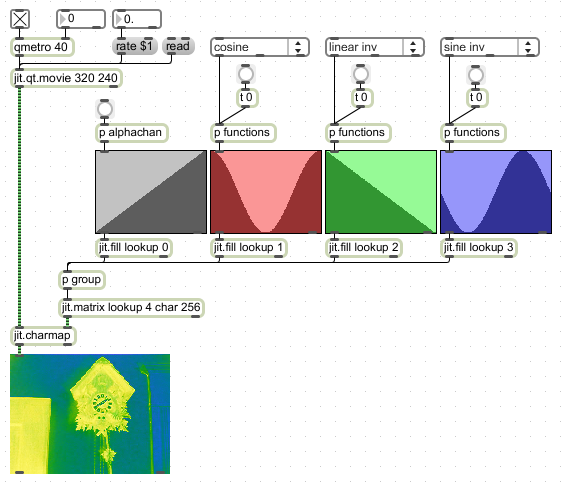
It's time to drop this awesome patch into the Vizzie-Kit effects example patch, so let's rejoin those readers who skipped ahead!
Using the Vizzie-Kit
Now that we have a Max patch to use in creating our own Vizzie effects module, let's start by opening the patch named effects-example-patch.maxpat in the Vizzie-Kit folder
When you open the patch, you'll see something that resembles the front panel of a generic Vizzie effect - it's got a video display, labels for a couple of video inputs and output, one data inlet, one data outlet, and a generic data controller.
(Note: The example patch you see here is displayed in what we call Presentation mode in Max. If you're not familiar with Presentation mode, you might want to have a look at Max tutorial 20 for a quick and easy overview.)
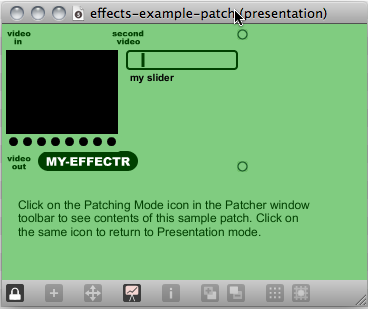
To see the insides of the patch, click on the Patching Mode icon in your toolbar.
The patch is divided into different subunits, each of which handles a part of the things you'll want to do with nearly any patch you'd like to convert into a Vizzie effects module. Each of these subunits contains a subpatcher with a name in the form more-on-something. Double-clicking on any of those subpatchers will open a patcher window that describes the contents of the subunit in more detail.
Creating a module using this sample patch is a matter of making a few decisions, cutting/pasting/modifying what's here to suit your needs, and then doing a little housekeeping (arranging your user interface, and adding hints to make your module easier to figure out when you share it with others.
The first official task is to choose a name for our Vizzie module – the name in capital letters you see when you load Vizzie modules from the Max file browser. I'm going to call my module MAPPR.

Each Vizzie module is composed of a pair of Max patches:
A Max patch that contains the module patch. These patches can be found in the VIZZIE-PATCHES folder located inside the patches folder in your Max application folder. By convention, the name of the functional part of the patch is related to the name you choose for your module, and takes the form (module)-patch.maxpat. I'll begin by saving the effects example patch in the VIZZIE-PATCHES folder using the name mappr-patch.maxpat.
A second Max patch that contains only a bpatcher object. This file has the all-caps name that you see when you use the File Browser to drag and drop Vizzie modules into your Patcher window (e.g. MAPPR). We'll create that file in a few minutes
As we did with the color mapping help patch we're converting to a Vizzie module, the first and easiest task is to get rid of the things in the effects example patch we don't need for our module. Since our color-mapping module only has one video input, we don't need any of the stuff that's inside the Second Video Input rectangle. The same is true for the Data Output portion of the patch. Therefore, these objects should be removed from the patch. We don't need to do anything at all to the video input and output portions of the effects example template patch apart from connecting them properly, so we're in great shape there.
Now we're ready to drop our modified helpfile patch into the Vizzie-Kit effects example patch. As before, there are a few things here that we don't need any more:
The jit.qt.movie part of the patch is no longer needed – we'll be getting input from another Vizzie module.
We also don't need to display any output, since we're sending our output down the line to other Vizzie modules.
Now here's what we'll be adding to our newly created mappr-patch.maxpat file:
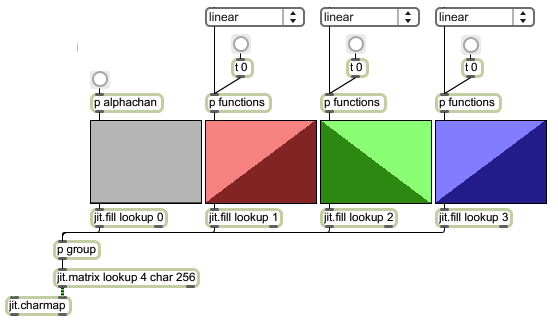
Adding this to the Vizzie-Kit effects example patch involves making connections to the inlets and outlets we've already got in the Vizzie-Kit effects patch:
The video input comes from the second outlet of the video-handler abstraction, so we'll connect our jit.charmap object to that.
Video outputs are sent to the outlet for the bpatcher itself, and to the gate object that lets us enable and disable the video display.
Adding data inputs
As you'll recall from our earlier meditation on what we wanted our Vizzie module to do, we'll need to set up our module to let us select the mapping functions for red, green, and blue portions of the video image by sending values into a data inlet so that we can change them on the fly.
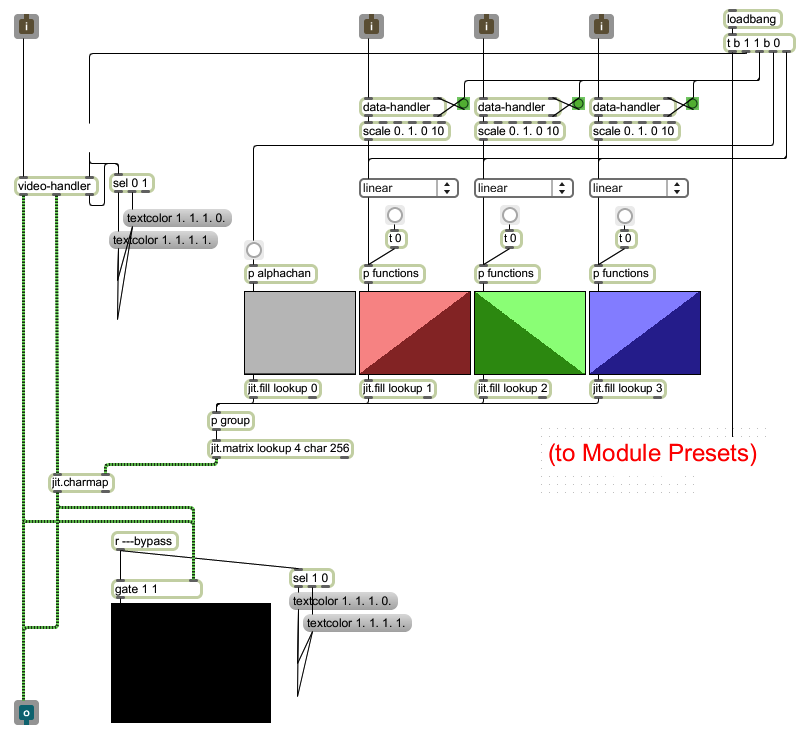
We need one video inlet for each of the mapping functions. Each data inlet will need to have the input data scaled so that it will choose one of the ten possible mapping functions defined in the functions subpatcher. Using the materials in the Vizzie-Kit effects example patch, all we need to do is to copy the data input and scaling parts of the patch twice to create two more data inlets and connect the copied inlets to the loadbang object to make sure that they're initialized in the "on" state.
Since we're using a umenu object to choose the mapping functions, we need to take data in the 0. to 1.0 range and modify it so that that number range is converted to a range of 0 (the first function listed in the umenu object) to 10 (the final function). We can use the Max scale object to do that for us.
In case you're wondering why we'd scale our data in the range of 0 to 10 to choose from among eleven choices instead of 0 to 9 (remember that we're counting from zero), consider this: Using an output scaling range of 0 to 9 would mean that the only time we would output 9 as a choice would be when the input was 1.0 - there would be a wide range of input values that output every other number except for 9. Setting the output scaling from 0 to 10 means that we have equal output scaling ranges for all ten values. It's true that ehe scale object outputs a value of 10 for an input value of 1.0., but we're using that integer value to send a value to the umenu object. Sending a value above 9 will always select the menu item with the highest index.
The effects example patch contains examples that show what data inputs for an effects module look like. The Data Scaling rectangle provides general example of how we modify the standard floating-point data in the 0. – 1.0 range that all Vizzie modules use for our purposes. What we're doing here is a little - we can keep the scale object and replace the third and fourth arguments to the object (which specify the range we want to map the input 0. – 1.0 range to) from 0 and 127 to 0 and 10.
There's just one other little bit of housekeeping – we'll need to initialize the function values for the alpha channel to set a linear mapping by sending it a bang message. Adding a bang message to the trigger object attached to the loadbang object will achieve this.
Once we drop in our patch, make the connections and changes we've just described, and do a little cleanup, here's what we have:
Adding Presets
Whenever it makes sense, Vizzie modules include presets as starting points for exploration. The color mapping module lets us not only select mapping functions using menu choices, but also to go and draw into and over those mapping functions to create new effects. How do we set things up to allow for the creation of presets that will save our multislider object scribbling for posterity?
The Vizzie-kit example patch shows what the preset storage and recall housekeeping looks like in a general sense.
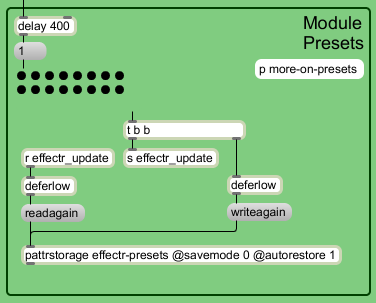
This is a general example, so we'll need to modify this portion of the patch for use inside of the MAPPR module I'm making. For one thing, we'll need to go through and change some names in arguments to the Max objects.
In any Max/MSP patch, the names of things are always considered to be global – every object or send/receive object destination with a given name shares its data with every other object using that same name. In some cases (such as presets), that's a good thing – I want to have the same set of presets available to me every time I use a module in my patch. In other cases, I want to make sure that the preset object recognizes that these are presets for my module (as opposed to presets for BRCOSR or SKETCHR).
Every different type of Vizzie module needs a unique name for its pattrstorage object. We'll need to change the argument to the pattrstorage object in the Module Presets rectangle with a name that matches your effect instead of the example effectr-presets name.
There's also a send/receive pair of objects in the Module Presets rectangle whose arguments will need to change to something unique to the module name instead of effectr_update.
This final alteration change isn't apparent from looking at the patch, but it's very important. The Max preset object in our patch works to store and recall presets because it "knows" it is associated with the pattrstorage object in our patch (the one we've just renamed to mappr-presets). We'll need to set up the preset object to do that for us.
Select the Max preset object, open its Inspector, and type the name of the pattrstorage object into the Value column for the pattrstorage attribute located at the very bottom of the Inspector, replacing the effectr-presets entry.
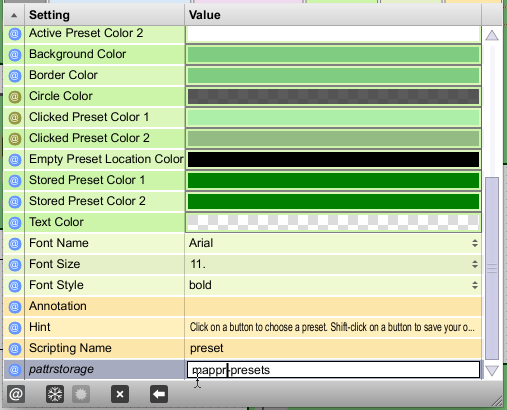
Once we've done that, here's what this part of the patch now looks like this:
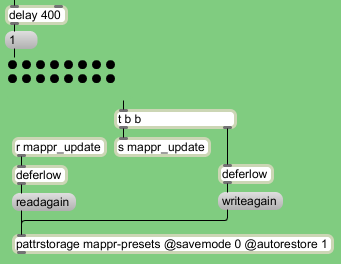
that doesn't trigger any output.
But what about the actual parameters we want to include in our module?
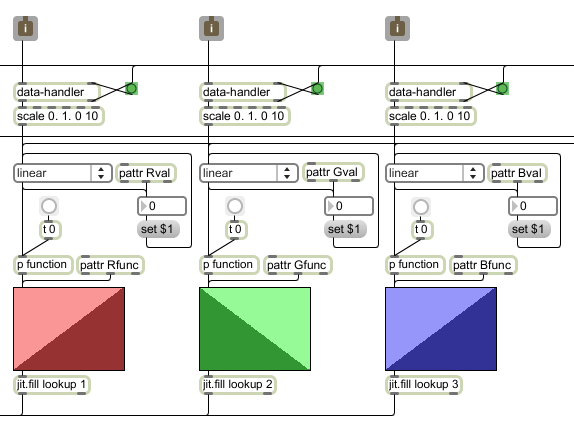
Looking at our patch, it seems as though there are six parameters we'd want to keep track of – the menu selections for the red, green, and blue mappings (they constitute the "starting point" that we might further modify by drawing into the multislider objects), along with whatever is drawn into the multislider objects themselves.
Each parameter we want to keep track of should have a pattr object with a unique name as its first argument that has its middle outlet connected to the user interface element (in this case, umenu objects and multislider objects) that we want to keep track of.
There's one more thing to keep in mind, though – while we'd probably want to keep track of the umenu item on which our multislider squiggling was based, we don't really want to have that function loaded into the multislider when we recall the preset – it would likely overwrite the scribbling we saved. Instead of saving the umenu setting, we'll use a secret Max trick. The parameter we'll add isn't the umenu itself, but a number box (that's hidden when in Presentation Mode) that outputs a new value every time we select a function, which is then stored in an int object. By treating that integer as a preset parameter rather than the umenu item, we'll always recall that last function. And since we don't actually want to trigger any output when we recall this value (the overwrite problem), we'll include the recalled preset number as part of a message that precedes the number with the word "set." The set message is used widely in Max. Generally speaking, the message will cause a user interface object to do only half of its normal task – it will display the value we send to the UI object, but it will do so in a way that doesn't trigger any output. Here's what our newly added preset logic looks like:
Creating a User Interface
Now that our patch is integrated with the Vizzie-Kit's template patch, it's time to put the finishing touches on our module and create our user interface. This will involve three steps:
Modifying the umenu objects and the button objects in our patch so that they match the color scheme used for Vizzie effects modules.
Adding the interface elements from the patch we ported to the Presentation Mode so that they'll be visible in our finished module.
Adding helpful hints to the UI objects to assist ourselves and those people we share our modules with.
The Vizzie-Kit example patches provide a set of regularly used Max UI objects that are already helpfully colorized to make the type of module you're building. To access the items, double-click on the p more-UI-objects subpatcher in the Labels & Useful Stuff rectangle in your patch. The subpatcher that opens contains a whole set of colored UI objects you can copy and reuse:
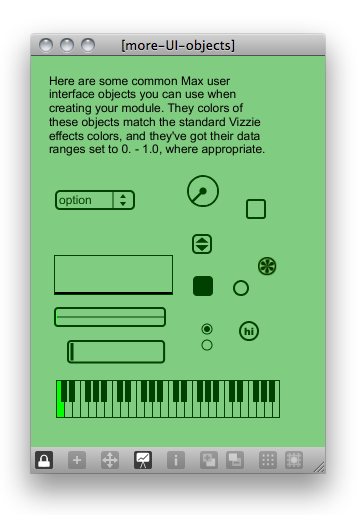
For our module, we'll need three green umenu objects, and three button objects. Copy the button and umenu from the subpatcher and paste it into the top-level patcher. The three reset buttons can be pasted into the patch by copying the green button, selecting the three reset buttons to replace, and choosing Paste Replace from the Edit menu.
To replace the umenu items, open one of the existing umenu objects and copy the text in the Value column of the Menu Items listing in the umenu item's Inspector, and then replace the text in the green umenu you copied from the more-UI-objects subpatcher. Once you've created a green umenu with the proper function name entries, you can copy if, select the three umenu objects in your module, and choose Paste Replace from the Edit menu to replace them, too.
Since our module needs a snappy Vizzie-style nameplate, click on the green textbutton object labeled MY-EFFECTR, open the object's Inspector, and type "MAPPR" into the Value column for the Text "Off" Label attribute.
We need to add the multislider objects to the Presentation Mode layer so that they'll be visible on our module's front panel (The nice thing about using the button and umenu UI objects from the more-UI-objects subpatcher is that they're already been added to the Presentation Mode later - they're ready to go). We don't need to see the alpha channel mapping, so we'll don't add it). Select the three multislider objects and choose Add To Presentation from the Object menu.
When you click on the Presentation Mode icon in the toolbar, all of the patch except for the items that are contained in the Presentation Mode will vanish. The objects that were originally in place in the effects example patch will return to their proper position, but you'll have to move and resize any user interface objects you've added to your patch to create an interface you like. Here's what I decided on:

There's one final bit of our user interface to add: hints.
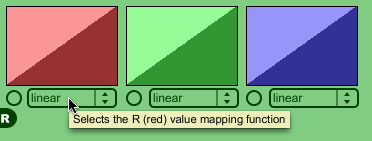
My wise sensei always said, "…to add comments to your patching is to write love notes to yourself and to your friends located somewhere in the future." In a Vizzie module, we do this by placing helpful explanatory text in the Hint attribute of each user interface object in our patch. Doing this in the Presentation Mode is perfect because we can see each interface object. Select a UI object in the patch, open its Inspector, and type your text into the Value column for the Hint attribute.
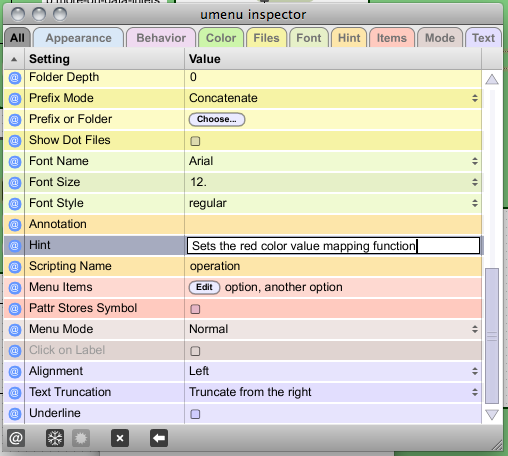
Whatever you add will become the visible hint when you mouse over a UI object in your Vizzie module in a locked patcher.
Putting It All Into A Box
Our long journey to Vizzie enlightenment is almost at an end – it is time to create the Vizzie module bpatcher file. It is the file which is the container for all we have just made. It's the file you drag from out of the File Browser window into your Vizzie patch. It is the file whose name is always the name of the module in bracing capital letters (e.g. BRCOSR, PLAYR).
If you have not done so already, save the file to the same VIZZIE-PATCHES folder where normal Vizzie patches live (the folder can be found inside the patches folder in your Max application folder). Make sure that you name the file mappr-patch.maxpat.
Open a new Patcher window and type "n" to create a new object box.
Type "bpatcher" into the new object box and hit return. The object box will disappear and you'll see an empty box appear.
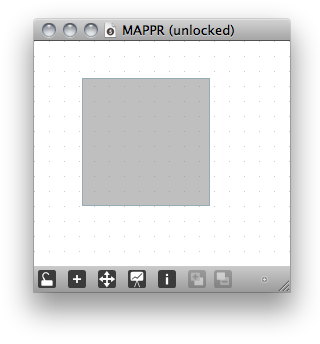
Save the this patch to the VIZZIE EFX folder located in the VIZZIE-PATCHES folder where the rest of your Vizzie effects module patches live (the folder can be found inside the clippings folder located in the patches folder in your Max application folder). Make sure that you name the file MAPPR.maxpat.
Click on the bpatcher object to select it and open the object's Inspector by clicking on the Inspector icon in the patcher window toolbar.
Click on the Load button for the Patcher File attribute to open a file browser. Navigate to the folder where your mappr-patch.maxpatfile is located and select it.
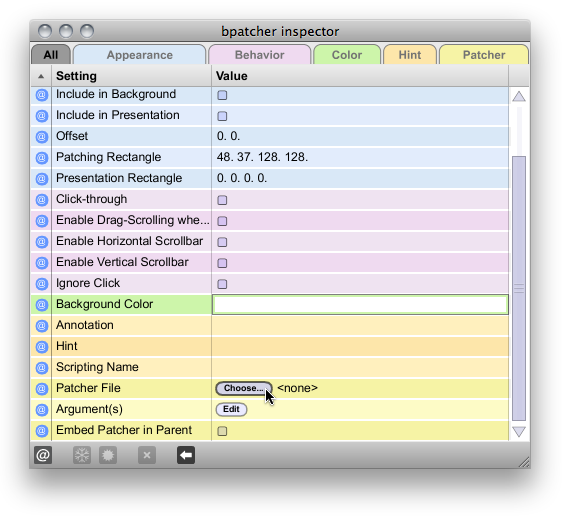
When the file is loaded, you'll see a change in the bpatcher object's rectangle – there will now be inlets and outlets in the bpatcher object box – one for each inlet and outlet object in the original mappr-patch file.
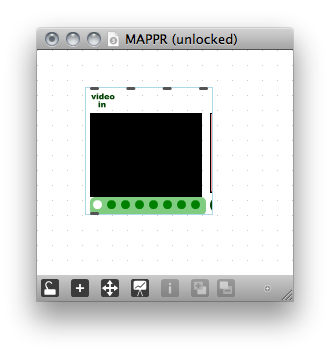
What happened to the nice green background our mappr-patch file had? We'll need to tell the bpatcher object that we want to use the background color of the patcher we've loaded into the bpatcher. We can use the bpatcher object's Inspector to do that, too.
By convention, Vizzie modules don't have box outlines (We do this to make the inlets and outlets more visible). As long as we've got the Inspector open, let's set both of these attributes.
Open the bpatcher object's Inspector again, choose Patcher Background Color from the Background Mode's pull-down menu, and click in the checkbox for the Border attribute to turn the border off.
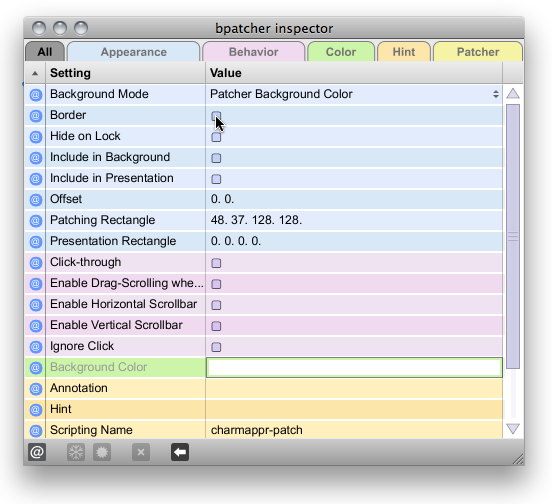
This is looking a lot more like a real live Vizzie module, but the bpatcher box is the wrong size. Use the bpatcher object's Patching Rectangle to change the horizontal and vertical size for the object (by convention, most Vizzie effects modules are 154 pixels high, and the width varies depending on what's in your interface. I went with a size of 490 x 154 pixels.
The final task involves making sure that the circular buttons for the data inlets and outlets are properly positioned. The easiest way to do this is to open up the mappr-patch file in another window, move the UI items around, and then save the patch. You'll notice that the UI items in your bpatcher will change position every time you save the mappr-patch file.
When you've finished your Vizzie module, there's an additional and optional step you might want to take if you use the Max browser when doing your Vizzie patching. As you may know, the Max file browser contains a set of helpful links to the various Vizzie modules that you can use for drag-and-drop Vizzie patching.
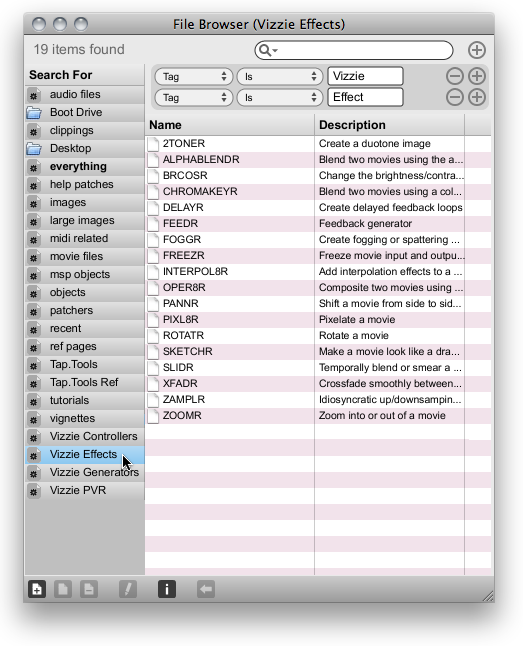
If this is a feature you use often, you may want to add information about your Vizzie module so that it appears and is described in the Browser. You can do this by editing the contents of a text file called vizzie-init.txt, located in the init folder, which is found in the Cycling '74 folder in your Max application folder. Each identification consists of three lines of text separated by spaces and terminated with semicolons. Here's a sample entry from the vizzie-init.txt file for the 2TONER module:
max db.addmetadata 2TONER clipping tag Vizzie;
max db.addmetadata 2TONER clipping tag Effect;
max db.addmetadata 2TONER clipping description "Create a duotone image";
When I do this, I copy the lines for an entry in the init file, paste the copied lines into the file, and modify the copy. As you can see, there are really only two things we'd need to modify in this listing: change every incidence of 2TONER to MAPPR, and replace the descriptive the text inside the double-quotes to match what our module does. The result would look like this:
max db.addmetadata MAPPR clipping tag Vizzie;
max db.addmetadata MAPPR clipping tag Effect;
max db.addmetadata MAPPR clipping description "Color remapping using function tables";
Once you've added that line, your new module will now appear in the Browser along with the other Vizzie modules.
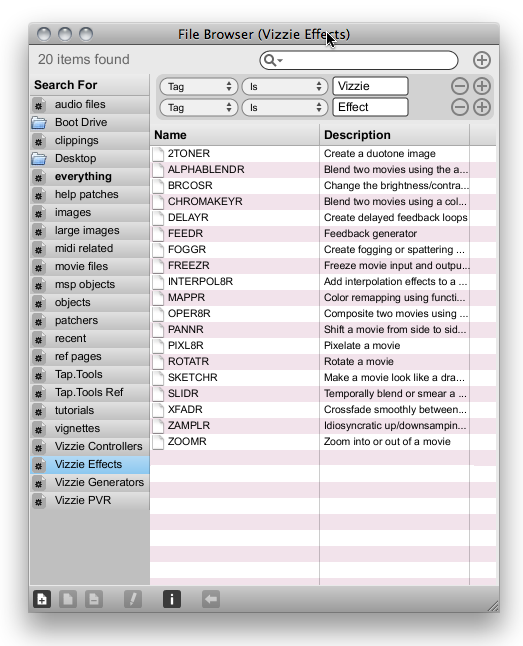
Note: Since this file is re-installed each time you upgrade Max, it's best to save a text file that contains information about your own Vizzie modules that you re-add to the vizzie-init.txt file after upgrades.
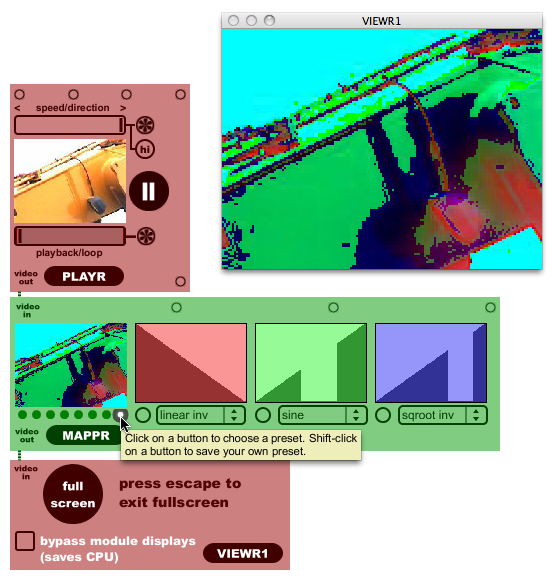
That's it. You've created a real live Vizzie module. The final step is your reward – you get to be the person who creates the presets for the object. Create a Vizzie patch for yourself using a PLAYR and VIEWR module along with your new MAPPR module, and start playing around with the function menus and drawing in the multislider objects. When you find a setting you like, shift-click on one of the black buttons in the preset object to save your setting for posterity (When the file dialog appears, make sure you save your presets file to the same directory as the mappr-patch.maxpat file).
Next time, we'll use the Vizzie-Kit to create another kind of Vizzie module. In the meantime, have some fun with the MAPPR module and try your hand at turning the Jitter help file of your choice into a Vizzie module.
by Gregory Taylor on April 14, 2011

