Winter's Day jit.gl.pix: A Procedural Drawing Homage
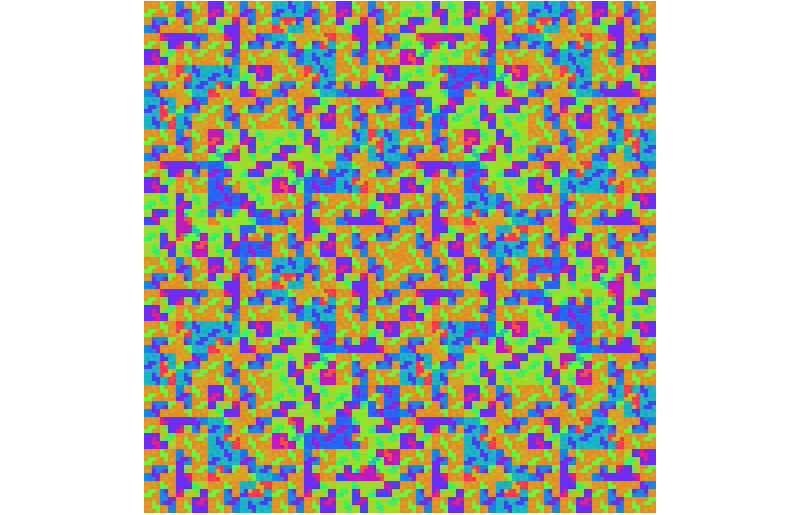
During a visit to NYC a number of years back, I accidentally backed into a singular experience that has stayed with me for a long while. On my friend Luke Dubois' recommendation, I paid a visit to the American Museum of Folk Art to see an exhibition on the subject of obsessive drawing. Of all that I saw, the painstaking and fantastically beautiful work of Martin Thompson was my favorite.
The work really stuck with me, and when I returned home, I turned my attention to attempting to create that sort of iterative image creation using Jitter matrices. You can find a record of that activity (and a Max patch, too) here. I still make use of the patch all the time, and recently it occurred to me to think about porting the patch to the Gen world - what might a jit.gl.pix-based version of my original patch allow me to investigate?
I realized that I'd need to make some changes from that original patch — I'd be working with textures instead of Jitter matrices, to start with. I decided that even though I might encounter some constraints or things that required changing, it'd be an interesting exercise.
Here's what happened.
Getting Started - Images and Textures
My original patch had two basic parts:
Patching that transformed input from a matrixctrl object to a Jitter matrix
Patching that used a jit.rota object to zoom, offset, and process matrix-based images in a recursive fashion, with controls for those parameters.
Working with images in the Gen family of objects for jitter (jit.pix and jit.gl.pix) requires a little conceptual retooling (If you're new to that game, there's no better guide to getting the lay of the land than Les Stuck's wonderful introductory article on ref="https://cycling74.com/tutorials/my-favorite-object-jit%C2%B7gl%C2%B7pix">the jit.gl.pix object).
The first part of the task involves translating the simple matrix-based graphic from my original patch to a texture, which is what jit.gl.pix works with. I can borrow the initial patching I used to create my 8x8 matrix-based graphic image as a starting point. I grabbed that original part of my patch and rearranged things a little bit to keep things better organized in terms of understanding the process, and wound up with the p grid2matrix patch. Here’s what’s inside:

It’s a pretty straight-ahead bit of patching. Any time you click on an element in the matrixctrl object, a message to set (or clear) the element is sent in the form <row> <column> <0/1>. The patch sends messages (getrow N) back to the matrixctrl object instructing it to output lists for each row of the square. Those messages are collected together using pack and zl group objects into a 64-item list that is converted to an 8x8 char Jitter matrix using the jit.fill object, and then stored as a 1-dimensional Jitter matrix (the jit.matrix the_grid 1 char 8 8 object), and then output for display.
Note: that last jit.matrix object is used to display the results of clicking the matrixctrl object so that the displayed output matches the position of matrixctrl elements, using the usesrcdim, srcdimstart, and srcdimend attributes (for more on those attributes, take a look at this Jitter tutorial on matrix positioning). When I send that output to a jit.pwindow, the results look just fine - onward!.

I can convert any Jitter matrix into a texture with the same dimensions as my matrix using the handy jit.gl.texture object. I’m going to use the same size image that my original Jitter patch used - a 512x 512 image, so I’ll need to specify that output size by sending the result to a jit.gl.texture @dim 512 512 object. But the results are puzzling and disappointing.

I’m seeing a blurry image rather than a hard-edged one because the jit.gl.texture object is trying to do me a favor by adapting and interpolating my image as it is scaled up - something I didn’t have to worry about in my earlier Jiiter patch. It looks interesting, but I’ll need to fix that. I can do so by adding @adapt 0 as an argument to the jit.gl.texture object to turn that interpolation off. Now that I’ve got my fresh-baked texture, it’s time to do perform some transformations.

By the way - you've probably noticed that little jit.world object in my patch. Perhaps you've even wondered by I am not showing you the jit.world object's display window. I'm using the second outlet of the jit.world to keep my patch running by sending bang messages to the jit.gl.texture object. The illustrations here don't include the jit.world object's display window because it's too big to comfortably include. Instead, I'm using the Vizzie VIEWR module to display the textures in my patching. If you're working on a nice, big monitor. it's more fun to see the larger display!
Teaching A Texture to Dance
In the original matrix-based Jitter patch, I used the jit.rota object to handle offsetting the image matrix with each pattern processing iteration – notice the arguments to the jit.rota objects in the patch:

I'm working with textures now, so things are a little different. To help demonstrate the way I need to work with textures, I'm going to start modifying the texture with a simple image transformation: offsetting the texture horizontally and/or vertically. It is a simple procedure that provides a good way to become familiar with one of the basic ways in which the jit.gl.pix object does its work.
Instead thinking of the location of an individual pixel in terms of pixels in a matrix, the location of an individual pixel in the jit.gl.pix 2d image world is identified by X and Y coordinate positions, where X and Y coordinates are floating-point numbers in the range 0. – 1.0.
That method of describing space isn’t unique to the Gen world – it’s how the Jitter jit.expr object works, for example (Andrew Benson’s tutorial on jit.expr might be something you want to check out - it gave me the confidence to do some fun stuff myself, in fact). Andrew’s tutorial talks about what I'm going to be dealing with here - normalized numbers - Jitter Gen objects work with them, too.
In order to offset the image, we’ll be working with object positions in an image using the Gen norm operator (which provides a way to access the normalized coordinates of an input texture) in conjunction with the sample operator, which lets us access vectors from another location in the image.
Here’s what’s going on inside of the jit.gl.pix object:

The input image comes in by way of the in 1 operator. To move the image, I use the norm operator to provide us with X and Y coordinates in the range of 0. to 1.0. The swiz operator returns the current X and Y coordinates for each of the cells in the input matrix (the default is the location of the current cell). When a value is added to the swizzled output values for X and Y, another cell offset from the original input is sampled – adding an X offset value of .5 to the swizzled value will locate a cell which is half the length of the input matrix to the right. Similarly, a Y offset value of .5 will locate a cell which is half the height of the input matrix down (negative floating-point values indicate offsets up/to the left). Feeding that value to the sample operator will fetch the vector values for that cell and output them. Presto!

When I first started getting the hang of working with Gen in the Jitter world, I tended to use the swiz and vector operators like the Max pack and unpack objects – as a a way of taking a group of data and breaking it up into individual pieces that I could modify individually and then repack and send on their way (that’s what you’ll see in use in Gen tutorial 2a: The Joy of Swiz). Along the way, I’ve learned to work with vectors, where sets of similar calculations can be combined into a single calculation (think of a vector as a kind of list that contains a list of values). That’s why you notice that the swiz operator is used with two arguments and also that I’ve listed combined the param operator values when doing addition. That’s referred to as vectorization - if you’re interested in getting a little more in depth on the idea of vectorization, Gen tutorial 2b: Adventures in Vectorland follows on from the tutorial on swizzing and shows you how vectorization changes the original patches from the previous tutorial).
Expanding On Our Understanding (Zoom)
So - if I can make my image move by using the sample operator and adding an offset value from the norm operator, zooming an input image should just be a matter of multiplying the swizzed values, right? You’re almost right. Here’s what you'd figure might work...

...and the result is somewhat unsatisfying:

The problem is that the zooming for the image is done relative to the upper left-hand corner of our image (which is the 0. 0. point when we start with the swizzing). This problem can be fixed by adding a param operator that sets a center point for the multiplication operation. Given what we know about positioning now, the center of the image is located at .5 .5, so I’ll subtract that center parameter value before I do the multiplying to move the image’s center

The results look much better.

If you look and think a little bit about the two different image operations I’ve done so far, you’ll notice that they’re almost exactly alike - I swizzle out the position vector and then do something with it. Since the two operations are both sequential and similar, I can now modify the jit.gl.pix object so that it performs both operations in the same patch - all we really do is to add the param objects and then do the offset addition right before we start the zoom.

The results have us one step closer to porting the original patch.

Thinking Outside the Box (Boundary Conditions)
When first moving the texture/image about, you might have wondered what would happen if the sum of the norm operator’s output value and the offset value was less than 0. or greater than 1.0. It’s not intuitively obvious from the patch, but the Jitter Gen sample object automatically wraps any input values which are not in the expected range to keep all of the sums safely within bounds.
The original Jitter patch made use of the @boundmode attribute of the jit.rota object to modify that behavior when processing our images to produce a final result. The jit.gl.pix sample operator allows us to do something similar by using an attribute with the same name (although it uses different terminology and has fewer modes of operation).. The three attributes names are wrap (similar to the wrap mode in jit.rota), mirror (similar to the fold mode in jit.rota) , and clamp (similar to the clip mode in jit.rota) . These modes are best understood by exploration, so here’s a sample patch that lets you do just that:
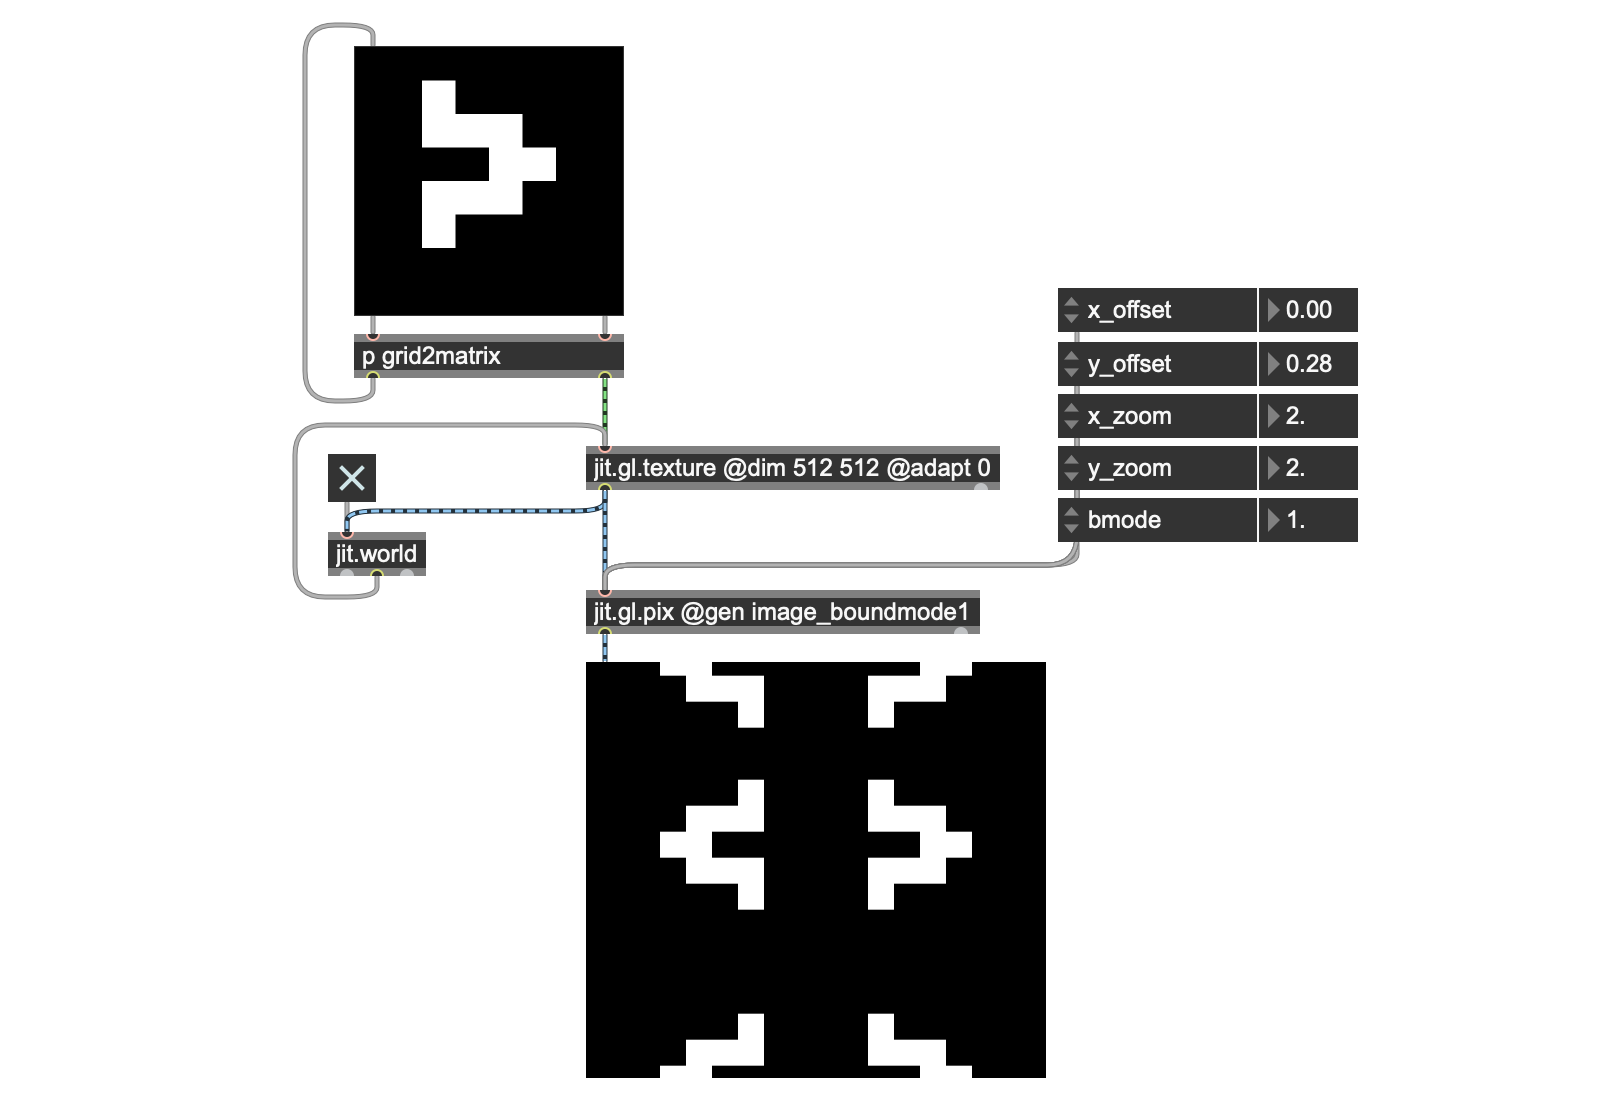
Inside the jit.gl.pix @gen image_boundmode1 object, I’ve taken the original offset and zoom patching and made two more copies of the sample operator. Each additional new sample operator includes an @boundmode attribute set to one of the bounding mode operations. In order to select which one will be displayed, I’ve added a param operator to specify which operation we want to see, along with a selector 3 operator to switch between the multiple inputs.
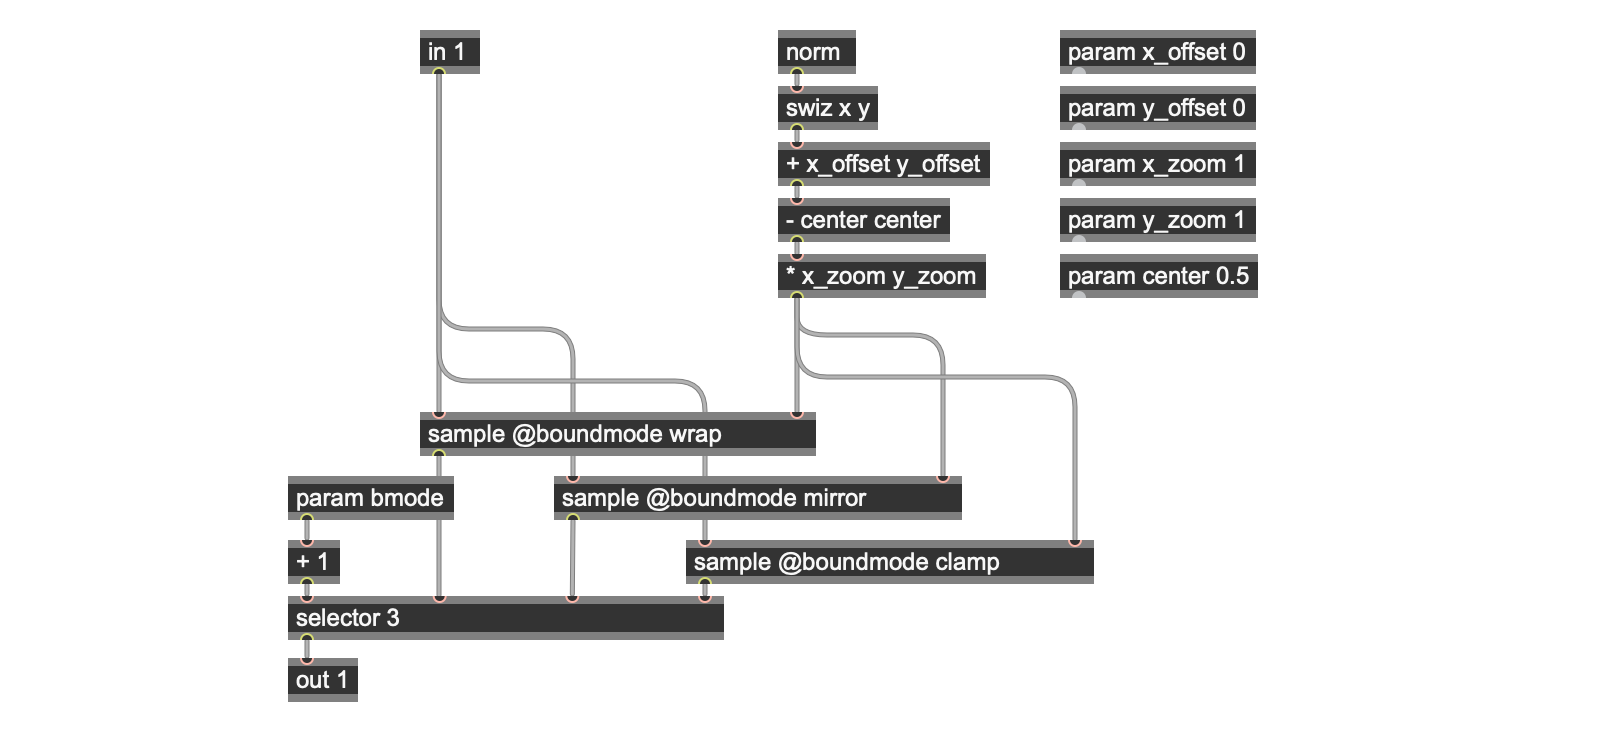
This works well, but there’s a little question of efficiency here. If you examine this patch closely, you’ll notice that we’re doing the same calculations for the three bounding modes in parallel and then selecting which one we want to output. Since this patch is going to be iterating this basic set of operations, that’s going involve some duplicated effort. Wouldn't it be more efficient to make a choice and then perform only one transformation?
So it’s time for some codeboxing. There are a lot of Max programmers who love writing command line code, but I tend to use the codebox operator and write code only when I really need it. There are some things in Gen that you can’t really do without the codebox operator, and procedural operations are one of those things (for more on the topic of codeboxing, this tutorial will help you get started). So I added a codebox operator to the patch where the earlier duplicated sample operators and the selector operator were located, and added a little bit of procedural coding (you'll find it in the setting_the_boundmode2.maxpat patcher:
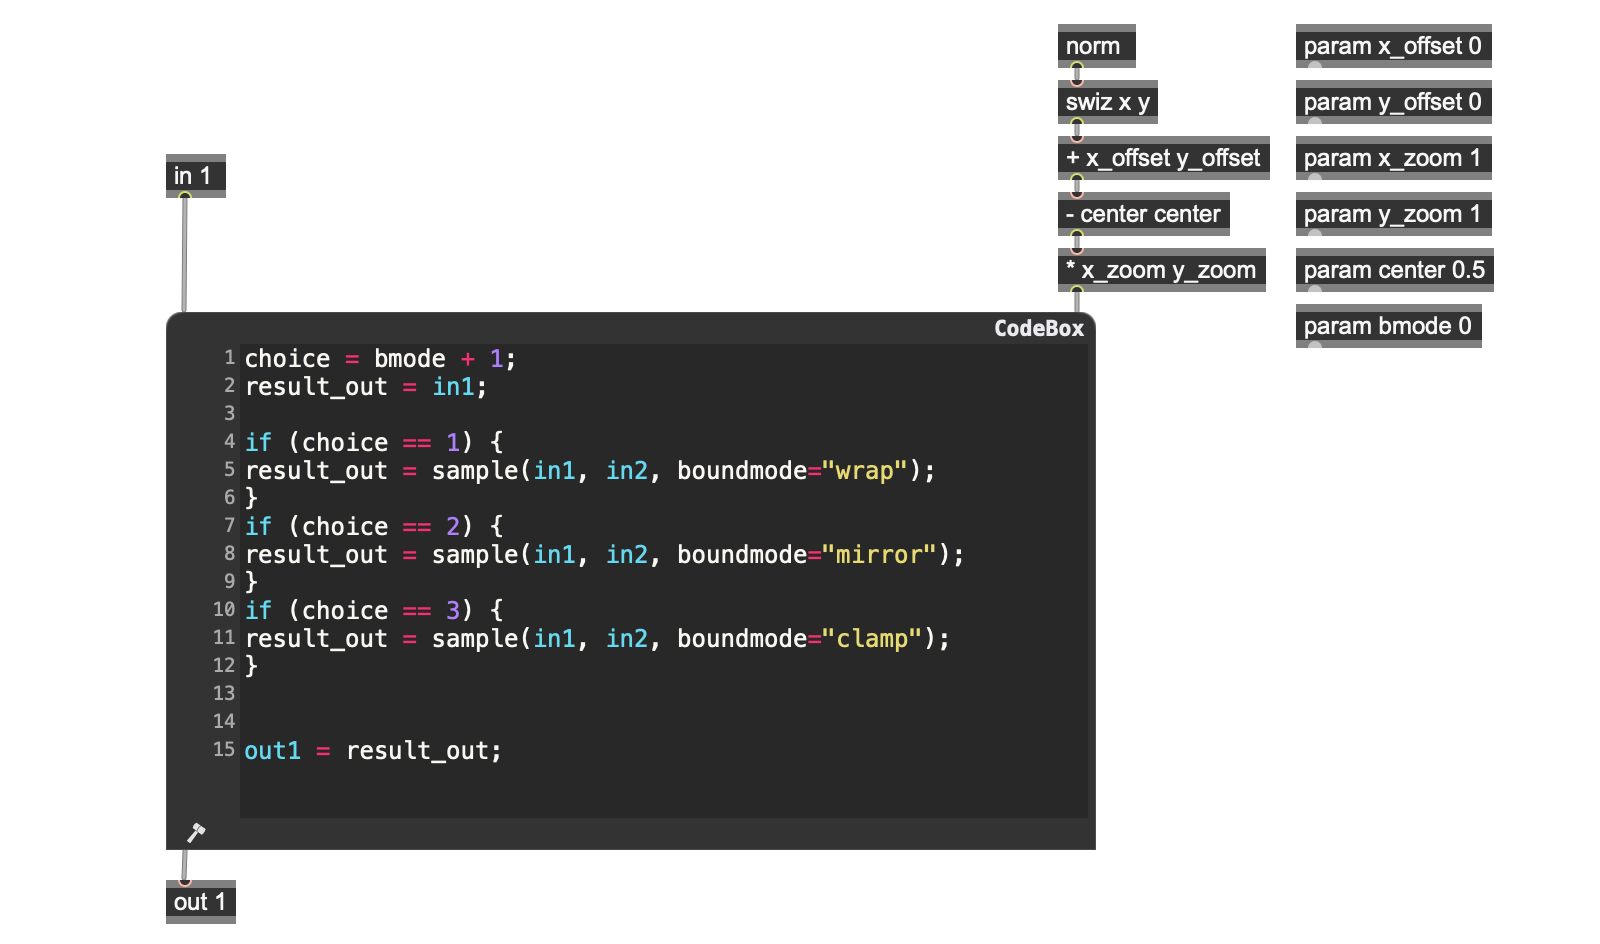
While that’s quite simple, the result of replacing the multiple sample and selector operator patching is that the sample operator patching will only be performed once rather than doing parallel calculations and then choosing one of them. While the patch looks the same from the outside, it’s more efficient.
Combination
Now that we’ve got an efficient way to offset, zoom, and wrap, mirror, or clamp our image, let’s turn our attention to another feature of our original Jitter patch - compositing operations.
Combining two images isn’t hard at all. Here’s a really simple example that calculates the average between the original input image and the zoomed and offset result:
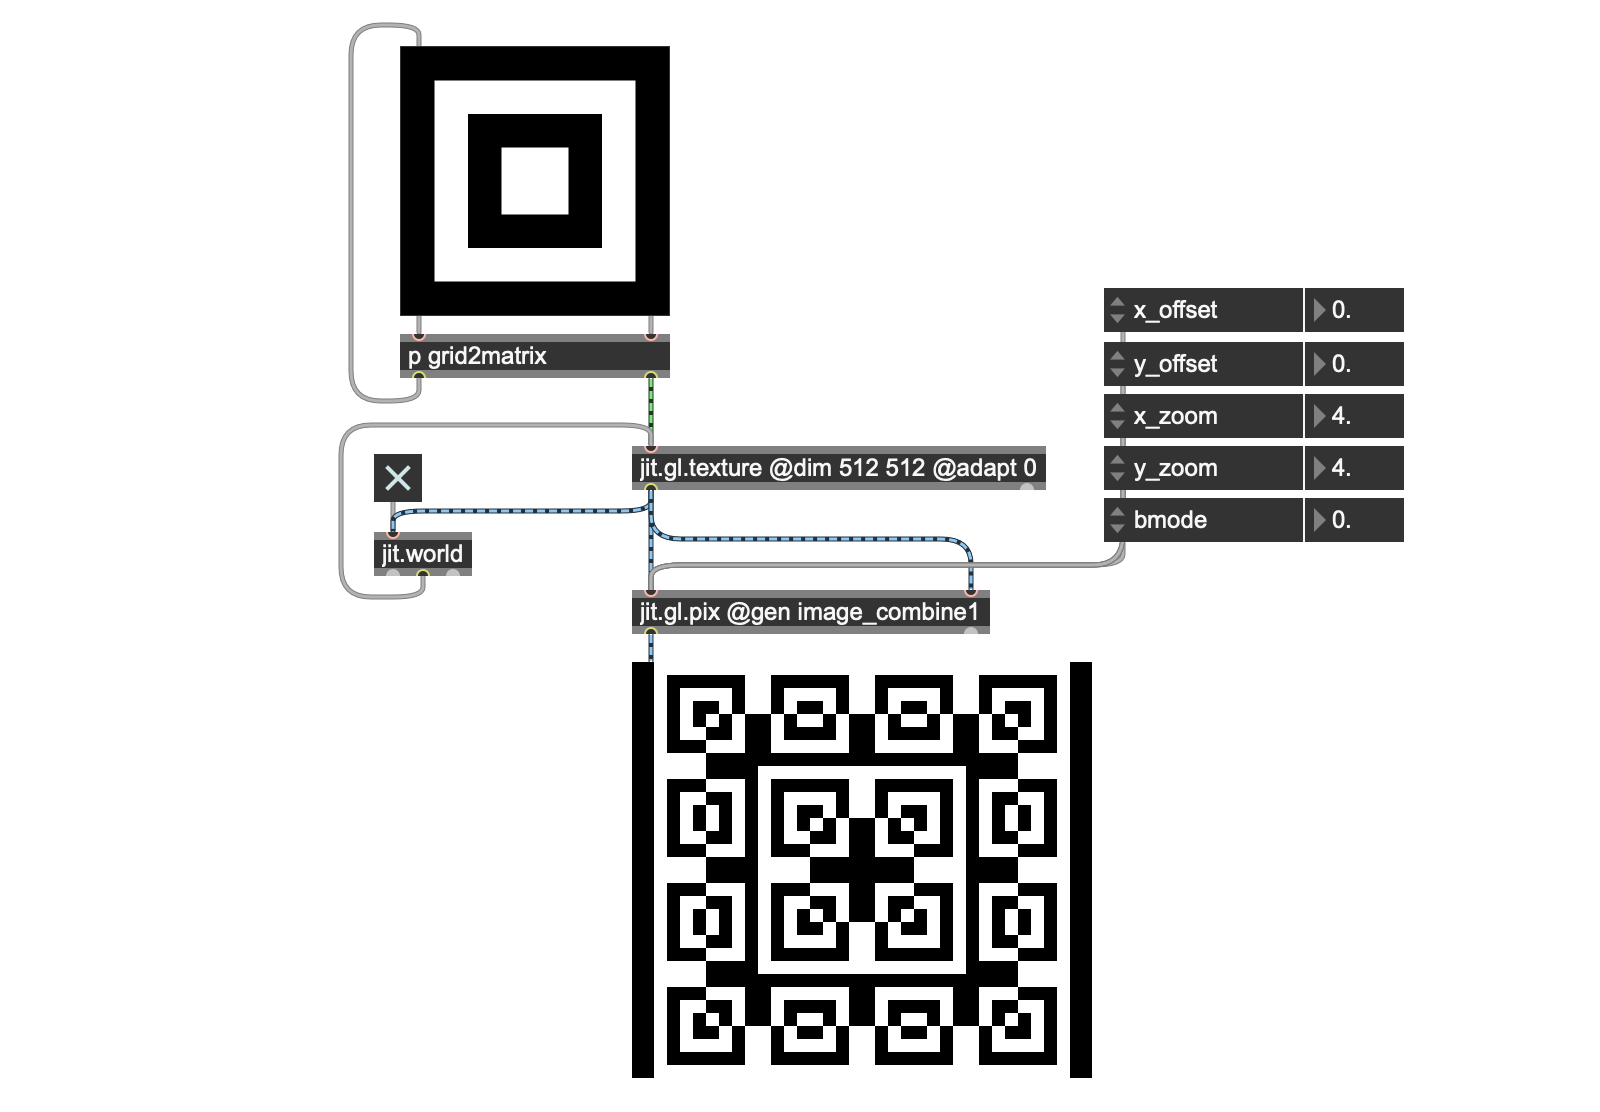
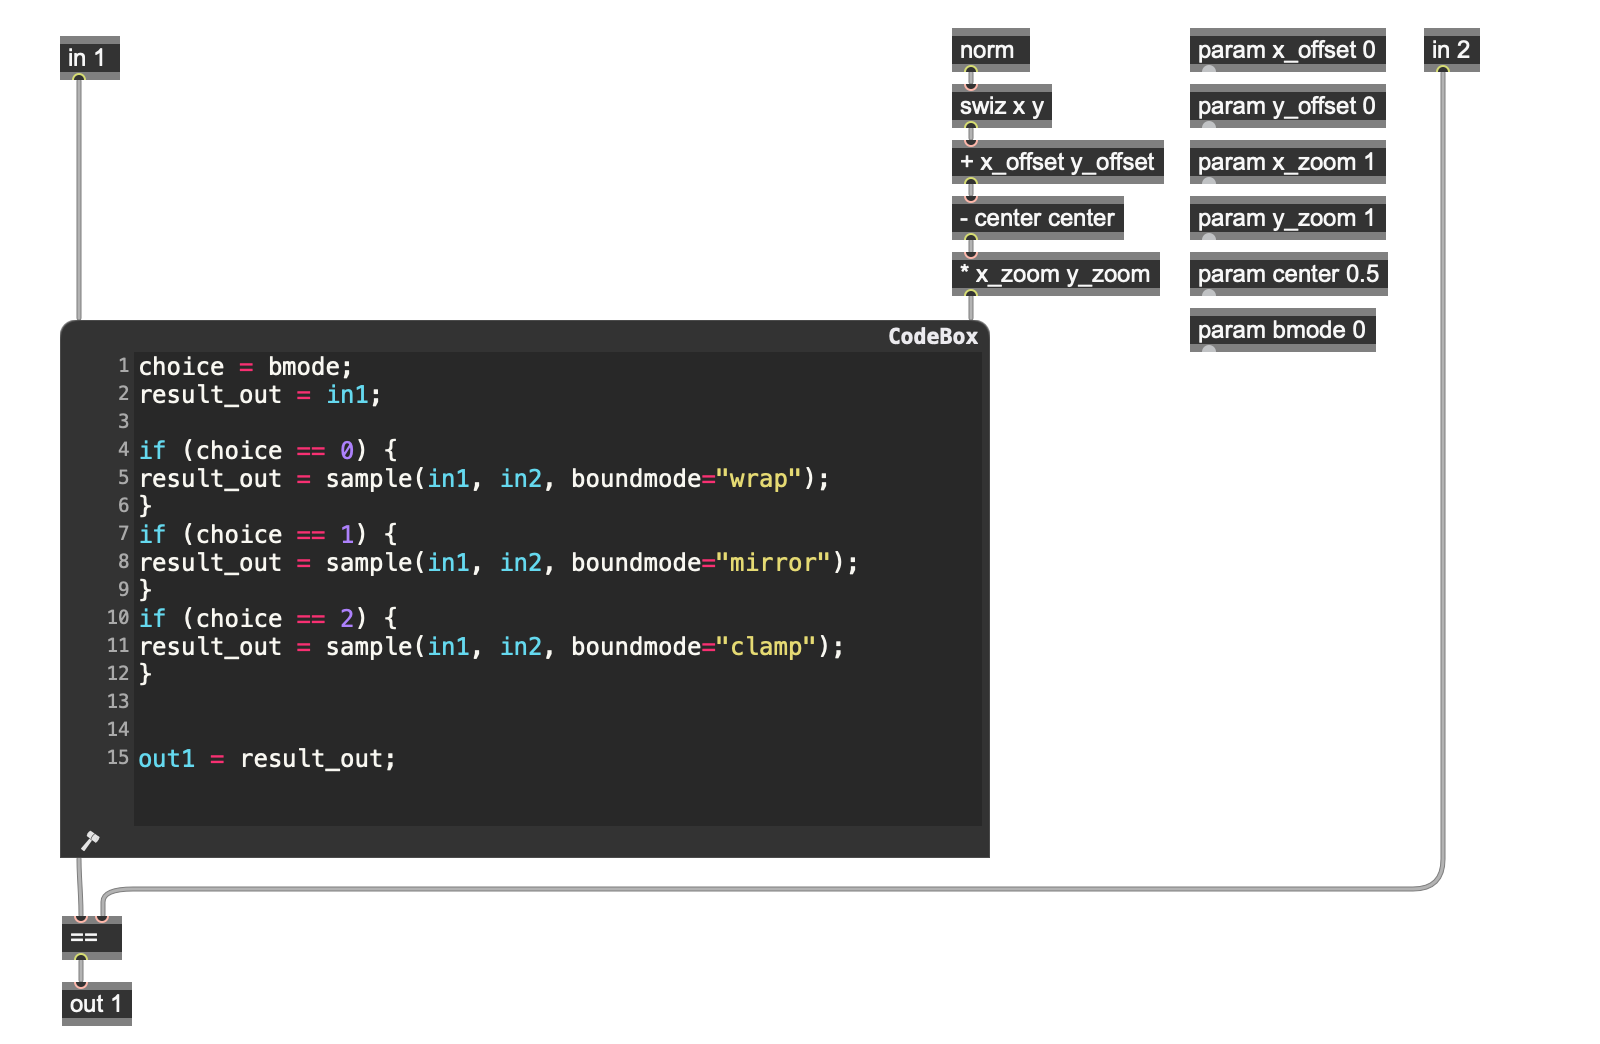
The inside of the patch is simplicity itself - I take the original image from the in 1 operator and route it to the sample operator-based patching done in the codebox while receiving another copy of the original image from the in 2 operator and then comparing the two textures using one of Gen's logical operators (in this case, it's the == operator).
There are more logical operators in Gen that we can also try, of course. Working with these logical operators is where we find the single biggest difference between working in Jitter and working in Gen.
In the original Jitter patch, we made use of the standard set of Jitter logical operations available to us in Jitter. While Gen has logical operators, the list of logical operators in the Gen world differs slightly.
The primary difference lies with the absence of bitwise operators. This is due to the fact that - unlike Jitter in Max - there is no distinction made between floating-point numbers and integers - all number values in Gen are treated as floats. Floating-point numbers don't have bits at the level of value-representation, which is why you can't apply bitwise operations to them.
That said, there are still a lot of interesting possibilities:
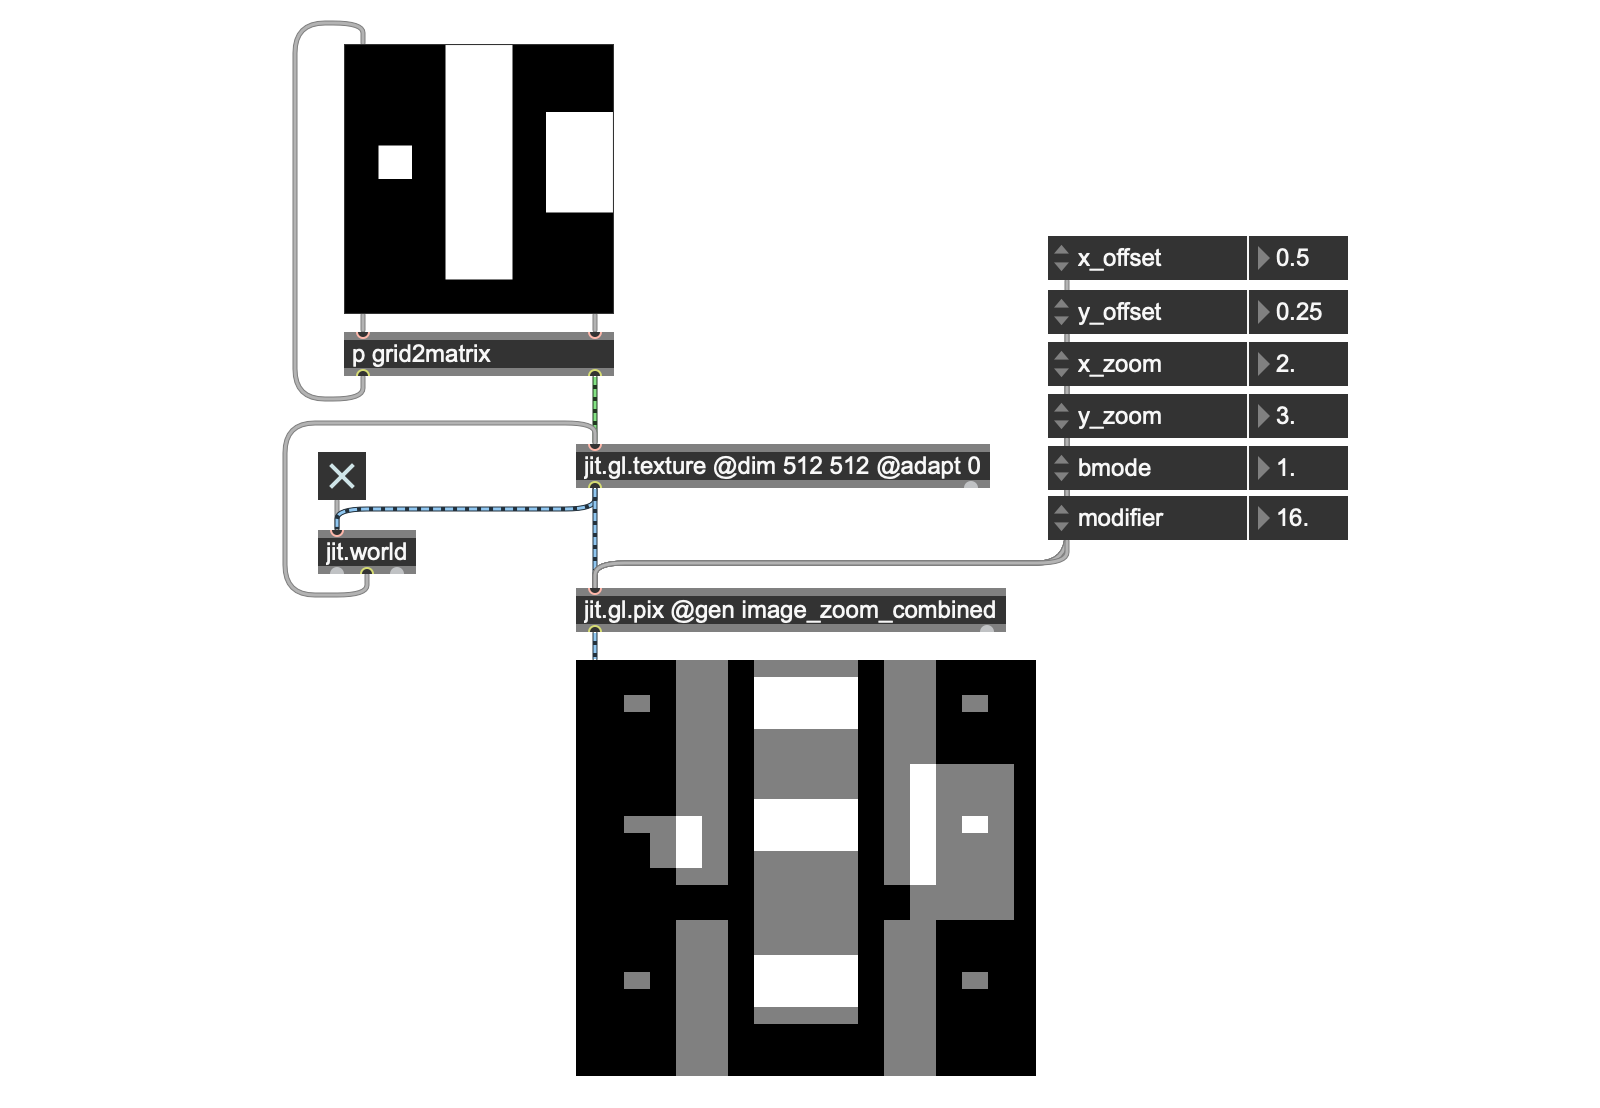
Modifying the jit.gl.pix Gen patch to support the logical operations which are available is another straightforward case where using a codebox operator for procedural coding is a must. The necessary procedural code responds to a number input by choosing a particular logical operator, applying it to the two inputs (in this case, those correspond to the original image and its zoomed/offset result), and outputting the result.
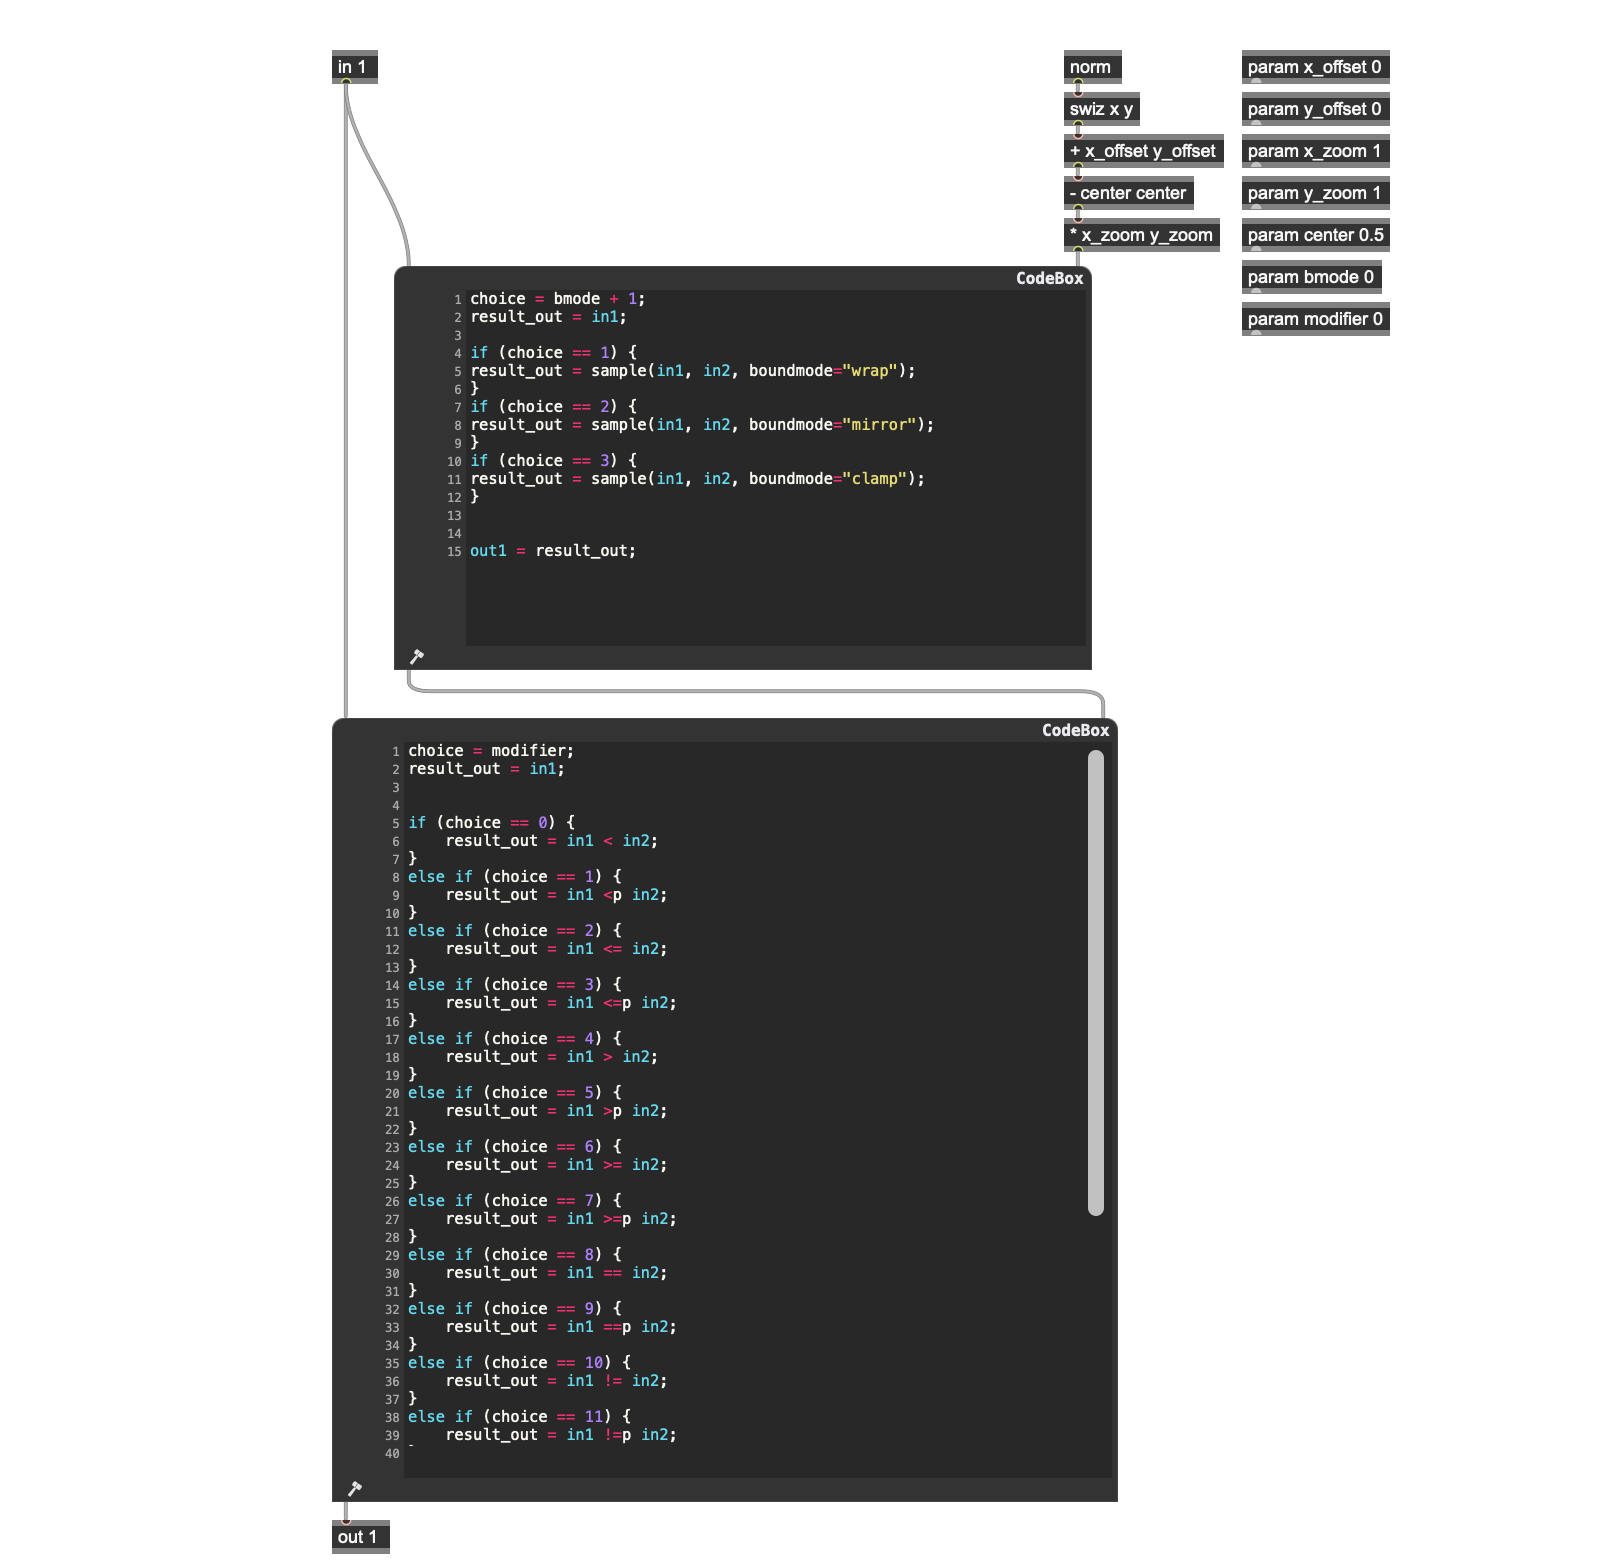
Note: In addition to the standard logical operators, you’ll find that operator 16 averages the two images rather than performing a logical operation on them.
Iteration
The only thing needed to finish up the basic port of the Thompson homage to the Gen world is to create multiple iterations of the processing above, to provide some UI controls for the result, and to patch the ability to choose a given “level” of iteration for image output.
Recursively iterating through an image processing sequence based on the offset, zoom, bounding mode, and logical operator is a simple matter of hooking a sequence of jit.gl.pix objects together and feeding the output to the inputs of the next jit.gl.pix instance, similar to what we did with our original Jitter patch.

In addition, I'm going to need a different way to route my parameter choices to each jit.gl.pix instance. For that, I replaced the Max attrui objects (which can only be connected to a single jit.gl.pix external at a time) with a number box/umenu-based interface whose outputs are sent to a single send object, and then distributed to each jit.gl.pix instance from a receive object.
You’ll notice that I’ve added a little patching to the X and Y offset parameter calculations. With the original Jitter version of the Thompson patch, I was offsetting the image using pixel values. While it’s true that the texture version uses floating point numbers between 0. And 1.0 to describe positions, I can still perform image offsetting using integer values by taking a integer offset value, dividing it by a floating-point value of 512. (the total number of pixels in the image in the X and Y dimensions, and using the result for the offset values.
To choose the level of iteration, I added little more patching (jit.gl.pix @gen level_selector), which consists of a selector operator and a param operator that lets us choose the level of iteration I want to output.

Here’s what the result winds up looking like:

In Living Color
I think it was the idea that I no longer had bitwise operations that first got me thinking about teaching my ported patch a few tricks that the original version didn’t have. One obvious advantage that I had by virtue of doing the work on my GPU was that it’d be efficient. I initially thought that I’d hook all my parameters up to some modulation sources and watch the results slide, shudder, and dance. In turn, I found myself thinking about something that my original patch lacked: color.
Since the patches I was creating produced multiple images, my first thought was that I’d just grab three separate iterations and map them to red, green, and blue. Since my patch output black and white images, the simple RGB planar overlap wasn’t anything special (feel free to take the patches I’ve included with this tutorial and experiment a little for yourself.
In the course of doing a recent tutorial on developing Videosync plug-ins in Max for Live, I’d run across the ISF Color Diffusion Flow shader and found its way of generating color to be interesting. I’d never really done much experimentation with color palettes and procedural graphics, but there was plenty out there to take a look at. Probably the most accessible explanation I ran into was from Inigo Quillez’ computer graphics website. It provided not only a good overview of the method of colorization I’d seen, but also pointed me to a nice Shadertoy site that had some code I could use, too. Thanks, Inigo!

He also helpfully included some helpful sets of parameters to generate color palettes that I could work with, too.

The nice thing about the procedural coloring described here was that it worked great on greyscale images — from the point of view of working with jit.gl.pix, all I’d have to do was to pop in a swiz operator and swizzle out one of the three color values ( r, g, or b) and plug them into his equation. I took the page in hand, created a new jit.gl.pix object, opened it up, and then popped in a codebox operator and a little supplementary patching that matched what I’d been reading about. Here’s what I wound up with on my first attempt:

Since I was working with procedural rendering of greyscale images, I figured that I could easily start by using the average modifier in my regular patch, since it kicked out greyscale averages automatically. I mocked up a test patch with my jit.gl.pix object, plugged it in, and was immediately excited by what popped out. Wow!
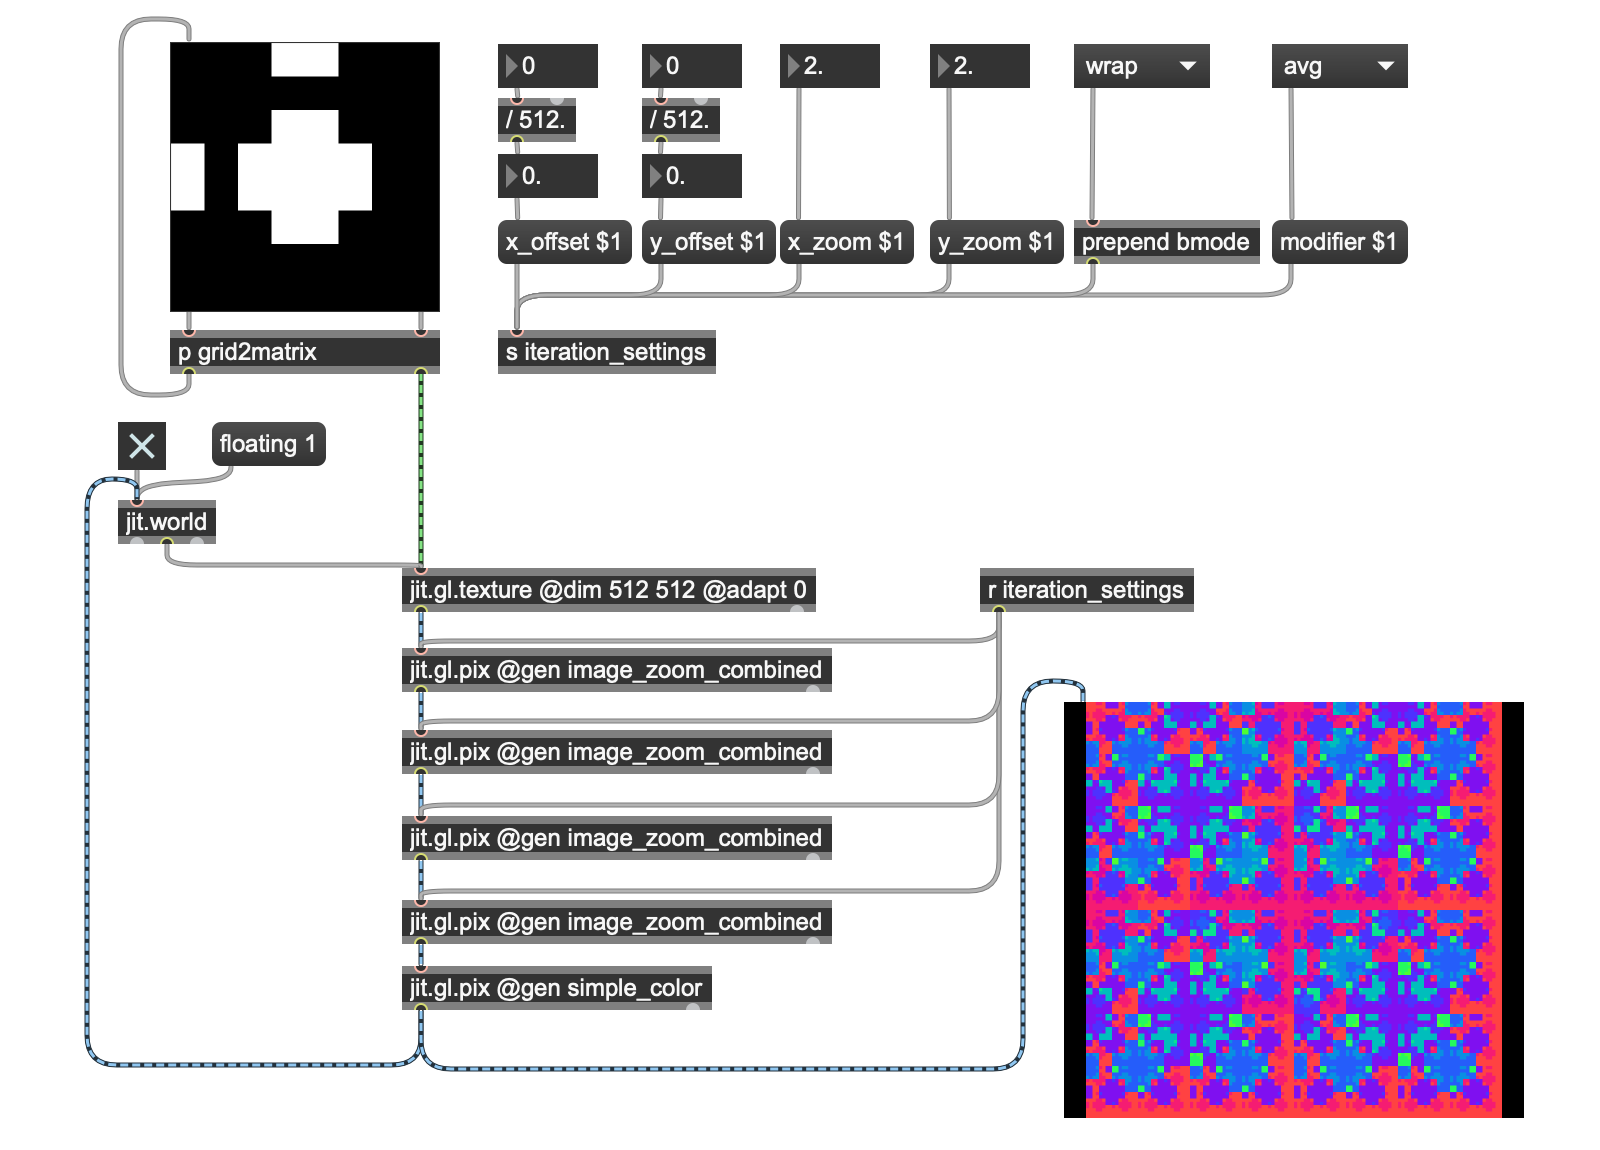
Inigo had also provided a great explanation of how I could vary the input vector values to the codebox calculation to use different color palettes, so I made a list of them from his webpage, cracked out a codebox operator for the procedural bit of the patching, and created a jit.gl.pix patcher (jit.gl.pix @gen color_palettes) that would let me select from the 7 palettes that his code example provided. Here’s what the inside of that patch looks like:

The results were equally impressive - I now had a great way to colorize my procedural graphics page with some real variety.

But I wasn’t finished yet. As I flipped back and forth between the color palettes, it occurred to me that what I was seeing was, in effect, statically colored based on the calculations working on a single value from the swiz operator. I started thinking about what I might do to change it up a little bit. The solution started from the fact that I realized that I was staring at a big stack of those iterated images, each of which was a separate but interrelated black and white or averaged image. Could I combine them to create something interesting? And maybe I could come up with something to modify each of the individual images from my stack to further add a little variety.
And so the color_example3.maxpat patch was born. Instead of a single value from a swiz operator, I grabbed one from each of three outputs in my procedural graphics stack, added a param operator to let me fade the images (fade1, fade2, and fade3), inverted the result with a !- 1 operator (they looked more interesting with the reversed output), and then summed each plane to derive my swiz operator's value and used that result.

It wasn’t much of a change, but once I dropped it into my patch and started changing the fade1, fade2, and fade3 variables, my images just caught fire. While no patch is ever done, this was the place to stop and enjoy the results, and to start the longer and slower act of living with my patch and quietly meditating on What Might Be Next.

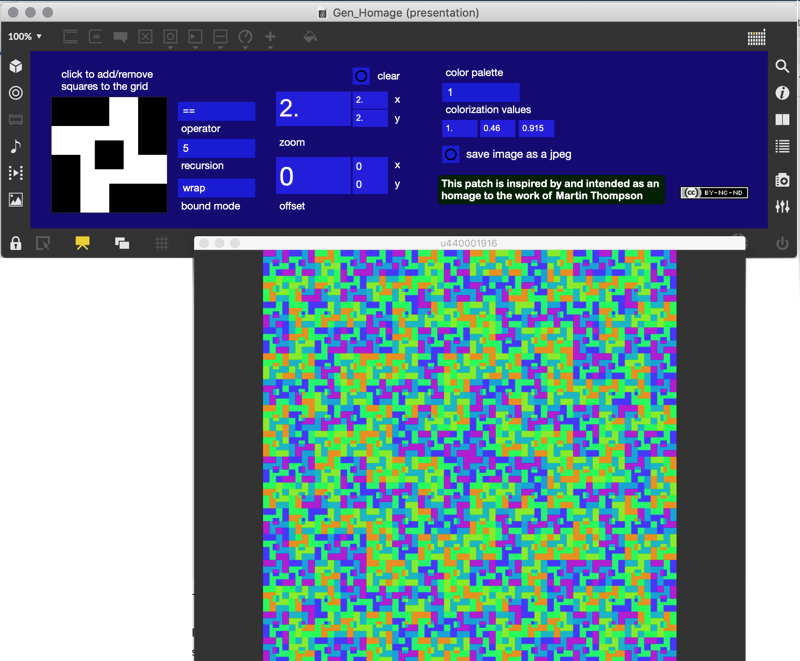
For a final touch, I took this patch, added a touch more jit.gl.pix to let me select color palettes that tracked the level of recursion I displayed and wrapped the whole thing to more closely resemble the Jitter homage patch (Gen_homage.maxpat).
Apart from setting up a presentation mode and adding a little color to the interface, the only major change from color_example 3.maxpat is the modification of the contents of jit.gl.pix @gen color_palette_fade (the new version is named jit.gl.pix @gen color_palette_fade_last).
The modification adds two things: First, there's another bit of codeboxing that will let me derive my fade1, fade2, and fade3 values differently depending on the level of recursion I choose. And finally, at the very bottom of the patch I'm including a swiz rgb, a constant of 1, and a concat 0 0 object to add an alpha channel to my image.
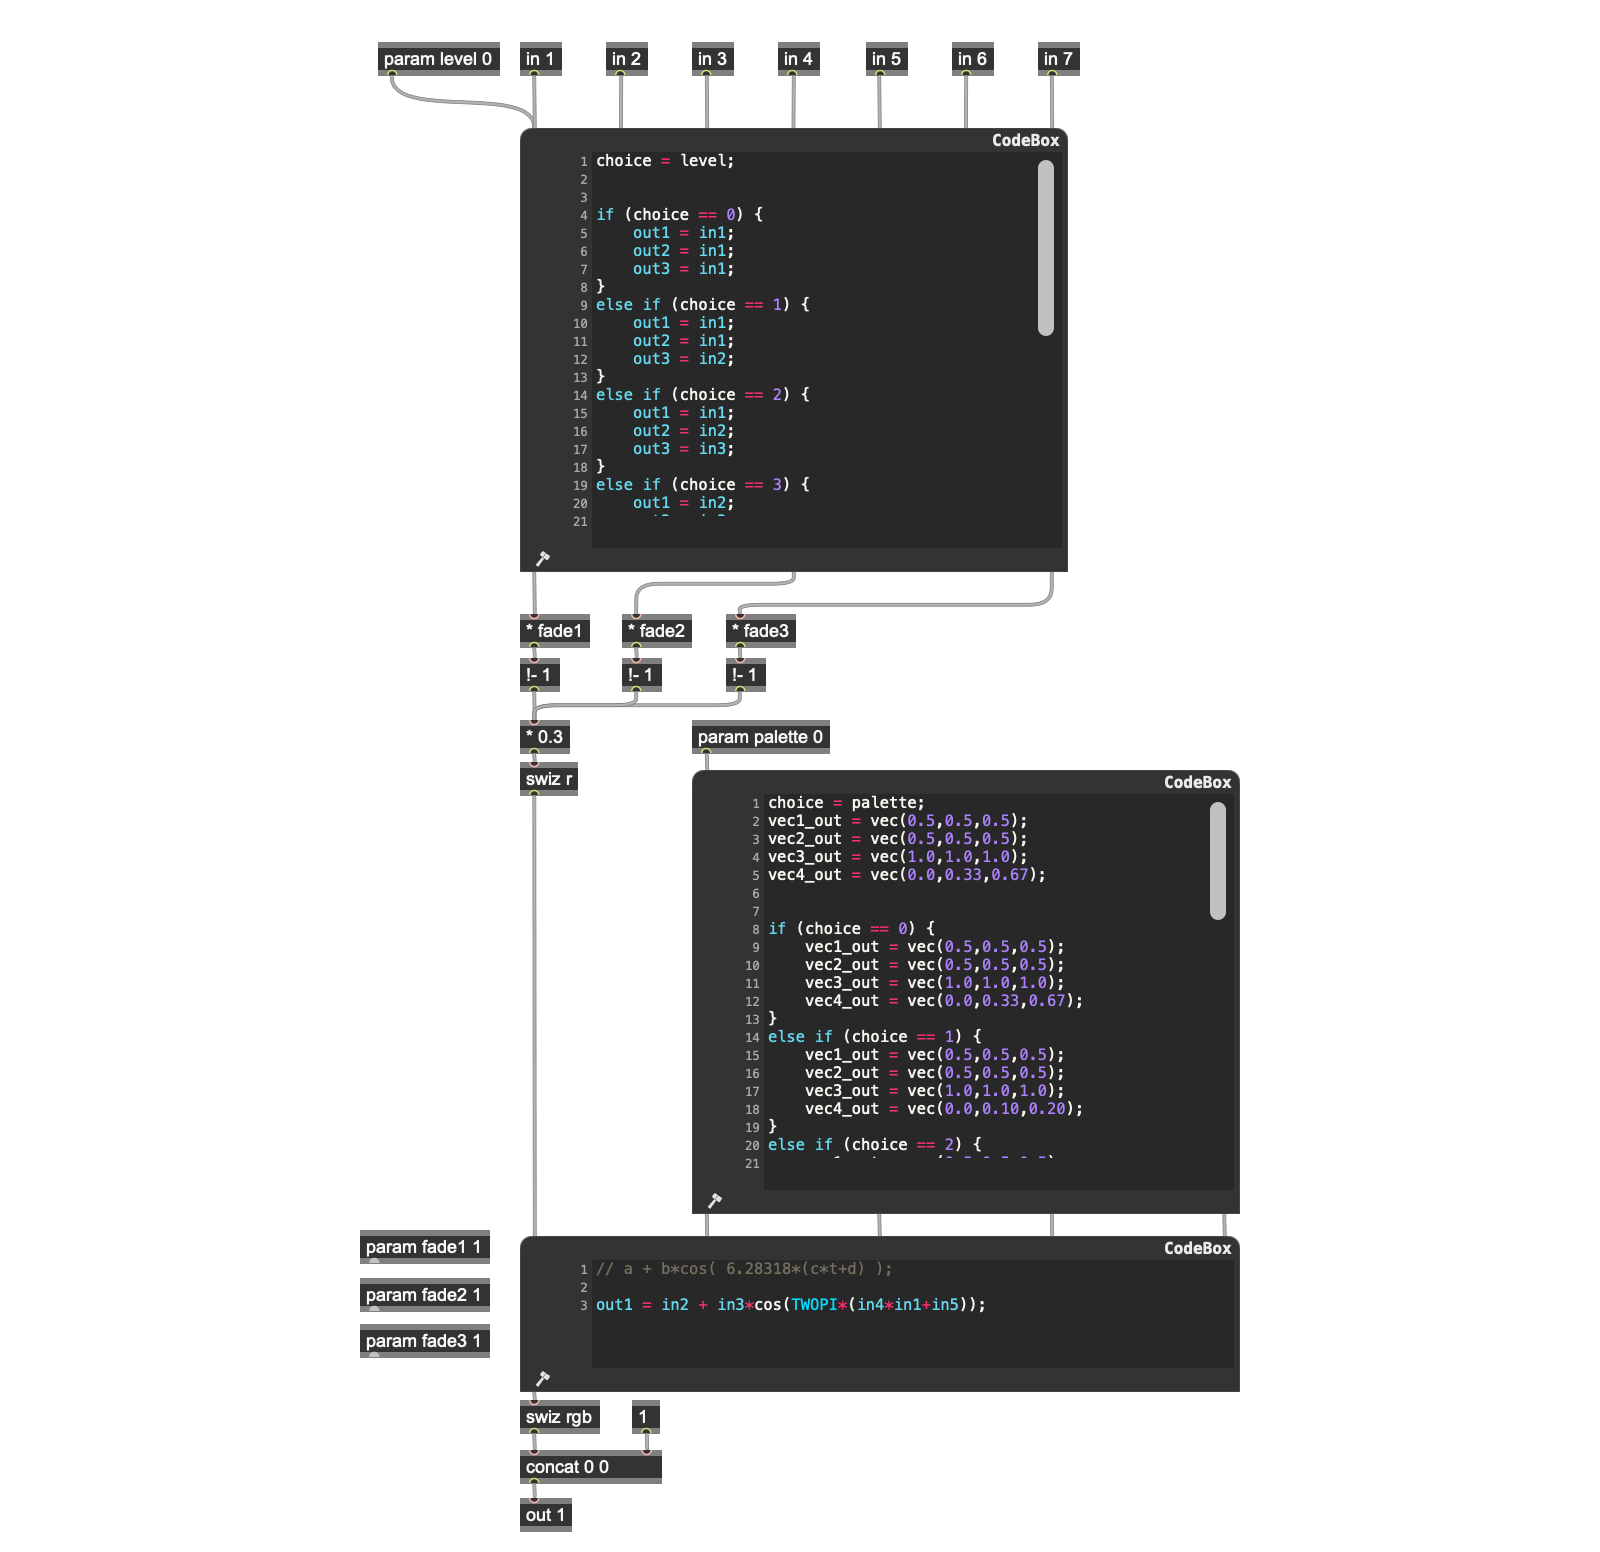
That'll be pretty important because I'm adding the ability to save the current image, as well (It's right at the bottom of the patch).
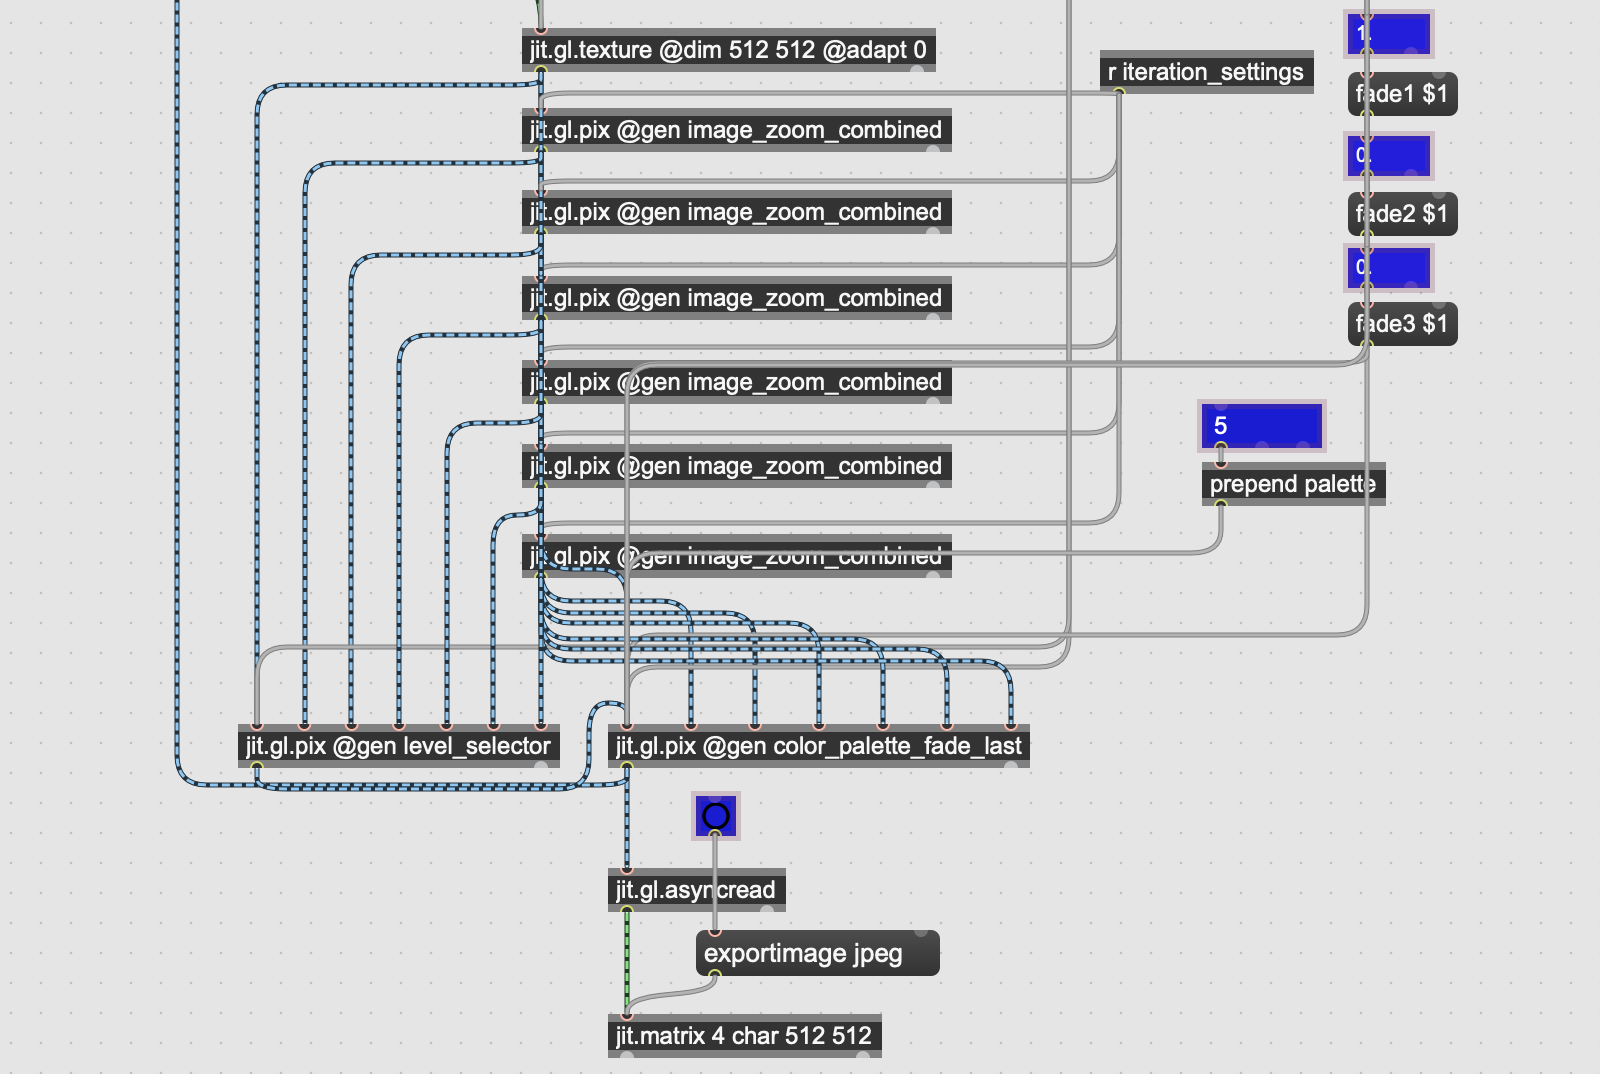
The final difference here is that the actual display is handled by jit.world, so the UI is a bit smaller.
I’m going to close this tutorial with a short video that demonstrates what happens when all that jit.gl.pix can be stirred in real time. All I really did was to take a slight variation of that final patch, add a Vizzie 4OSCIL8R module to handle the parameter modulation, threw in a scale object here and there to fine-tune the parameter ranges, and then sent the results off to Syphon for recording (courtesy of Anton Marini and Tom Butterworth’s Syphon package). I hope that you’ll find the results inspiring.
Happy patching!
by Gregory Taylor on February 4, 2020


