
Working with Hardware: Livid’s Code
Welcome to the first installment of a new series: “Working With Hardware”. For our first go-around, we are going to be working with a relatively new hardware controller – the Livid Instruments' Code – and will create some useful software for this system from scratch. I’m going to start by making a basic sequencer, and then we will follow up with a few more advanced tutorials, giving you the opportunity to follow several developers as they create useful and interesting software for a specific device.
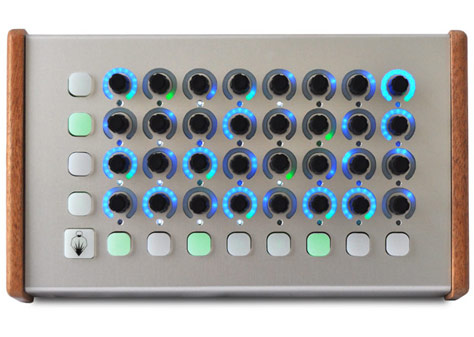
After taking a quick look at the Code, I realized that all the pieces were there for an interesting sequencing device. We have multiple rows of knobs, row and column buttons, and a nice big button that would be perfect for a start/stop button. Something you might not be able to tell from product pictures, though, is a key feature: each of the rotary encoders is also a push-button switch, something I could use for individual step gating as well. That was all that I needed to know to get started.
The Livid website has a pointer to a Wiki page that had a lot of great information. The most useful part of the documentation was the following diagram:
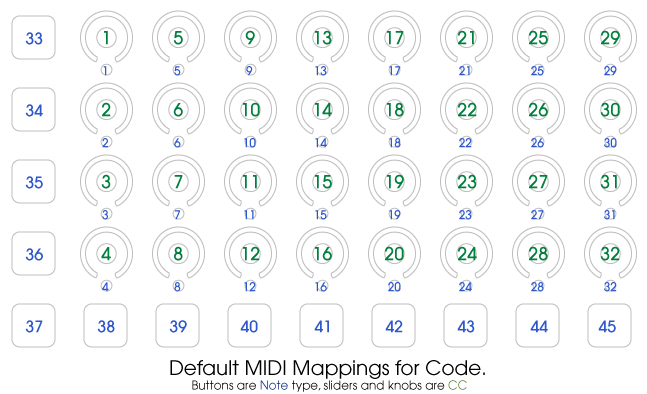
Since the Livid Code is a MIDI device, this one diagram held all the keys to the kingdom for me. Using this documentation and a piece of scratch paper, I started putting together my plans for a super 32-step sequencing device, where the entire user interface would be done at the controller.
Creating the Clocking Subsystem
The first thing that I wanted to tackle was the clocking system – the core of any step sequencer, and a challenge for a hardware-centric UI. While each step has a small white LED available, I wanted to leave those for individual step gating, so I had to find something else.
With a set of row and column buttons, I realized that I could just show the current step by showing the current row and column; visually, it would be easy to track the step by triangulating the two points. Since I was going to make this a full-on 32-step sequencer, it meant that I needed to get something that would count from 1 to 32 (or better yet, 0 to 31), then map that to the buttons.
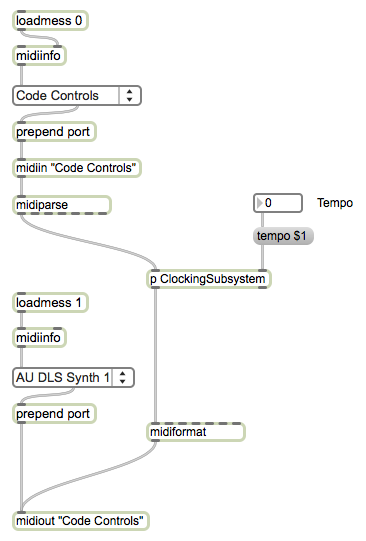
I started with the basis for any good timing system: the transport object. I decided to stick with 16th notes, so I just built a simple way to start and stop the transport, and I used a few simple math objects to get the output down to a 0-31 range. Once I had that range, I further split the numbers so that I had a row (0-3) and column (0-7) number that could map to the Code’s buttons.

Now that I had a tracking system, I needed to tie it to the physical device. Working with MIDI for this is a breeze, so I just started with a basic midiin and midiout scheme (with midiparse and midiformat, respectively) and a few objects to let me select a MIDI device. Creating the start/stop button was first: since buttons map to MIDI notes, and the Big Button is mapped to MIDI Note 37, I just took the incoming note stream, checked for 37, and toggled the transport on and off on each push. You’ll also note that I reset the transport time to 0 (the beginning) whenever I stop.
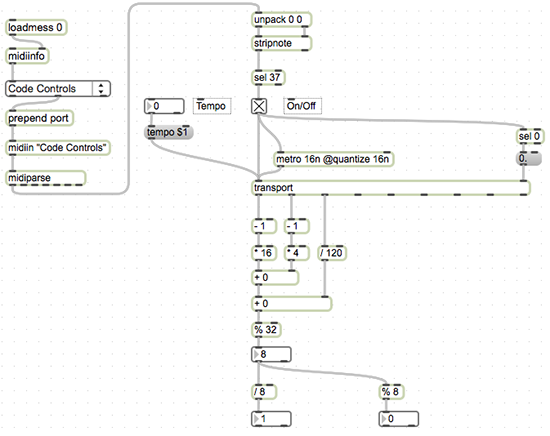
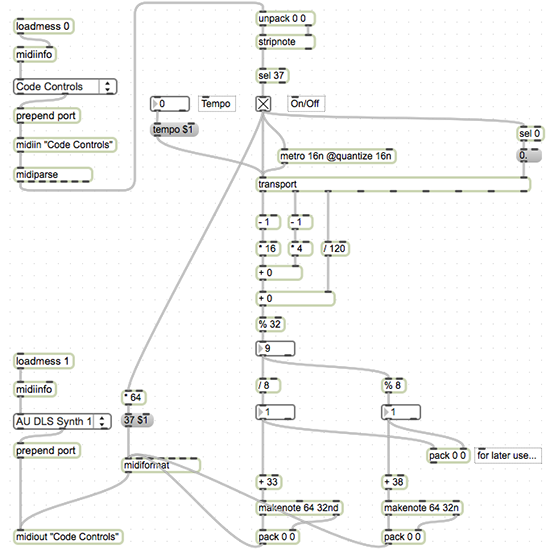
Next up is the display of the current row and column. We are going to use the numbers that we got from our clocking system and generate notes from them: a note sent to a particular button will turn on the built-in LED, while a note-off will turn it off. Rather than do a bunch of calculations to determine how long the LED should stay on, we’ll just use the makenote object’s ability to slave to the transport, and have it control its own duration.
We take the column number and add 38 to it – this will work with the buttons from left to right. Since we are clocking the system at 16th notes, having the button’s LED strobe at 32nd notes seems appropriate. So that’s what we do – and we now have the columns displaying the current step.
The rows are handled similarly, only starting with MIDI note 33. Using similar logic (but instead using 16th notes, so the row stays on for the duration of the steps), we can get row displays happening. Once this is in place (and saved, please…), we have a clocking system that is easy to program – and easy to see.
So, to run this, do the following steps:
Select the Code as the incoming MIDI device (the menu at the top).
Select the Code as the outgoing MIDI device (the menu at the bottom).
Click the bottom-left button on the code, and you should see the system running, rows top-to-bottom, columns left-to-right.
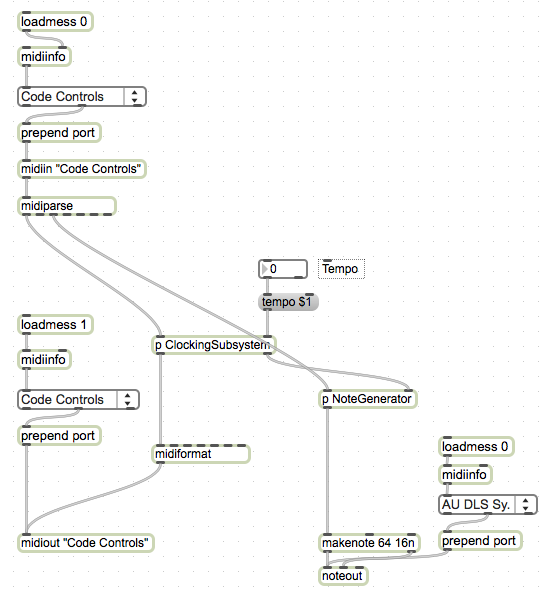
Next up is using the rotary encoders to retrieve and generate notes – the point of the next section. But in order to keep our patch tidy, let’s encapsulate most of the existing code in a subpatcher. I’m going to have an inlet and an outlet for the MIDI input and output (since we will want to share this data with other subsystems), and also have the tempo input and current step output exposed to the outside world. I select everything else, choose the “Encapsulate” option from the Edit menu, and I have a super-clean interface as I start my next bit of programming.
Creating the Note Subsystem
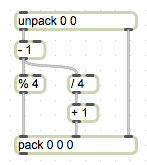
The rotary encoders of the Code are exposed as MIDI CC messages, with the controller representing the encoder number, and the value as the CC value. This is quite easy to parse into a row/column combination using the following code:
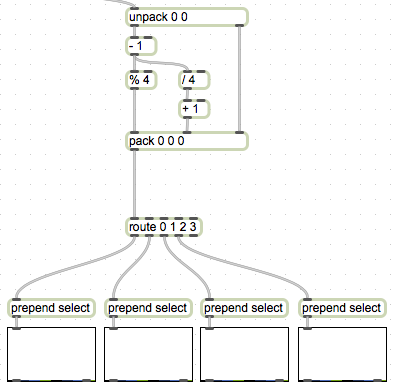
The easiest way to deal with the storage of the four rows of data is within four multislider objects. In addition to maintaining the state, it is rather easy to pull individual data segments out, and we get a nice little display for debugging purposes. Using a route object to choose the row, we then prepend the select message to the data so that only a single slider is updated. Now, if we move the rotary encoders, we should see the multislider object change their values in concert with our movements.
One thing to note: we had to add a one (1) to the column number, since the multislider column count begins at 1, not 0. This is a small price to pay for all the functionality that we get, so we can live with it!
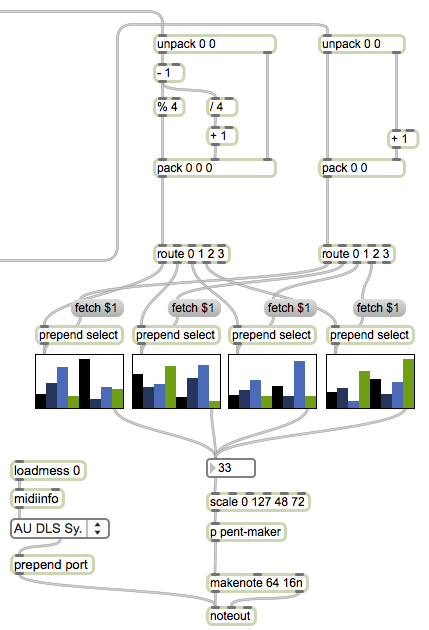
Now, to get the data out again, we have to “ping” the correct multislider to get a column value. Given the output of our timing system, we have the current row and column. This gives us the data we need to route to the right multislider, then use the fetch message to grab a single column’s value. Again, we have to add 1 to the column count because of how the multislider works.
Now, we have data – the current step’s value – available as an output. There are many ways you could deal with this output; in my case, I choose to limit it to the range of 48 through 72, and to run it through a little abstraction that will force it to be in a minor pentatonic scale. From here I route it into a separate makenote object (one dedicated to the note output), and I can play my sequence right off.
If you wanted to make the note player more robust, you could use more complex programming for the output scaling, or you could build a secondary grid system for note selection. In this case, though, I just wanted a sequencer that would work simply and musically, so I went down the path that I did. To tidy up the patch before I begin the next section, I again encapsulate everything specific to the note generation and end up with a tight little patch:
Creating the Gate Subsystem
What we have now is a pretty credible step sequencer – 64 notes that play based off of a 4x8 grid of rotary controls, and all coerced into a nice little pentatonic scale. But there are two parts of the hardware that we can use to make it even more interesting: the per-step LED, and the push-button switch built into the rotary controller. What we will do is to use the switch to set the gate for each step, allowing us to make more interesting phrases from our step sequences.
The switches are MIDI note producers, using the note numbers that match the rotary controller numbers. The LEDs are note-receivers, following the same note number map. So grabbing the incoming note information (and sending note information) will allow us to manage the entire gating grid.
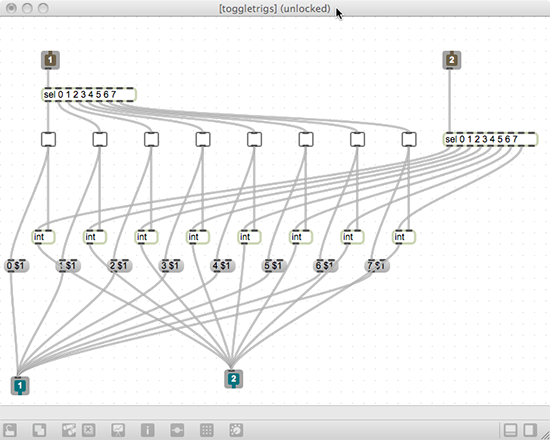
The output of the switches is [note number, velocity], where the velocity is 64 if pushed down, and 0 if released. Since we don’t want to have to hold down an encoder to hear a step, we need to change this functionality into a toggle-like output. Probably the easiest way to do this is to literally use a toggle object, looking for a velocity of 64 as an indication of a switch press. We also need to turn the LED on or off based on the toggle value. Thus, we make a little fixture that we can use for each row’s grid system.
Now, if we use four of these fixtures for the four rows of the Code, we have a grid system ready to go. We need to connect it to the clocking system we created earlier, and we should be able to get gates out as the sequencer steps through the 64 stages. The last thing we need to do is to route the output to the MIDI note producer, so that only steps with their gates on will be output.

Finally, we wrap this up into another encapsulation (subpatcher), add a few comments, and we have a top-level patch that is simple and ready to use:
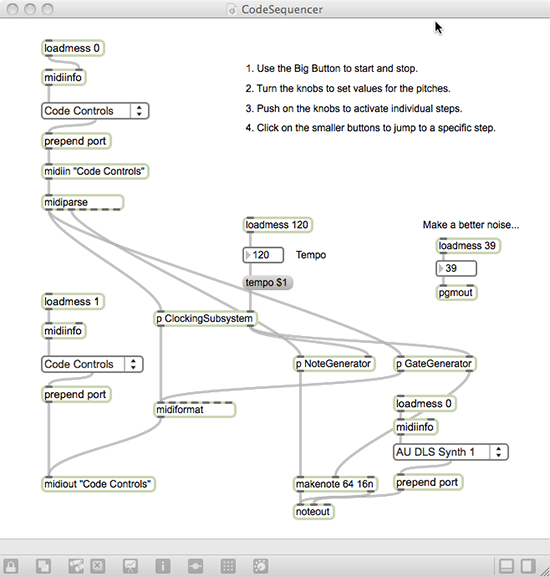
Again, there are many ways that you could expand this sequencer: you could add a preset system, you could find a way to control the tempo with the hardware, or you could build in a system to select specific steps during performance.In our next article, we are going to turn to Peter Nyboer, the chief programmer at Livid Instruments, to take the hardware connection even further. In the meantime, use, expand and tear apart this patch, and have a blast!
by Darwin Grosse on January 4, 2012


