
Gen~ Oopsy Looper Logic/Overdub Question

Hello wizards. I’m putting together a looper in Gen~ for use on a Daisy seed. I’ve got it set up to poke a data object while holding down a switch (sw5), and stop things with the next press of the switch. Mix is on knob 1, and knob 2 cycles some wacky playback options. It’s probably pretty clumsy, I’m new to Max and gen~ so I’m sure it can be improved on many levels…
What I’m especially having trouble with though is understanding how to make this into more of a ‘pedal style’ looper control. Meaning, I’d love to be able to press the switch once for start/record, press again to stop recording/play loop, press again to overdub, and long press to clear/stop. I’ve found some useful threads on ‘button logics’ by G. Wakefield, but can’t seem to wrap my head around implementing them. I’ve read the forum back as far as it goes (which was super helpful), but I’m still having a tough time with it… any help or critique you’d be willing to share?
Thanks all! Have a great day!

Hi,
i'm a bit foggy on the details(been so long ago, and it didn't seem to add much to what was already out there, so i decided to try and learn C++ more for electrosmith daisy stuff), but here's my 'snippet-looper' from long ago in case it helps:
but it might be too much to digest all at once, so to answer your questions more specifically:
I’d love to be able to press the switch once for start/record, press again to stop recording/play loop, press again to overdub
it looks like you've already done something like this(not finding much time to look in detail), but basically, you can use an accumulator(+=) to detect the switch presses, and count each one upwards, then route each number to an action, which can be done using a 'gate' op... or, you can do it in a more basic/explicit-style like so:
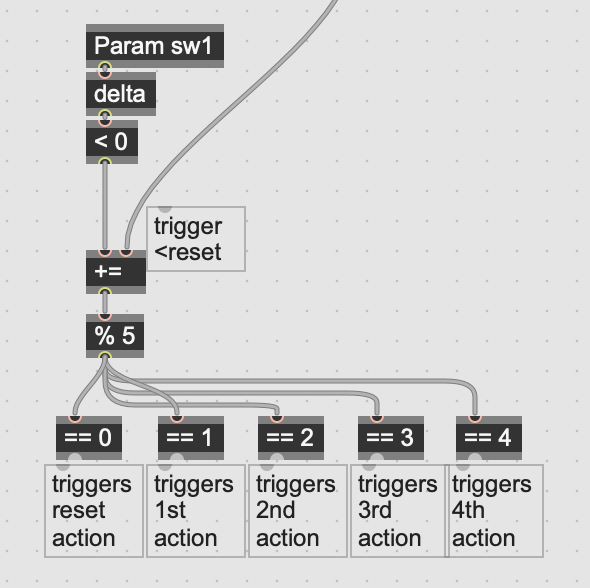
(i used '< 0' after 'delta' to detect based on lifting 'off' the switch, but you can change the '<' to '>' if you prefer detecting based from 'on' presses)
however, i might split your tasks apart so that the third part('overdub') is conditional based on whether the buffer was cleared or not:
press again to overdub, and long press to clear/stop
i'm unable to come up with a quick/easy patch example for that, but basically, store a value that would indicate the buffer was cleared(was hinting at this in the above pic, referring to 'reset action' but there may be better ways to set that whole situation up), and then if the buffer was cleared, instead of overdubbing, just go straight to record, otherwise, you could also just stop the loop temporarily(?)... this is just an idea...
in any case, for the final part:
long press to clear/stop
you could do something like this:
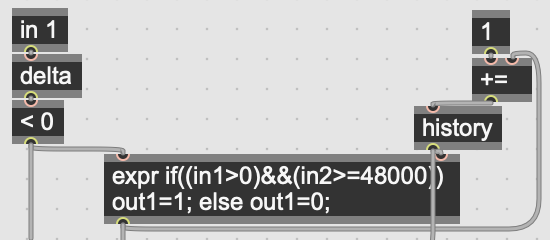
[EDIT: actually, my bad, that looks wrong, you would want an additional reset going into the '+=' op near the top-right of the above pic, that would restart the sample-rate count each time the switch is pressed(or lifted off from)... but hopefully you get the ideas]
that's from my 'Snoopsy' patch uploaded above, but i use it differently there, you would want to create that within a longer 'codebox', where you can setup that same code, but have the 'true'(1) condition trigger a 'for' loop that writes '0' to every sample of your 'data' op(this is how you can clear buffer/data ops instantly(within the timing of one-sample... depending on how cpu-intensive everything else is, if too intensive, can be a bit glitchy... but your patch doesn't look too intensive so far :))... keeping in mind, to stop playback beforehand, otherwise, you'll get clicks(you probably indicated this already in your description, "long press to clear/stop", but just making sure to state the proper progression outright).
if you get really great at codebox, much or all of this can be concisely written into that, too.
sometimes you might try starting threads here within the gen~ subforum, where instead of asking about 'Oopsy' specifically, you can try/demo smaller bits of your patch within gen~ by itself, piece-by-piece, and you might get quicker answers, too.
hope this helps until someone else further-in-the-know can give you better answers 🍻
Thanks Raja! This is super helpful.
Thanks a million for the ideas, and also the suggestion to not necessarily call out Oopsy and test out smaller bits of the patch! I’d love to get better with codebox, hopefully soon…
Thanks for sharing the Snoopsy (also my wife’s name) I’ll dissect and learn what I can from that too! You’re the best!
Can I ask for one small clarification please? This concept of a
'codebox', where you can setup that same code, but have the 'true'(1) condition trigger a 'for' loop that writes '0' to every sample of your 'data' op(this is how you can clear buffer/data ops instantly
Will this need to happen into the inlet of a poke object? That’s the only way input into a data object, correct?
Will this need to happen into the inlet of a poke object? That’s the only way input into a data object, correct?
poke ops can be coded within codebox as within a gen~ patcher as visual versions...
if i recall correctly, everything in the visual object form within gen~ can actually be translated to an 'op' within codebox, including your 'data loop1' object.
a simple codebox to clear your 'data loop1' buffer would be this, but keep in mind, since i'm declaring the 'loop1' data/buffer within codebox here, you might want to delete the visual object version from the main gen~ patcher, and only have it within the codebox:Data loop1(768000);
if(in1>0)
{
for(i = 0; i < dim(loop1); i += 1)
{
poke(loop1, i, 0);
}
}
(i can't remember since i've not worked with these details in awhile but it's best to only have buffer/data/history ops declared once within a gen~ patcher, otherwise, since it's referring to a physical hardware memory-space, it might get confused, or rename things internally to create separate data spaces... other ops like 'poke' and 'peek' can have multiple copies of the same name, so long as you remember where everything is and delineate what they're doing separate from each other, should be fine...
many things like History, Data, Buffer, etc. will need to be capitalized in codebox, as this is more like a declaration of an instance from a class within code as with many other programming languages, whereas the visual version of ops in gen~ will be left lower case as that's in keeping with the visual-object style of Max proper)
we can test this out further by using buffer instead(just for a Max-patcher-only demonstration), and by having a buffer refer to a buffer~ in the outer max patch, will allow you to double-click on buffer/buffer~(you can double-click on the gen~ op, or on the outer max object to see[edit: oh but i use the buffer op in codebox, so i guess you can't double-click on this one within gen~ below, have to use the outer max-patch buffer~... i commented as such in the patch to make it clear :)]), and check it's empty after writing something in it, here i've created a quick patch that can help you understand just that:
{Edit: that test patch pasted above is not an efficient one at all, while leaving the toggle on, it's constantly writing the entire buffer~ with 0s, basically cycling through 256 samples at a time, clearing them to 0, within the timing of one-sample at sample-rate... but in your oopsy patch, you'll have a different triggering mechanism that hopefully only triggers it once(during one single sample, not constantly) whenever you need it... like [Param sw1] -> [delta] -> [< 0] -> [codebox]}
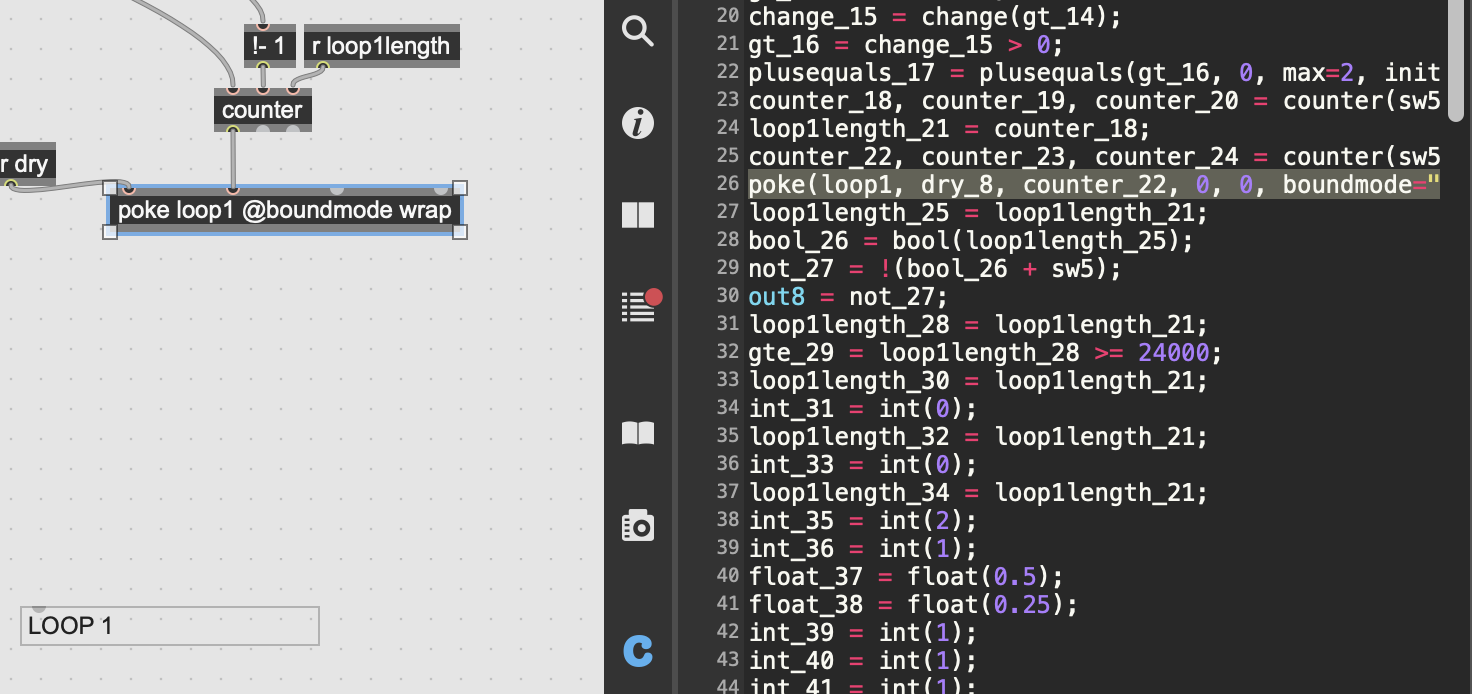
and finally, while the docs are extensive and can help a great deal, much of this i learned by clicking the 'C' icon in the right-hand toolbar, and looking at the code posted there after creating visual versions of what i wanted first, here's a pic that shows what i mean where i just highlight the one 'poke' object in your patch i wanted to research within the code(to remember what all the inputs are), and you'll see it highlights the equivalent line of code:
for your patch, i don't recommend just copying and pasting all that code shown within the 'C' icon's display into one codebox(gen~ will rename things with its own naming scheme that's very confusing for human-readability, and there's often redundant lines you don't need to write as much into codebox, even if it will translate into something more verbose for itself after you create something in codebox... and also, as it does this, it doesn't necessarily mean when it finally runs or exports to C++, that it will be less efficient(this is just the way it translates at first, then under-the-hood, will streamline for you)).
hope that all makes sense and helps 🍻
Thanks for sharing the Snoopsy (also my wife’s name) I’ll ... learn what I can...
cool name! (yes, one's wife is always the best to learn from, about all things in life) 😄

This is all super helpful thanks!
I have been trying t0 implement something similar in the example chopper patch to run on a Mod Dwarf
I have it working in Max okay, the chopper patch uses multiple channels so I made a nested for loop to read the channels and write zero to each data object.
However, I am getting some CPU spikes when I load it into the Dwarf. This is causing a very audible glitch when the clear Param is triggered.
I realise that there may not be many on the forum here that have any experience with the Dwarf but if someone could take a look at this code, check it's done right, I would be very grateful. I am not entirely certain I have implemented the 'delta' object properly in the codebox.
The for loop is on line 141 of the code box.

There's a lot going on with these patches so I'm going to try and offer a few more general thoughts that might be useful.
Clearing the contents of a buffer or data means writing zeroes to every sample frame. In the OP's patch for example that means 768000 samples at once. Trying to do this all at once in a for loop will definitely cause a CPU spike (and on embedded hardware sometimes that can cause a lock up). It's best to avoid doing this!
The best option is to design the algorithm so that clearing the data isn't necessary. For a simple looper example, you can have some flag that marks where the loop start & end points are, and to clear the data, you can just set them to the same value (meaning, there's no data between start & end). Your playback algorithm then simply plays nothing until the loop is marked valid by having different start & end points. The old audio is still there in the data, but is unreachable because it's outside the loop points. (Actually this is roughly also how a lot of garbage collection algorithms work -- the memory isn't zeroed, it's just marked as unreachable/re-usable.) So, for example in the OP's patch, the "long press" could simply set both loop points to zero. No data clearing needed!
The next best option is to use a lazy algorithm. That means, don't try to erase all the data now, erase each sample only when you absolutely need to. There are many variants of this model. Make sure to learn how the 4th inlet of poke works -- it can make overdubbing/mixing applications super easy.
A related option works a bit like a tape loop: you have a read head that is continuously stepping through the tape one sample at a time (e.g. a [peek] driven by a [counter]), and right after you read it, you erase it ("burn after reading"). You can ensure the order of operation here without needing a codebox: the last output of the [peek] is the sample index that you feed into the [poke] that erases the tape. In this model you can have other writer heads writing data "into the future" in the tape, by adding some offset to the current read head position.
In the worst case that you really do need the data to be quickly zeroed, the best thing to do is to spread this out over a short duration rather than all at once, such as zeroing 32 samples for each passing sample frame, so that there's no CPU spike. So, if your data represented one second of audio, it would take 1/32 of a second to clear it -- it takes you longer to push and release a button with your foot. The output of the codebox tells you if it is currently erasing.That can be done using a codebox for loop. Let's say you have a [history erase] and a [data loopdata 768000] and you trigger an erase event by setting erase = 0, then your codebox can be something like:
Data loopdata(768000);
History erase;
if (erase < dim(loopdata)) {
    end = erase + 32;
    while (erase < end) {
        poke(loopdata, 0, erase);
        erase += 1;
    }
}
out1 = erase < dim(loopdata);
BTW one other tip: if you are handling button presses on embedded hardware, you probably need to "debounce" the button using a schmidtt trigger: that means using different thresholds to turn on and to turn off. Otherwise, you might get a lot of false on/off triggers due to noisy circuits when the value is really close to the threshold. E.g., if you wanted a threshold of about 0.5, maybe make the on threshold be 0.6 and the off threshold be 0.4. To turn on you have to go above 0.6, and then to turn off again you have to go below 0.4. You can do this with a [switch 0.4 0.6] routed into the right inlet of a [< ] operator, and feed the output of that through a [history] back into the [switch 0.4 0.6]. :-)
Thank you so much @GRAHAM WAKEFIELD...
I’ve got a long way to go yet in gen~, but I really appreciate your patient guidance! I’m starting at the beginning of the new book today, and hopefully will absorb what I need to think in gen~!
Here's a bare bones looper to compare with. The core idea is closer to what a delay line is: we're continuously writing to a data, with a mixture of the raw input and the delayed data (according to the loop length, and the parameters of whether to erase and/or record).
Another section of the patch handles the logic to set a new loop length, which happens when both record & erase are enabled at the same time.
Thanks @Graham Wakefield for the super detailed feedback. I think I understand how I can implement some of the things you are suggesting but my programming skills are more hack away at the code until it does what I want rather that actually knowing what I'm doing!
Atm, I have the chopper set up on the Dwarf in such a way that a switch routes a noise generator with volume down to the input of the chopper, this effectively writes 'silence' to the segment_data data object. This works after a fashion but I am looking forward to trying your suggestions.
Trying to do this all at once in a for loop will definitely cause a CPU spike (and on embedded hardware sometimes that can cause a lock up). It's best to avoid doing this!
Oops, my bad, i didn’t know this, especially that about embedded hardware - extra great to know now
Thank You Immensely (i’ve become too spoiled/ignorant from being able to brute-force samps en-masse with buffer~ in Max on a laptop for years haha… and the ideas about clearing in blocks, or setting a flag to check if start==end is so helpful too), Very grateful!
In the worst case that you really do need the data to be quickly zeroed, the best thing to do is to spread this out over a short duration rather than all at once, such as zeroing 32 samples for each passing sample frame, so that there's no CPU spike. So, if your data represented one second of audio, it would take 1/32 of a second to clear it -- it takes you longer to push and release a button with your foot. The output of the codebox tells you if it is currently erasing.That can be done using a codebox for loop. Let's say you have a [history erase] and a [data loopdata 768000] and you trigger an erase event by setting erase = 0, then your codebox can be something like:
Data loopdata(768000);
History erase;
if (erase < dim(loopdata)) {
    end = erase + 32;
    while (erase < end) {
        poke(loopdata, 0, erase);
        erase += 1;
    }
}
out1 = erase < dim(loopdata);
Hello again Wizards! I’m coming back to this after a while with a related project. Graham, Please forgive me for wanting to make your ‘worst case’ work for me, but I’m wanting to understand how the 0’ing in blocks actually works. I’ve tinkered a lot with the codebox example above, but can’t seem to get it working in context.
Questions:
Is there a way of patching this outside of codebox?
If erase will be triggered by setting to 0, why the following?
if (erase < dim(loopdata))3. Since the History operator is declared inside codebox, will the inlet of the codebox be the way to access it?
Sorry to be so codebox illiterate! Thank you!
1) It requires a while() loop inside of an if() condition, so no it can't be done outside of codebox. But, only this part of the patch needs to be in codebox.
2) The erase variable is keeping track of how many samples have been erased so far. When we set it to zero, we are saying "we haven't erased anything, so we need to start erasing". In that sample frame, it will erase 32 samples. In the next sample frame, erase=32, but this is probably still < dim(loopdata), so we will erase 32 more, and update erase=64. This continues on each sampleframe until erase == dim(loopdata), and the erasure is now complete.
3) I had assumed erasure was being triggered by the message "erase 0" to the gen~ object. A History inside a codebox is actually global to the patch, the same as if you had made a [history erase] object in the patch. (The same goes for the code Data loopdata(768000); being equivalent to making a [data loopdata 768000] object in the patch; both are global to the patch.) So sending a message "erase 0" to the gen~ object will set the history value to zero, which causes the erasure to start.
Alternatively if you want to trigger erasure using some audio trigger signal input to the codebox, you can use this:
// the Data we are going to be able to erase.
// (alternatively you can create a [data loopdata 768000] object in the patch)
Data loopdata(768000);

// the current number of samples we have erased:
History erase;

// any nonzero input to the codebox will trigger a new erasure
// (so long as we are not already currently erasing)
if (in1 != 0 && erase >= dim(loopdata)) erase = 0;

// if we have not yet erased the full Data,
// then we still have some samples to erase
if (erase < dim(loopdata)) {
    // erase the next 32 samples:
    end = erase + 32;
    while (erase < end) {
        poke(loopdata, 0, erase);
        erase += 1;
    }
}

// output 1 while erasing, 0 when done
out1 = erase < dim(loopdata); But I think I should restate what I said in the post above -- "The best option is to design the algorithm so that clearing the data isn't necessary" -- if you can find a way to avoid needing erasing, that would be better.