The recent changes to the mtr object allow us to now access internal data in the form of a “dump dictionary,” a powerful feature that we can harness easily with scripting tools. This tutorial series will focus on using mtr with JavaScript.
In Part 1 of this series, we will introduce a JavaScript library called mtr-accessor which helps morph a dump dictionary into an easy-to-use format. We’ll show you:
How to import the mtr-accessor library
The structure and contents of the mtr data
How to do a basic operation like printing mtr contents to the Max console
Make sure to save these files in the same folder your Max patch will be saved, or in a location shared with all of your Max patches.
Now create a new empty file called “mtr-to-console.js” and save it in the same folder as “mtr-accessor.js”. This script will be where we write all of our code to access the shared library and send output to Max. It’s the JS to MTR connection!
Using require
Okay, let’s open up our script, “mtr-to-console.js” and add the following setup lines:
autowatch = 1; // Reload the script any time we save new changes
inlets = 1; // One inlet to the js object
outlets = 1; // One outlet from the js object

var mtr = require(“mtr-accessor”);
var myMtr;
The first var statement shows how “mtr-to-console.js” will use the contents of our shared library using the require statement. The second line sets up a global variable (myMtr) where our formatted mtr data will be stored.
Finally, let’s write the function that will fill up the myMtr variable with our easy-to-handle format!
function dictionary(v) {
    var d = new Dict(v);
    myMtr = new mtr.Mtr(d, 'dict');
}
What we’ve done here is take a dump dictionary in from the js object’s inlet and created a Dict object. To create an easy-to-handle object, we passing the Dict we just made into constructor for the mtr.Mtr() JavaScript object. Notice that the second argument to the constructor is ’dict’. The purpose of this will become clearer in later parts of this tutorial series, but for now just know that this tells the library the type of data being send it comes from a Max Dict object.
The data structure
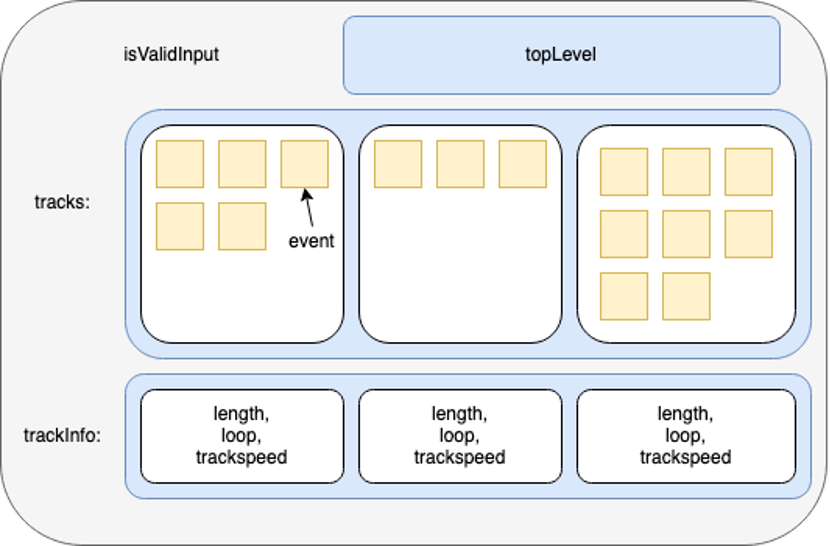
The following diagram gives a general idea of what data is stored in a mtr.Mtr object:
tracks: This holds “track” arrays which in turn hold event info, like event type and event value. Each event type is either a number or an array, making it much easier to handle all of the different possible kinds of inputs from Max!
trackInfo: For each track, there is metadata info like track length, whether the track loops, and what speed to playback at.
topLevel: This holds any miscellaneous top-level mtr data, like the type of dictionary input that is parsed.
isValidInput:This is true if the data was parsed with a supported type, otherwise it is false. isValidInput will be true in our current example because we passed in a supported type (‘dict’) as the second argument to the constructor of mtr.Mtr().
Basic JavaScript access
Now that we have an overview of what’s available to us in myMtr, let’s access it! We’re going to step through the data in myMtr and print it to the Max console.
First, add the following helper function for printing a single line to the bottom of your “mtr-to-console.js” file:
function postln(v) {
    post(v + '\n');
}
Now, back in the dictionary() function, after the line you created myMtr, we can iterate through the data with the following code:
for (var n = 0; n < myMtr.tracks.length; n++) {
    var z = myMtr.tracks[n].length;
    postln("");
    postln("Track " + n);
    postln(" Length: " + myMtr.trackInfo[n].length);
    postln(" Loop: " + myMtr.trackInfo[n].loop);
    postln(" Trackspeed: " + myMtr.trackInfo[n].trackspeed);
    postln("  Event Count: " + z);

    // the first and last event info (if available)
    if (z > 0) {
        postln(" First @ " + myMtr.tracks[n][0].accum.toFixed(2) + " ms");
        postln(" Last @ " + myMtr.tracks[n][z-1].accum.toFixed(2) + " ms");
    }
}
Once you save the changes you’ve just made to the script, you can feed dump dictionary output into the inlet of your js object and see the data in your Max console window!
What’s next?
Now that we’ve shown the power of the mtr-accessor library, part 2 of this tutorial series will demonstrate using the jsui object as a visualizer for our mtr data. Stay tuned!
Hi Martin! I'm glad you enjoyed the first part of this series.
A little bit about prototypes in JavaScript: your standard object-oriented syntax with the class keyword didn't become a part of the JavaScript language until ECMAScript 6 (ES6). For all intents and purposes, the class keyword in ES6+ is just a way to do the same prototyping work under the hood. Since the js object in Max uses ES5, you cannot use the class keyword you're probably used to with C# or Java, which is why prototypes are used in the mtr-accessor.js code. If you're interested in more about this part of JavaScript, there are some nice tutorials out there on ES5 object-oriented JS programming you can find by Googling. One article you might be interested in is here: https://medium.com/developers-arena/javascript-classes-inheritance-and-prototype-chaining-es5-and-es6-way-4b8e9416702b
For the scope of your question, I gather you're interested in taking data from a Max object and feeding it back into the mtr object? (So the reverse direction of data manipulation shown in this article.) If so, this is definitely a possibility that can be explored in later parts of this series. Until then, if you'd like to try it out yourself, any Max dictionary can be sent into the mtr object with the dictionary argument. https://docs.cycling74.com/max8/refpages/mtr#dictionary
...taking data from a Max object and feeding it back into the mtr object
...yes this is what I would like to do -record into [mtr], send it to [mc.function] for display and modification and sending modified data back to [mtr].
var d = new Dict(v);
myMtr = new mtr.Mtr(d, 'dict');
For this you will want to use myMtr.getDumpJson. This will output the myMtr data as a JSON string which you can feed into the dict.deserialize object.
Note that there are some subtleties that would require a full article to explain. The short version of it is that JavaScript handles all numbers as a Number type (see more here: https://developer.mozilla.org/en-US/docs/Web/JavaScript/Reference/Global_Objects/Number ) while Max cares about integers vs. floats. You can see in the mtr-accessor code that the way this is handled is by testing whether the JavaScript representation of the number has any fractional part. If there is a fractional part, it will output a Max float, otherwise it outputs a Max integer. This works well in most cases and will likely get you pretty far. However, you may run into issues in edge cases where you start with lots of floats in Max that are values like 0.0 or 1.0 which translate into JavaScript as a generic number, and then go back into Max where it gets represented as an integer, not a float.
There are a handful of suitable ways to get around this issue if it arises. Explaining those ways deserves a whole part in this series, so stay tuned. Hopefully this explanation gets you on a good start with your patching!
So my most important question left is - Are there any interface methods for [mtr] accessible via JavaScript that allow things like 'touch', 'addeventat', 'cleareventat'? Or is the dump dict the only way to communicate with [mtr] via JavaScript?
Are there any interface methods for [mtr] accessible via JavaScript that allow things like 'touch', 'addeventat', 'cleareventat'? Or is the dump dict the only way to communicate with [mtr] via JavaScript?
There are currently no JavaScript exclusive interfaces for mtr. In other words, all interactions between mtr and JavaScript would be done through a regular Max message using the available options you can find on the mtrreference page.
Does this mean that I can't use 'touch', 'addeventat', 'cleareventat' in javascript because in the reference page it is stated the following: "The message will only work in track-specific inlets, and cannot be sent to the left inlet." Or how would I specify the inlet the message is send to in javascript (without using this.patcher.connect() )?
Ahh OK .... or I could use a [js] object with an individual outlet for each track. Having in mind that [mtr] allows up to 128 tracks this raises the question why methods like 'touch', 'addeventat', 'cleareventat' don't allow to specify their target track? - But I don't want to waste your time, Isabel. Thanks for the support.