
[Sharing]: Tutorial for using polyphonic key pressure with Push and Ableton Live

When Ableton introduced Push, I reckoned it would only be a matter of time before they would integrate polyphonic aftertouch (a.k.a. polyphonic key pressure) within Live’s work flow. I mean: here was this great device with pressure sensitive pads… what a waste to not use that to it’s full potential.
When no announcements surfaced that people at Ableton were working on this, I figured it might be a while, and decided (also just for the fun of it) to see if I could come up with a workaround using Max for Live. That worked out well, and I’ve been using my own polyphonic aftertouch a lot since then.
We now have Push 2 and Live 10, and as yet no word on integration of polyphonic key pressure.
So I thought I’d work on my Karma and share my workaround here.
Moreover, I thought it best to share it as a tutorial, rather than as a ready made collection of devices/patches. There’s a couple of reasons for this.
First and foremost: the workaround is a bit hacky and might require some tweaking by the user; understanding what’s actually going on, might help in making the necessary tweaks.
Second, while the tutorial is focussed on Ableton Push (generation 1), the same approach should in principle work for other devices outputting polyphonic aftertouch, from ‘traditional’ midi keyboards to alternative controllers like Push 2, Launchpad and QuNeo, to mobile apps.
Third, Polyphonic Expression has recently been added to the official Midi protocol. In the future this might lead to new types of midi data being available in Ableton Live. To be able to use those, not just with dedicated VST’s, but with native Ableton Instruments and Effects would be nice, and the current system could be a take-off point for that.
Finally, I think the workaround involves some interesting and generally instructive ways to use (midi) data in Max in unconventional ways. For me, this is probably the single most valuable thing Max offers: putting all types of data on a level playing field, allowing me to reimagine (and if necessary to subvert) the tools I have available to serve my personal and often idiosyncratic ends.
In all, sharing this as a tutorial makes sense to me. I hope you will enjoy!
Overview:
What we’re aiming for is to set up a system in Ableton Live that will allow us to:
route incoming midi notes to separate voices; each voice being a chain of devices containing an Ableton Live Instrument and (optionally) some effects.
route the Push pad pressure of each played note to the appropriate voice, and map that pressure to any parameter within the voice chain (both instrument and effect parameters)
do this while keeping all of the functionality (scales, note layouts, lights, etc) of the Push Live Mode
do this in a way that is not super awkward and clunky to set up
To make things a bit less bulky, I’ll split the tutorial into parts below:
Voice allocation in Ableton Instrument Racks
Getting polyphonic pressure out of Push and into Live
Using pressure values without breaking the functionality of Push’s Live mode
Wrap up, with an overview on using the system, and some audio examples
Part 1: Voice allocation in Ableton Live Instrument Racks
In this first part of the tutorial, we’re going to design a setup/system to use Instrument Racks in Ableton Live in such a way that incoming notes are routed to separate chains in that rack. We’ll create two simple Max for Live Midi Devices to do this: one that’ll sit right before the instrument rack, and another that’ll sit right at the start of each chain in the rack.
Note: doing voice allocation in this way is interesting in its own right. Specifically, if each chain in an instrument rack is a separate voice, this allows you to put the Max Midi Device ‘Envelope’ on each chain, creating an envelope not only for Instrument parameters, but also for Midi Effect of Audio Effect parameters, greatly enhancing your sound design possibilities.
1) Working around Midi Channel limitations in Live
The most obvious way to do voice allocation of incoming midi notes, would be to use a different Midi Channel for each key press, and then, in each chain of the Instrument Rack, filter incoming midi messages by what channel they’re on.
However, this approach quickly runs into problems.
First, many midi controllers/keyboards, like Push, send note info on a single Midi Channel.
Second, and more importantly, Midi Channel information is eliminated and disabled within chains of devices in Live (Instruments as well as Midi Effects).
I think this probably has to do with the fact that Live has a system of its own for routing midi information from one track to another. Users can route midi coming out of one specific track/chain into another specific track/chain. Midi Channel info might complicate this routing, making the whole thing less user friendly.
Anyway, no Midi Channel, alas. So what do we do?
Well, when you think of it, and this will be a way of thinking we’ll return to a couple of times in this tutorial, midi is just numbers being sent and received in a fixed order.
Looking at things from this perspective, we can use specifically those characteristics of midi (numbers in a fixed order) to think of a workaround.
In this case: if we make sure that each Midi Note message is always immediately preceded by another message containing numbers representing a voice number, that allows us to create a filter later on, letting through only the Note-on and Note-off messages that are preceded by a specific voice message.
So here’s an extremely simple Max for Live device, named Poly-in, that will do the first part:
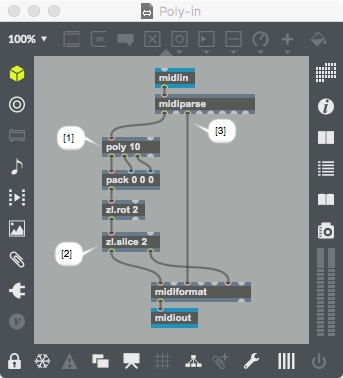
The Poly object [1] is used to handle voice allocation.
The voice number created by Poly is sent out as a Pitch Bend message [2], where the message order is such that the Pitch Bend message always immediately precedes the Note message.
(aside: if you’re fond of actual pitch bending, then choose another type of message, like Aftertouch; in essence this doesn’t matter, it’s only numbers in a fixed order, right?).
(second aside: connect Midi Control Change from Midiparse to Midiformat [3], we’ll need CC messages to pass through, as you’ll see later on).
Second, here’s another simple Max for Live device, named Poly-out, that will filter out notes that are preceded by the “wrong” voice number:
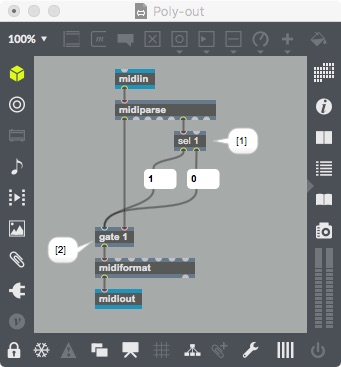
A Pitch Bend message, representing a voice number, being sent by Poly-in, will determine [1] whether the Note-message that immediately follows it will be allowed to pass through [2] to Midi-out. In this specific example [1], only notes associated with voice 1 will be let through.
It’s as simple as that: if you put Poly-in in front of a Live Instrument Rack, and Poly-out at the beginning of the first chain, only notes with voice number 1 will be allowed to pass through on that chain. Duplicate the chains to as many voices as you think you’ll need, and voila!
Well, not quite voila yet, since you’d have to create a separate version of Poly-out for each chain. Obviously, Poly-out will be more user friendly if we find a way to “automate” the voice number matching, so that we can use the same Max for Live Device on each chain of the Instrument Rack. In the example below, I’ve done just that:
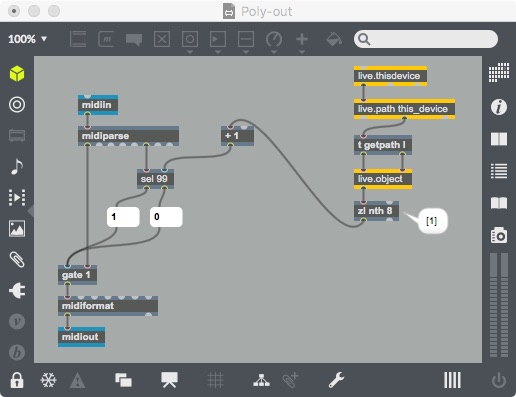
On startup, the Live.Object spits out the path of the device it is in. The eight element of that path [1] is the chain number of the rack enclosing the device; this chain number (+1, since chains start at 0, while voices in Poly start at 1) is then routed to the right inlet of Sel. This way, the Poly-out device sitting on the first chain of the Instrument Rack, it will match for voice number 1; the device on the second chain will match for voice 2, etc.
That’s it for part 1. Enjoy playing around with this, using the Envelope Max Midi Device. Or continue to part 2 and 3 where we’ll build on the rack we’ve created here to include polyphonic key pressure coming from Ableton Push.
Part 2: Getting polyphonic key pressure out of Push and into Live
Having developed, in part 1, a system for doing voice allocation in Instrument Racks in Ableton Live, we’ll now build on that system by adding Polyphonic Key Pressure and routing that to parameters of Live Devices (Instruments or Effects) in the appropriate rack chain.
An aside before we start: I hope you can see that without a system of voice allocation, it would be useless to try and use polyphonic key pressure with standard Live Instruments and Effects. I think this probably accounts for why integration of polyphonic key pressure wasn’t implemented in Live long ago: it requires, at the very least, redesigning Ableton instruments. Moreover, offering the possibility of linking key pressure to Effects parameters, like we’re aiming for here, would require rethinking some of the fundamentals of how Live works. So, quite a bit of work…
And a second aside: the following concerns Push 1, since that is the Push I have; I’d be surprised if things were very different for Push 2, but they might need some tweaking.
That said, let’s get to it. We’ll do two things in this tutorial: get Polyphonic Key Pressure Midi data out of Push, and get that Midi data into Live. The first is relatively simple, the second less so.
1) Getting Polyphonic Key Pressure Midi data out of Push.
I’ll keep this part short. Push 1 has two modes: one in which it sends out key pressure data as monophonic Aftertouch messages, and one in which it sends the data out as Polyphonic Aftertouch messages. You can switch between the two modes by sending Push a Sysex message. If I heard correctly, in Live 10 you can send out Sysex messages directly from Max for Live devices. In Live 9 I couldn’t, so when I developed this workaround, I put the patcher logic below in a ‘normal’ Max patch that ran outside of Live. Either way should work in Live 10. (Spoiler alert: we’ll need such an “outside” Max patch anyway for the second part below, so we might as well put this Sysex part in there as well).
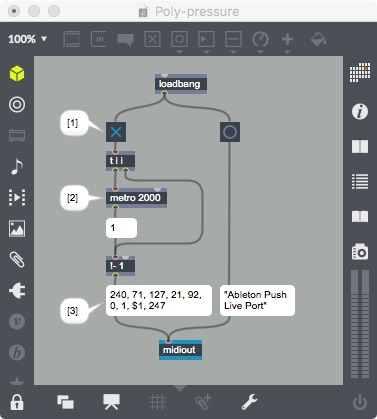
Nothing very interesting going on here. If the checkbox [1] is checked, the Sysex message [3] sets Push to Polyphonic Aftertouch mode; if it’s not checked, we’re in monophonic Aftertouch mode. You might ask why we’re sending out the “switch to polyphonic aftertouch mode” sysex message every 2 seconds [2]. The reason is that when Push is in Live Mode, it tends to switch to monophonic Aftertouch on its own when you’re switching between tracks in Live, which can be annoying. Reminding Push that we really want Polyphonic Aftertouch every two seconds seemed like a practical solution.
2) Working around limitations concerning Polyphonic Key Pressure messages in Live
Ok, so here’s the thing: Polyphonic Key Pressure Midi messages are eliminated and disabled in every part of Ableton Live. Anything you send into Live that has the format of a Polyphonic Key Pressure message, will simply be lost.
That might seem like a show stopper for what we’re doing here.
However, if we look at midi messages as simply numbers sent in a fixed order (see part 1 of this series), maybe we can think of something…
For example, what if we caught these messages outside of Live — say using a patch running in standalone Max or Max Runtime, where Polyphonic Aftertouch does work — and converted them to another type of Midi messages — say Control Change — and sent those messages into Live instead? To be honest, I didn’t think of this solution myself, but was inspired by a Max Patch called PushCC by Aaron Levitz, which I read about here: http://blog.dubspot.com/5-ableton-push-software-devices/
Even if you only have a license for Max for Live (through Live Suite) but not for Max/MSP, you can still create and save regular (ie. non-Max for Live) Max patches, which you can then run outside of Live, using the free Max Runtime. The trick to creating such patches is to start off with a Max for Live device, create a subpatch within that device, put all your patching logic in that subpatch, and then save the whole thing from inside the subpatch. This will give you a .maxpat file which you can subsequently open with Max Runtime.
So here’s the Max Patch I made for converting Polyphonic Key Pressure messages into Control Change messages, including, on the right hand side, the logic for sysexing Push into Polyphonic Aftertouch mode.
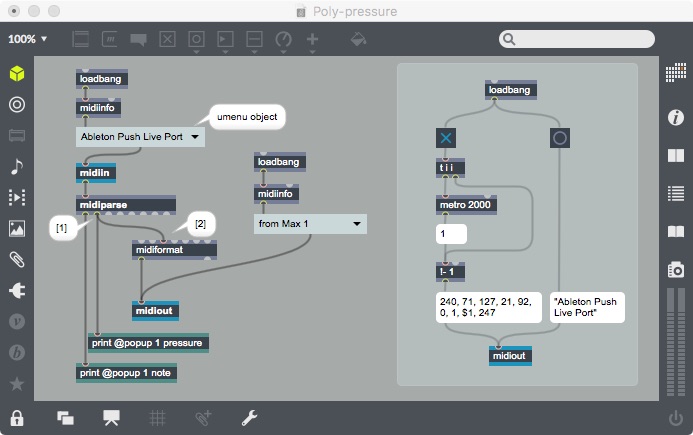
Pretty straightforward stuff, since the format of Polyphonic Key Pressure messages (Note-number Value) is the same as that of CC messages (Controller-number Value).
So, what comes in [1] as Polyphonic Key Pressure messages (second outlet of Midiparse) simply goes out [2] as Control Change messages (3rd inlet of Midiformat). The print boxes are handy for debugging, but can be added or omitted according to taste. Likewise for the Umenu objects, which can be replaced by message boxes if you know the exact names of the Midi Ports you’re looking for.
In Ableton Live, you may need to adjust Midi Preferences so that the virtual midi port (in the example the “From Max 1” port created by Max/MSP) is setup properly. That is: the box below ‘Track’ needs to be set to “On”.
We’ll leave it here for now. If you’re patching along with this tutorial, you’ll notice that when you run the Max patch we’ve just created outside of Live, that indeed you can get the key pressure information from Push into Ableton Live as Control Change messages. You’ll also notice that that we haven’t accomplished anything usable yet by doing this. We’ll need to do a bit more work to be able to put these CC messages to use. So see you in part 3.
Part 3: Using pressure values without breaking the functionality of Push’s Live mode
From parts 1 and 2, we have the following:
A system for doing voice allocation in Instrument Racks in Ableton Live
A Max patch (running outside of Live) to convert Polyphonic Key Pressure messages from Push into Control Change messages going into Live.
What’s left to be done is to combine these two parts; that is: to route the Control Change messages to the appropriate chain of the Instrument Rack, and link the pressure values to one or more parameters of Live Devices on that chain.
Before we start, once again, please note that I’m using Push 1 here, and things may work differently with Push 2. One of the advantages of doing this as a tutorial series, is that I’m hopefully giving you enough background to look for solutions if things don’t work on your end as they do on mine.
1) Slight detour: Launchpad Pro
Before we get to Push, I want to take a detour to show you how to do the above with Launchpad Pro. The main reason: routing pressure values to the right Instrument Rack chain is a lot more straightforward with Launchpad Pro than with Push. I hope doing the Launchpad case first will make the whole thing less incomprehensible when we get to Push.
(Also, other midi devices/keyboards sending Polyphonic Aftertouch are likely to work like Launchpad Pro, so this detour might be useful for all sorts of non-Push users)
Basically, the whole process we went through in the previous tutorials is the same for Launchpad Pro as for Push. In fact, it’s a bit easier for the Launchpad, since you don’t need the part in the second tutorial where you send the device Sysex messages to put it in Polyphonic Aftertouch mode. With Launchpad Pro, you can switch from Monophonic to Polyphonic Aftertouch on the device itself, in Settings Mode.
So, a quick recap, here’s where we are at the moment: key pressure values are converted tot Control Change messages in our outside Max patch Poly-pressure, and are sent to Ableton Live. Inside Live, they’re passing through the Poly-in Max for Live device, and are coming into the Poly-out devices on the different Instrument Rack chains (see part 1 of the series for what Poly-in and Poly-out are). To be able to use these CC-messages in a meaningful way, we’ll need to make some changes to Poly-out, so that we can filter out all CC’s that are not relevant to the given chain:
As you remember (hopefully) from part 1, inside each Poly-out device incoming notes are filtered by the voice numbers that are coming in as Pitch Bend midi messages [1].
By definition, from the way voice allocation works, the Gate object will let through Note-on and Note-off pairs, while blocking all other incoming notes that arrive in between. And the Control Change messages (representing key pressure values) that we want to use in this specific Instrument Rack Chain, are precisely those CC messages for which the Controller Number (first number in the list coming out of the third outlet of Midiparse) matches the Note number of the Note-on that was let through the Gate.
Please take a moment to think this through, to make sure you understand how this works. You’ll need to in order to keep your sanity once we get to Push ;)
Once you see that this is indeed how things are supposed to work in the Poly-out device, building a filter to only let through the right Control Change messages is easily accomplished by means of a Route object [2].
Coming out of Route is a stream of numbers, corresponding to the key pressure values of the allocated Note. I’m feeding those numbers into three Bpatchers which allow you to map the pressure values to parameters in Live. I will freely admit I lifted the contents of these Bpatchers (with some minor tweaks) from the ‘Expression Control’ Max for Live Midi device that Ableton/C74 have kindly provided. You’re free to roll your own, of course, but I have to say I’m pretty happy with these. (note: the “mappers” from Expression Control include a way of “smoothing” values before sending them to the device parameter. This is really useful for dealing with zipper noise, so be sure to include the smoothing option in your mapper).
Basically that is it. Tidy things up, make a nice setup in Presentation mode, and you’re good to go. If you use Launchpad Pro, that is…
2) Coming back to Push
Ok, so why will the above not work for Push, when it does work for Launchpad Pro?
Basically, the issue is this: while in Launchpad Pro extra functionality, like collapsed scales and LED note layouts, is done inside the device itself, for Push those things, which are part of Push’s Live Mode, are done inside Ableton Live, using Python control surface scripts.
Quick aside: I really like Live Mode: it offers some great functionality and instant usability (no need to set things up manually all the time). If using Polyphonic Key Pressure would mean having to switch to User Mode and giving up all that Live Mode functionality, it would not be worth it.
So, preserving Live Mode is an absolute must. But this does present a problem: when you press down on a Push pad, the Note number that our Max patch running outside of Live sees, does not match up with the Note number that our Poly-in and Poly-out Max for Live devices inside of Live see. Which in turn means that, inside Poly-out, matching up the Note number (which has passed through the Python script) and the Controller number of the CC messages (which come from the Max patch running outside of Live and have not passed through the Python script) is not a trivial tast. Try it by putting up some print boxes in Poly-out, and you’ll see what I mean.
So, can we somehow find a link between the notes coming from the Max patch outside Live and the notes inside Live that have passed through the Python script?
At first glance, it appears the answer is no, since the logic of how Push button presses are transformed into notes is inside the Python scripts, and we cannot access those scripts through Max for Live.
So, are we stuck?
Well, once again, let’s keep in mind that midi messages are just numbers sent in a fixed order. Looking at it like this, there is indeed a number that provides a link between a Note-on message in our outside Max Patch and a Note-on message that has gone through the Python scripts. Only, the link is not the Note Number, it is the Velocity! A Note-on message that went through the Python Script and a Note-on that didn’t, will both have the same velocity, and we can use that to link the note numbers.
So, here’s what needs to be done. First we’ll need to get a Note-on message that did not go through the Python script, and get that message inside our Poly-out Device. To do this, we need to make a small tweak to our outside Max patch:
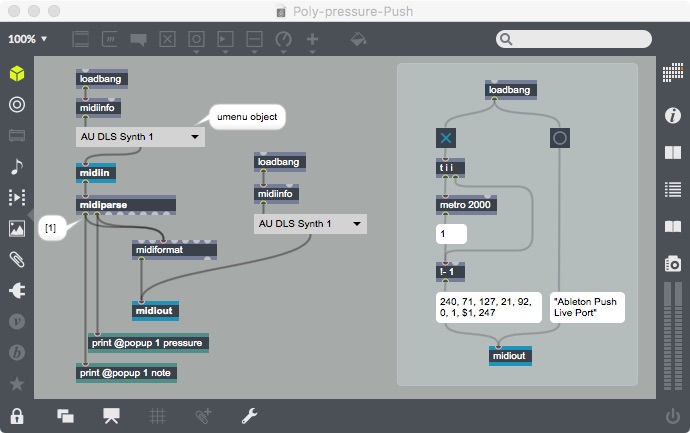
There’s probably different ways to make this work. What I came up with, after some experimenting, is that I could managed a working solution by sending out Note messages as CC messages (once more, it’s only numbers in a fixed order). So, not only the Polyphonic Key Pressure messages go out as CC’s, the Note messages do so as well [1].
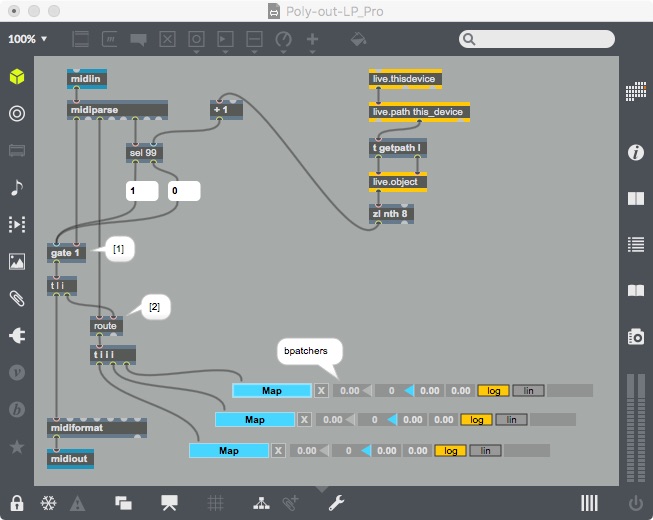
Second, we’ll need to rethink the Poly-out device we made for the Launchpad Pro:

The essence remains the same as with the Launchpad Pro: we’re looking for a way to filter CC messages coming out of Midiparse, so that only those corresponding to the allocated note are let through. Except, the Note number we’re using to set the Route object [1] that does the filtering, is no longer the Note number of the Note-on coming out of the Gate [2], but the Controller Number (1st item in the CC list coming out of Midiparse) of the CC message for which the Control Value (2nd item in the CC list coming out of Midiparse) matches the Velocity of the Note-on coming out of the Gate.
I’ve probably lost you.
Let me try again, from another angle: Now that we’ve adjusted our outside Max patch Poly-pressure-Push, so that incoming notes get sent out as CC messages, the following will happen in Poly-out every time a pad on Push is pressed: a Note-on message will come in, immediately followed by a CC message. The ‘Note Numbers’ for both will differ, but the ‘Velocities’ will be the same. Looking for matching velocities [3] allows us to find the Note Number we need to set our filter [1] for subsequent incoming CC messages. The rest of the patcher logic in the shaded area, like the Gate [4], is simply there to support this general idea, to get the relevant numbers to the relevant objects in the correct order.
Still not clear? Sorry about that! Try building the device and compare it to the Launchpad Pro Device. Put in some print objects to track the signal flow. Hopefully that helps. Or just build it and hope that it works. If so, who cares how it works!
If it doesn’t work, that most likely has to do with the order in which messages arrive. Looking at midi as ‘numbers arriving in a fixed order’ is all good and well, but you have to be sure what that order is! And in sending Midi messages from Push “simultaneously” to Ableton Live and to our outside Max patch, it is not immediately obvious which of those messages will arrive first in our Poly-out Max for Live device. For me, on my specific system, messages passing through the outside Max Patch consistently arrive a little bit later than the ones going directly into Live. If this is not the case for your system (because of different hardware, OS, software, etc.), you’ll have to adjust the patcher logic accordingly.
Ok, enough for now. Perhaps this it is good to give your brain a break. I’ll wrap things up in a final post.
Part 4: Wrapping things up
Ok, after all that, what we’ve ended up with is 2 Max for Live devices (Poly-in; Poly-out-Push) and 1 Max patch (Poly-pressure-Push).
The Max patch you’ll have to run outside of Live, either in Max or in Max Runtime. It’s best to start the patch when Ableton Live is open, since it will have to find the Ableton Push Live Port midi device.
Within Live you can subsequently easily create a Polyphonic Key Pressure Instrument Rack as follows:
Put an instance of the Poly-in Max for Live device on a new Midi Track
Create the basics of your “instrument” by adding some Live devices: Midi Effects, an Instrument, Audio Effects; tweak device parameters to taste.
Group all devices (except Poly-in) into an Instrument rack
Add an instance of the Poly-out-Push Max for Live device at the beginning of the chain
In the Poly-out-Push device, map pressure to parameters of the Live devices; test the sound by varying the pressure on the pad; adjust settings to taste
Select the chain in the Chain List of the rack and duplicate the chain to create as many new voices as you think you will need.
That’s it!
Live makes this setup process quite easy. For instance: when duplicating the chains in step 6, the mappings of pressure to parameters will work automatically for the newly created chains; no need to remap them. Likewise, you can save a Polyphonic Key Pressure Rack as an Instrument Rack preset, and when you put the preset on a new midi track and put a Poly-in device before it, it’ll work straight away: no need to redo mappings.
I’ll close with a couple of audio examples; three short, rough, unedited, one-take improvised sketches I made. Not that I think most users will be stuck for ideas. Given that the system we’ve created allows you to link key pressure to pretty much any parameter on any Ableton Instrument, Midi Effect and Audio Effect, as well as parameters on VST’s, there’s plenty to explore. The following examples I found particularly fun to play around with. (note: none of the examples use envelopes, lfo’s or randomness on any of the parameters; all timbral variation you hear is produced by varying key pressure).
The first involves putting a single audio sample in a Simpler and mapping the key pressure to the Sample Start and the Loop Length (and in this example also to the dry/wet of a delay effect on the same chain). Having the Loop Length get shorter as you press down harder gives you this great sense of physicality. I found that field recordings, or acoustic instrument (like the live recording of a Moroccan Ud player in the example) work particularly well.
Second, mapping the key pressure to parameters of Midi Effects can be very interesting, especially with Note Length or parameters in the Arpeggiator device. In the example I used Operator as its sound source, using the default preset and with key pressure mapped to the Level of Oscillator B. Key pressure is also mapped to the Steps parameter in the Arpeggiator and to the Level of the Filter Delay audio effect.
Third, I found this neat little trick by Gustavo Bravetti for building feedback loops in Ableton Effects Racks: https://youtu.be/h6mH5rUbbv4 (note: the video’s not in English, but the steps are pretty clear)
The Instrument Rack I created, uses this trick. The sound source is exactly the same as in the previous example: an Operator with a bit of modulation through oscillator B. The Bravetti-feedback loop contains a Corpus Audio Effect using the ‘tube’ setting, that is tuned to the note coming into the chain. The key pressure is mapped to the Radius and Decay parameters in Corpus, thereby controlling timbre as well as the amount of energy that is fed back into the system. So, a sort of tuned, feedbacking tube, I guess. A bit unwieldy (don’t forget to put a limiter on each chain to avoid the feedback from exploding) but lots of fun to play.
OK, I hope you enjoyed the tutorial and I hope you were able to create your own working version. If any part of the tutorial is unclear, or if things aren’t working the way you were expecting/hoping, let me know by posting a reaction; I’ll see what I can do. And if things do work, I’d be interested to know what kind of “instruments” you created using the system.
Cheers,
Reinout (aka Campos)

Interesting can this play polyphonic after touch per note instead of channel after touch? If so is this possible on a single channel? Only way I have found to do this is to route each note held to a separate channel. Using the qunexus controller I was able to do this but at a high cpu cost. Once I started holding more than a few notes cpu would go up a lot. I think that ten notes all sending CC or After touch messages and per note pitch bend would be close to maxing out the 1000 message per second midi limitation. Thanks for the post I found it interesting.

Thanks So much for this post, and making it as a turorial, this is a very great idea.
I'm working on applying this tutorial with the push 2, and I think I understund pretty much every thing. But at the step of turning the push 2 in after touch polyphonic, I get stucked. I have first try why the same message of push 1, and then I found this ressource (Push 2 midi implementation) and at the point aftertouch (2.8.5), I find this : Example: [F0 00 21 1D 01 01 1E 1 F7] = set pad aftertouch mode to "polyphonic key pressure". So I sent this message (240, 0, 15, 29, 1, 1, 30, $1, 247) instead of the one of the push 1, but nothing get out of poly key pressure, in the midiparse. I have try to one/off LED of the push 2 and it work, so I don't know Why I can't turn on poly key pressure. If you have an idea, that would help, thanks !
PS : I've also tried to send (240, 0, 15, 29, 1, 1, 30, 1, 247), directly from metro to midiout (without the [!- 1] and [1] message, because I don't realy understund why we do that. Sorry For my english, I hope it's not too bad !