
Replicating jit.gl.material in a custom shader, heightmap, and vertex displacement on the GPU

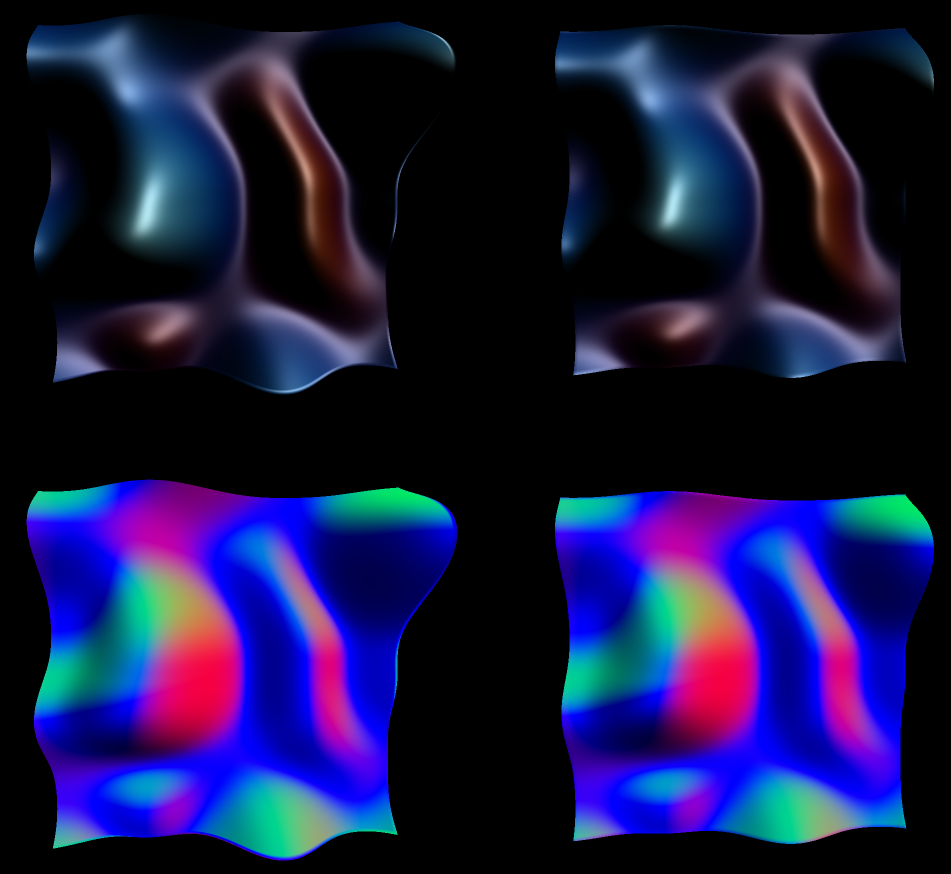
Hi, I've been working with heightmaps on Max since a few years, but I have never been able to get the smooth result of a jit.gl.mesh + jit.gl.material and vertex displacement made on the CPU ("classic" way, but also the slow way as the heightmap usually comes from the GPU as a texture). I know I'm not the only one who encountered that issue, as there is a lot of posts here and on the facebook pages about that topic. Even Federico Foderaro from Amazing Max Stuff somehow adresses that topic in one of its videos.
There are known ways to use a heightmap and stay in the GPU domain, such as using jit.gl.buffer and jit.gl.tf, or [jit.gl.material @heightmap_mode vtf_normals], but unfortunately the former doesn't allow to use jit.gl.mesh in tr_grid draw mode, and I've always got poor results with the latter (kinda broken normal map and lightings).
But today, things have changed, as I think I've managed to find how to tweak the default jit.gl.material shader to make it compute normals just as if the vertex array came from the CPU.
Most of the work is in the filter_normals function, which in its default form lack a multiplication factor (38.0 seems to be a good value), has messed derivative calculation (h1-h0 instead of h2-h1 and h3-h2 instead of h0-h3), and is called with texelsize = 1.0/texdim instead of texelsize = 2.0/texdim:
vec3 filter_normal(vec2 uv , float texelsize , sampler2D tex ) {
    float strength = 38.0; //DEFAULT: Doesn't exist
    float h0 = texture(tex, uv + texelsize * vec2(0, -1)).r;
    float h1 = texture(tex, uv + texelsize * vec2(-1, 0)).r;
    float h2 = texture(tex, uv + texelsize * vec2(1, 0)).r;
    float h3 = texture(tex, uv + texelsize * vec2(0, 1)).r;
    vec2 step = vec2(1.0, 0.0);
    vec3 va = normalize(vec3(step.xy, strength * (h2 - h1))); //DEFAULT: normalize(vec3(step.xy, h1 - h0));
    vec3 vb = normalize(vec3(step.yx, strength * (h0 - h3))); //DEFAULT: normalize(vec3(step.yx, h3 - h2));
    return cross(va, vb);
}
The other modification is to "manually" pass material params, which are normally contained in FrontMaterialParameters coming from a jit.gl.material, but which is unavailable when using a custom shader.
So the main caveheat of this technic is that you need to "test" what jit.gl.material settings fits you with another "regular" jit.gl.mesh, then port them inside of your custom shader. Most material settings are already available in the shader in the form of parameters or commended code lines (for different reflection models and fog), but things get quickly dirty in case of multiple lighting or one non directionnal lighting, so I'll let you adapt the shader in these cases.
Also, a thing I don't get is why I need to use @auto_normals 1 @auto_tangents 1 while they are computed in the shader.
But anyway I feel like a huge release after finding out this technic. Now I can displace vertex using a heightmap while staying in the GPU domain, drawing the mesh with tri_grid, AND using whatever jit.gl.material setting I like without getting weird, unexpected result.
I just updated the original: new patcher for better comparison (both mesh rendered in individual nodes with same camera and lighting settings ; jit.gl.handle now attached to jit.world), and updated the shader (now most material settings are readily available, and a normal strength of 38 seems closer to what @auto_normals 1 achieves with vertices coming from the matrix domain).

tremendous improvement, thanks much for sharing! I'll get this ticketed to investigate including your improvements in the material generator for a future update.
Thanks Rob, that would be awesome if the vtf_normals mode could benefit from this!
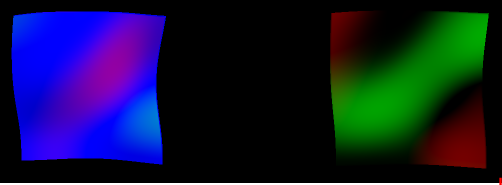
To add to the ticket: I've found two edge cases giving different results between both methods.
- If the heightmap has negative values, the "lowest" vertices seem to simply disapear from the right mesh (with displacement calculated in the custom shader), which seems unexpected to me, unless a heightmap is not mathematically supposed to have negative values. That can be "fixed" by replacing
vec4 pos = sample_vertex(jit_out.jit_Surface_texcoord1, heightmap, jit_out.jit_Surface_normal);by
vec4 pos = modelViewMatrix * vec4(jit_position.xy, texture(heightmap, jit_out.jit_Surface_texcoord1).r, 1.);which basically means that we get rid of the sample_vertex function and simply move the z component according to the heightmap, which also work only if we start from a plane, which is ok in my specific use case but not for a general purpose vertex displacement shader...
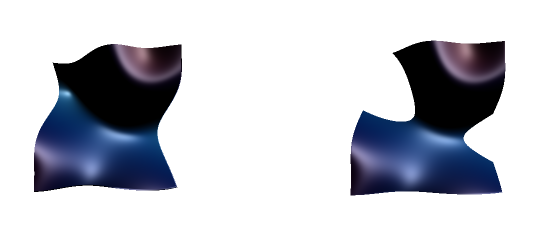
- second edge case is when the mesh are upside down: they get different normals. I don't know which one is supposed to be expected, the left one seems more realistic to me, but the left one is maybe more computer-graphics accurate, as the normals seems to be simply upside-down? When disabling two-sided lighting on the left mesh, we get the same result as the right one, which makes sense. However, I've noticed that enabling/disabling two sided lighting on the left mesh simply adds/remove a "* -1" at the end of this line:
jit_out.jit_Surface_normal = transpose(inverse(mat3x3(modelViewMatrix))) * jit_normal * -1;but we don't get the same result if we do the same modification in our custom shader (it just reverts the normals regardless of the mesh orientation), so I assume the problem comes from deeper (maybe the modeViewMatrix?) but that's kind of too deep for me at this time.
Here is the patcher illustrating both edge cases. The shader file is the same as in the first post.
I'll have to study your post more when I work on this, but to quickly explain the 2-sided lighting. If an object is cull_face 0 (so drawing both back and front faces), and 2-sided lighting is enabled, then the object will draw once normally, and once with inverted normals (the *-1 you are seeing). Unfortunately get_gl_shader simply returns the last shader used to render that particular object, which will be the back-faces one when enabled.
You can set @cull_face 1 (and probably should if you're not interested in back faces) to only get the front-faces shader.