
The Compleat ROBO, Part 1: An Overview and The MIDI System
Introduction
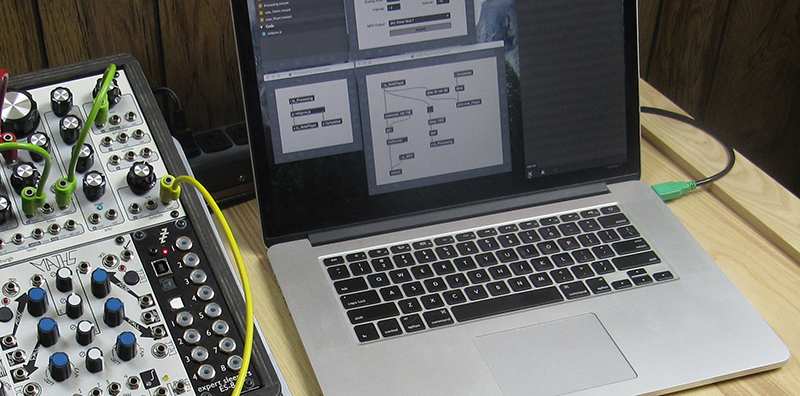
Welcome! Thanks for joining me for a short holiday series - one that is based on my own obsessions, but one that will I hope will result in something interesting for you as well. You see, I’m a synth fanatic, and I really enjoy working with analog synths, modular systems and other similar hardware.
But recently, due to the updated Live/Push sampling system and a recent purchase of an Akai MPC Live, I’ve gotten excited about creative sampling again. I therefore decided to bring these interests together for a tutorial series - and maybe help you build a little holiday gift for yourself in the process!
Over the next four weeks, we are going to be creating an automatic sampling system that can be used to ‘harvest’ sounds from synthesizers, plug-ins, Max for Live devices and other sources. This can be useful for making a sample-based ‘emulation’ of a synth, but is even more fun in capturing the sometimes-unpredictable output of a modular synth or Max for Live device. I’m hoping that this will become an interesting addition to your sound design toolbox, and that you’ll learn a few new Max programming concepts along the way.
Basic Planning for the System
Creating our ROBO automatic sampler will involve building a few discrete subsystems.
First, we have to generate MIDI information that can be used to drive whatever device we are sampling. In this case, we will want to set a note and velocity range and then have the system play all of those note/velocity combinations so that they can be recorded.
Once we have the MIDI system, we will then need a recording system that can capture the audio, ID it, and save it to a file. That sounds simple, right? While part of the process might be straightforward, there is some complexity that requires a third system: audio detection.
Audio detection is complicated because playing a note on our synth is not easily timed; there might be a slow release that needs to be captured for seconds after the note is released, or there might be effects (delays or reverbs) that extend the sound well past the note-off point produced by a MIDI note message. For these cases, we will need to create a detection system that can pay attention to our audio stream and notify the system when a note appears to have completed.
This isn’t going to be a beginner’s tutorial; in fact, I’m going to do things that some people might consider completely wrong. Because of the techniques we will use, I’m going to be writing Javascript for certain functions. I’ll use a lot of send and receive objects in order to keep our subsystems discrete. And I’m going to pay extra attention to the user interface, culminating in the creation of a standalone application - I want to enjoy using this patch outside of Max, and I hope it will be interesting enough to share with my friends. With these things in mind, let’s get started!
Creating a User Interface
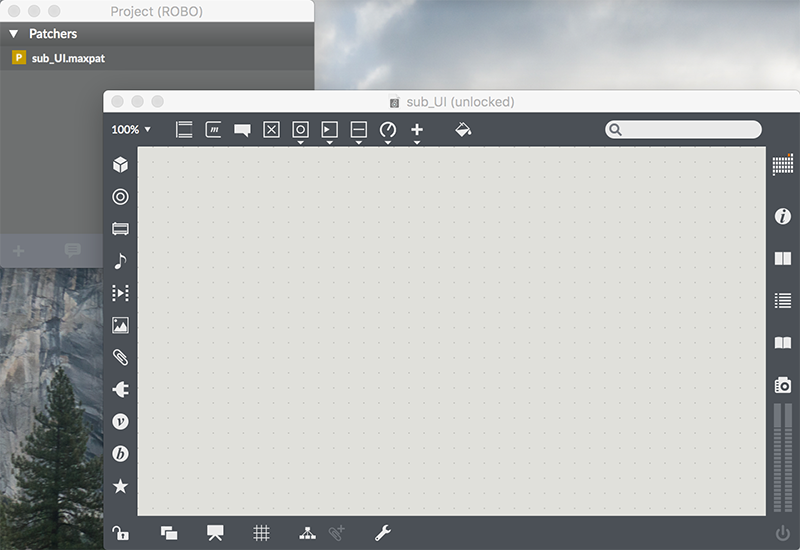
Since we are going to be making a ‘system’, I’m going to start this whole process by creating a new project. Projects in Max are a great way to work if you are going to be building a large system from a number individual parts, and that’s exactly how this is going to go. I begin by selecting New Project from the Max File menu, picking a location, and naming my new project “ROBO.” Next, I'll add a new file (we will call it “sub_UI.maxpat”, and create it as a Max patcher), and I’m ready to start building my first patch.
Since we are going to be using MIDI as the activating mechanism for this system, we will need to enter a number of parameters.
I’m going to want to pick a range of MIDI notes to record.
I’ll want to (possibly) pick a range of velocities for each note.
I’ll also need to know the MIDI output routing options.
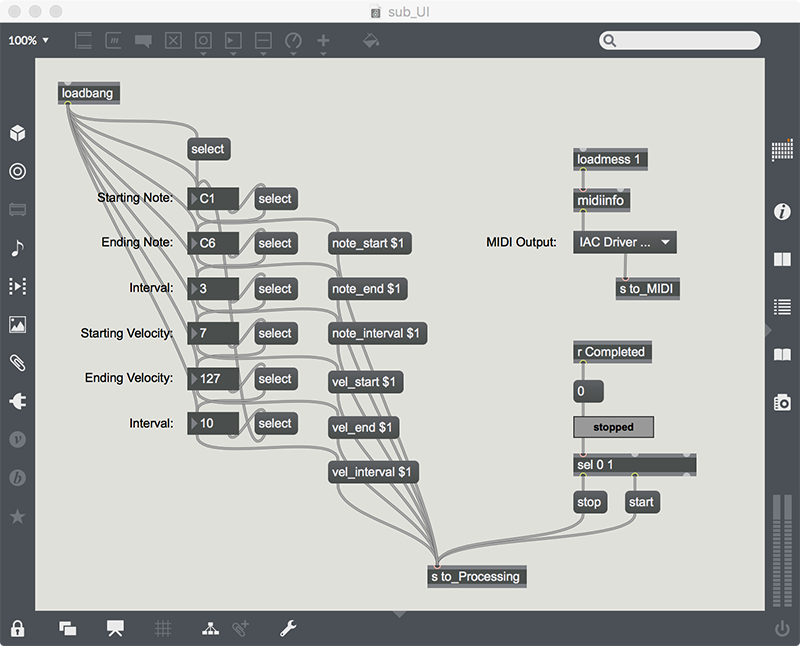
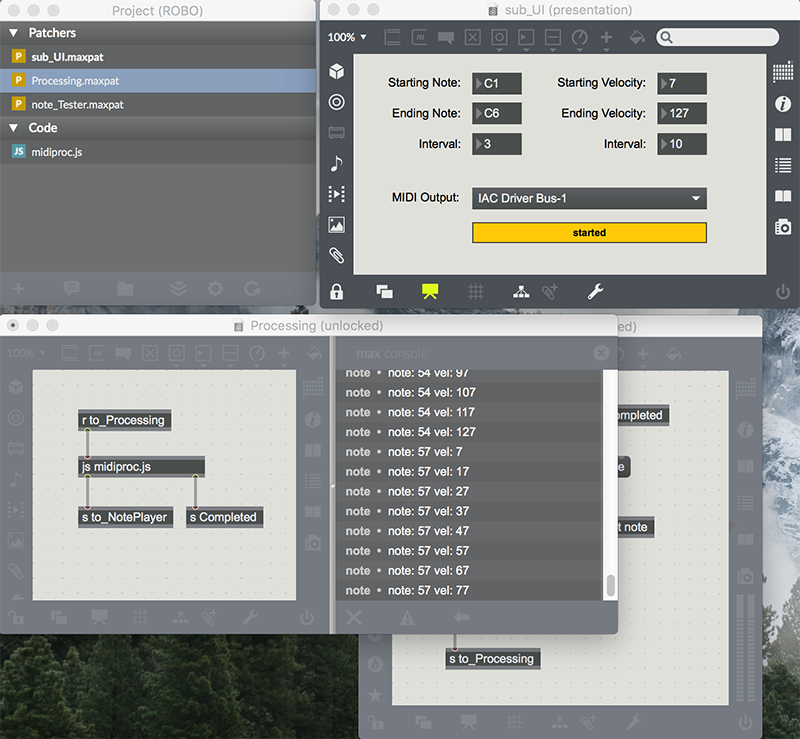
To do this, let’s make a simple user interface featuring some number boxes (we'll set some of them to using the ‘MIDI’ display option using the Inspector) and a umenu of available MIDI outputs. Here is the basic lay of the land:
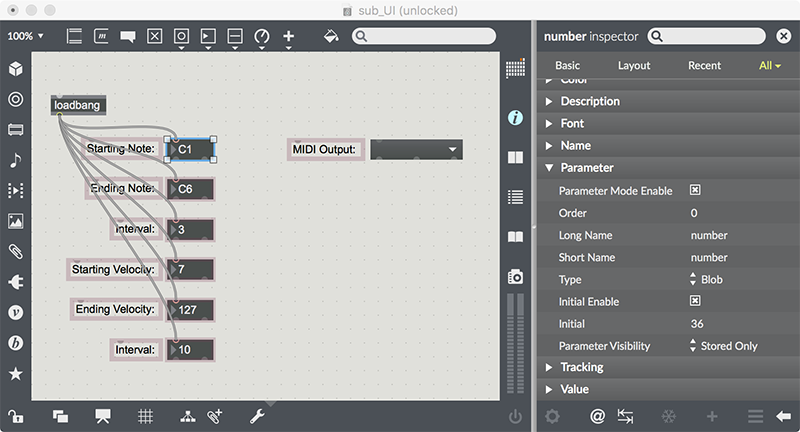
You’ll notice that, in order to have useful starting values, I’ve activated the parameter mode for the number box objects, and set initial states for each. I then attach a loadbang object to these values so it sets the default values throughout my system. We are going to need to know what each of these values represent; the easiest way to do that is to use message boxes to identify the concepts. I’ll tag all of the content, and send it all to a single send object that I’ve labeled “to_Processing”. We’ll need a start/stop button, so I’ll use a live.text object to help me with that, and send the results to the same send object. Finally, we will want to get the available MIDI outputs into a menu, so I’ll steal a little code from the midiinfo object’s help file, tag that value, and ship it to a “to_MIDI” send object:
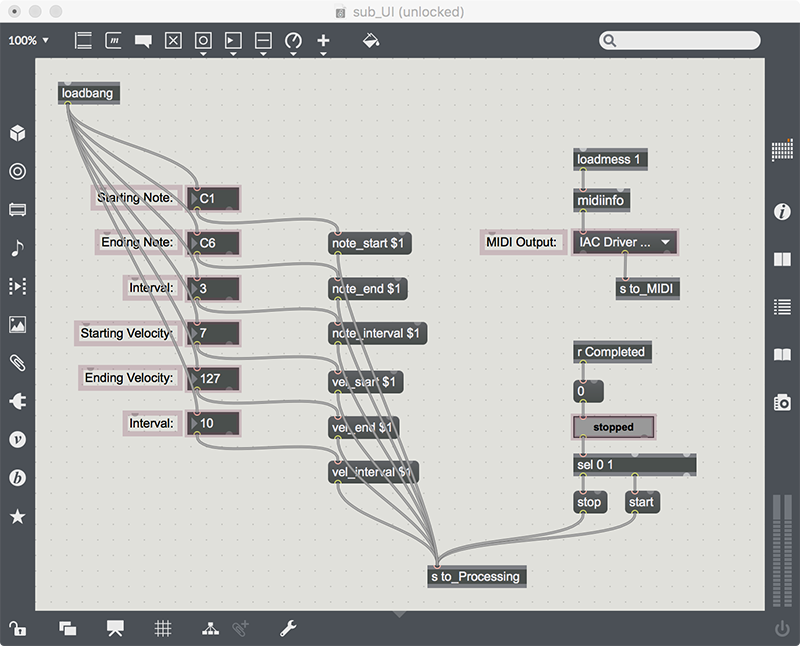
I also added one more little thing: I created a receive object for something named “Completed” - this is going to be a general use receiver for anything that needs to know that processing is complete.In order to make the UI a little slicker, I’m going to take advantage of a little-used function of the number box object: its right outlet. When you are using a number box, you can use the arrow keys to move values up and down, or just type in values. But if you hit the <tab> key, the number box object sends a bang message out its right outlet. You can use this feature along with a number of select messages to force the system to select another field for entry. Using this, I can hop around among the number box objects for some quick entry action.
As a final step, I'll select all of my UI elements and set them to be available in Presentation mode by choosing Add to Presentation from the Object menu. Then, I jump into Presentation mode and get my UI ready to hum.
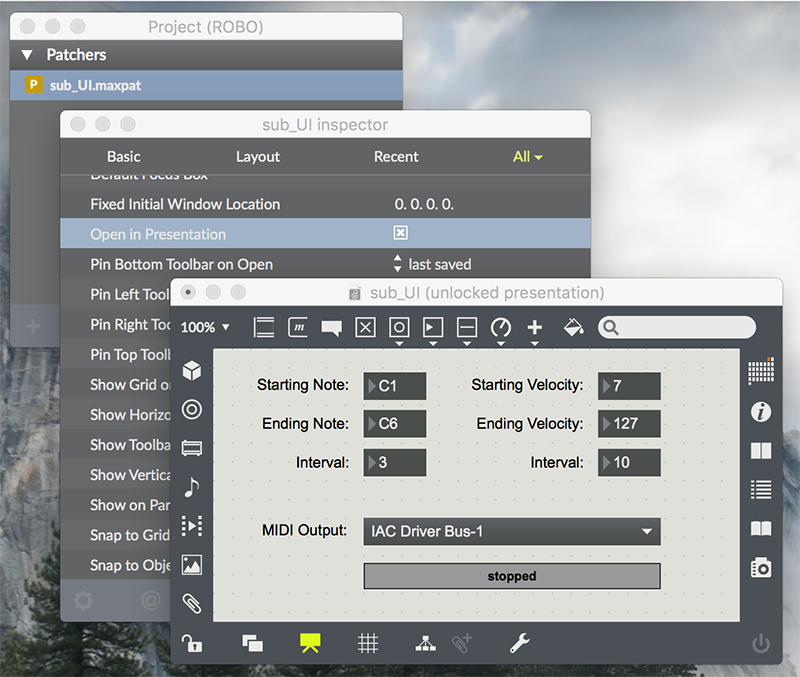
Since I want my patcher to open in Presentation mode whenever I use it, I'll choose Inspector Window from the View menu and click on the Open in Presentation check box in the Inspector. It's time to move on.
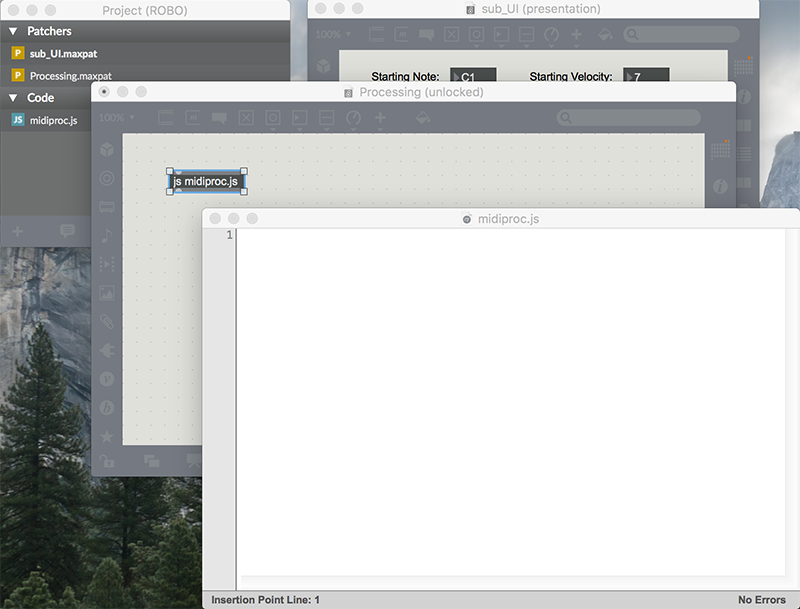
Creating the Core .js Script
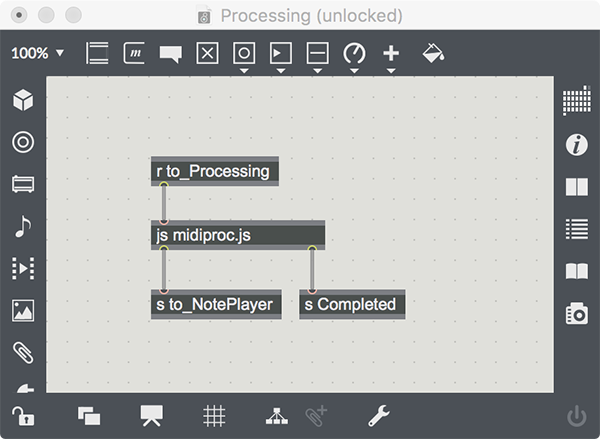
The processing system for note selection is a kind of dual-loop function: we step through our notes, and for each note we step through all the velocities. We are going to create a new Javascript file called “midiproc.js” (make sure that you identify it as a “Javascript file” in the File Format drop-down). Then we create a new patcher (called Processing), and create a js object inside of it, using the name of the file we will develop: midiproc.js. Double-click on the js object, and you’ll see the editing window for our Javascript.
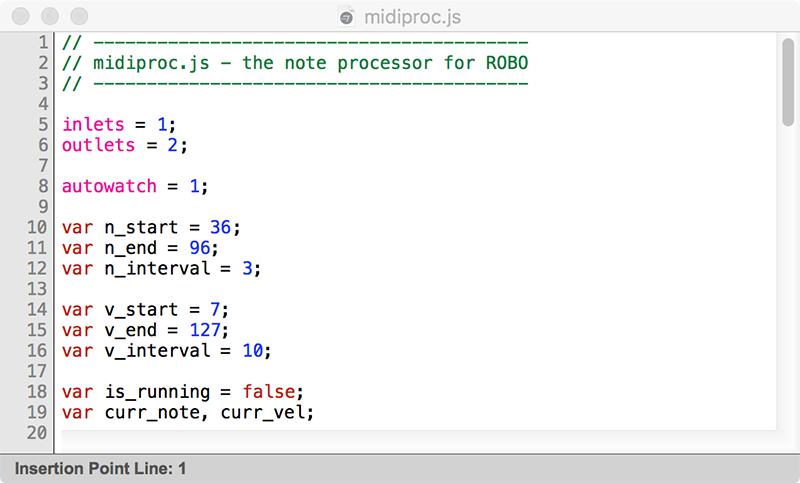
If you are new to Javascript, you might want to look into a coding tutorial to bring you up to speed. If you are an experienced Javascript programmer, but are new to Javascript in Max, you’ll want to keep a tab open to the Javascript In Max reference - it’ll come in handy. Luckily, this is going to be a fairly easy bit of programming. First, we need a group of variables to store the settings, and also store some runtime information:
Next, I need to respond to the tagged entries when they come from the UI. We do this by creating functions that are the same as the tag, and use the argument as the new value:
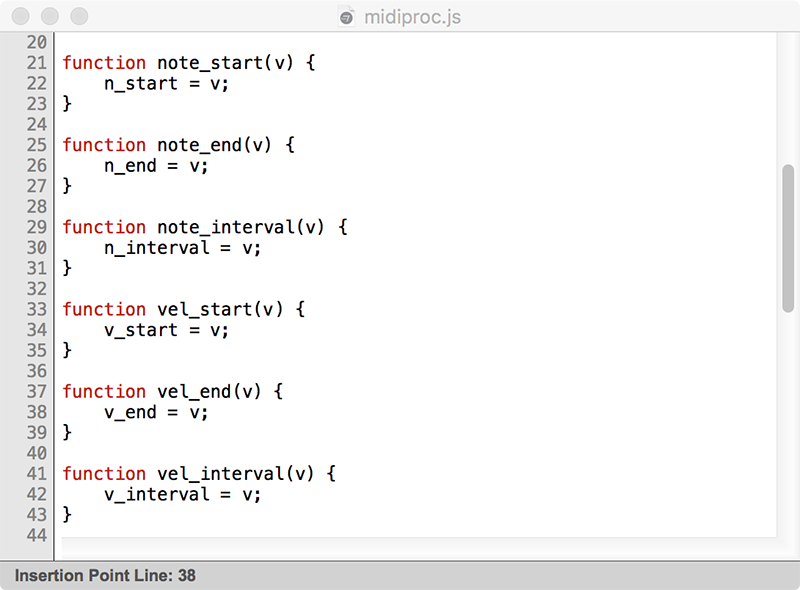
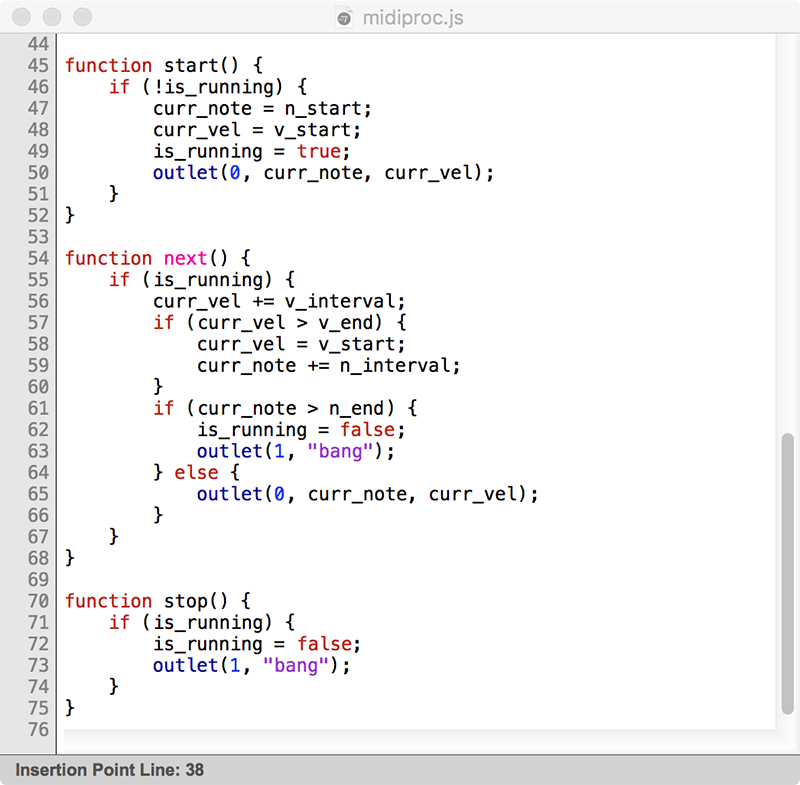
Finally, instead of driving this through an internal looping system, we will be driving it with external messages: “start”, “stop” and “next”. So we have to have functions for those:
We are going to need to send messages to this object, so we will add a receive object that accepts messages from that “to_Processing” send object we created for the UI. We’ll also connect the first outlet of the js object to a “to_NotePlayer” send object, and the second outlet to our “Completed” send object - a global signal that everything is done.
One of the things you get used to as a Javascript coder is to create tests for your code. Let’s do that by making a new patcher - we’ll call it note_Tester.maxpat - and set it up to interact with our Javascript. It will look like this:
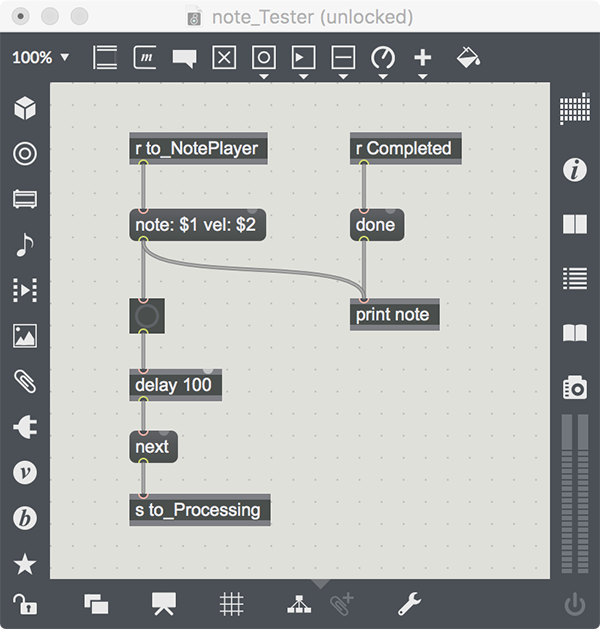
Now, if we open up a Max window ‘pane’ and hit the button on our UI, we should see a stream of values stream down the Max window (assuming we have it visible…), starting with our initial MIDI note/velocity, and ending with our terminal note/velocity.
Making the Note Player
Now that we have an operational - and testable - Javascript system, we need to get it to actually play MIDI notes, and to wait until a note is finished before it continues. We will do this by creating a new patcher that I’ll call note_Player. Within that patch, I’ll use a makenote object (with a default duration that we’ve arbitrarily picked as 750 ms) and a noteout object. We also have a delay 1000 object to delay the “next message” onset by 1000 ms - just to give us a little breathing room:
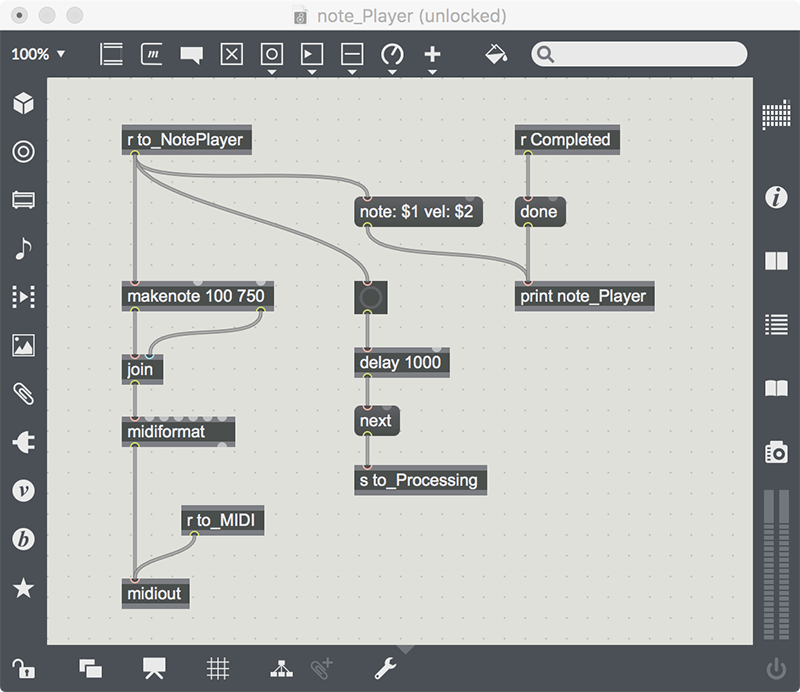
So, why would be doing this using and send/receive objects instead of using direct connections within the Processing patcher? I chose to do it this way so that I could have replaceable destinations. Anything capable of receiving messages from the to_NotePlayer send object can play the results, so later I’ll be able to make different players that support VST instruments, Max for Live devices or OSC-controlled systems - all I'll have to do is open the correct patch in my project and I’ll be ready to sample!
Testing the Results
It's now time to test out our first bit of patching!
Using the note_Player.maxpat patch, I hook up the MIDI player and set the MIDI output to my MIDI device: to the internal DLS synthesizer in one case, and to a MIDI interface connected to a mini-modular in another. You can see the results - and an example of why I might want to try this - in this video:
Next week, we’ll start the recording process. In the meantime, here is the complete code listing for the Javascript file midiproc.js:
// -----------------------------------------
// midiproc.js - the note processor for ROBO
// -----------------------------------------

inlets = 1;
outlets = 2;
autowatch = 1;
var n_start = 36;
var n_end = 96;
var n_interval = 3;
var v_start = 7;
var v_end = 127;
var v_interval = 10;
var is_running = false;
var curr_note, curr_vel;
function note_start(v) {
n_start = v;
}
function note_end(v) {
n_end = v;
}
function note_interval(v) {
n_interval = v;
}
function vel_start(v) {
v_start = v;
}
function vel_end(v) {
v_end = v;
}
function vel_interval(v) {
v_interval = v;
}
function start() {
if (!is_running) {
curr_note = n_start;
curr_vel = v_start;
is_running = true;
outlet(0, curr_note, curr_vel);
}
}
function next() {
if (is_running) {
curr_vel += v_interval;
if (curr_vel > v_end) {
curr_vel = v_start;
curr_note += n_interval;
}
if (curr_note > n_end) {
is_running = false;
outlet(1, "bang");
} else {
outlet(0, curr_note, curr_vel);
}
}
}
function stop() {
if (is_running) {
is_running = false;
outlet(1, "bang");
}
}
Cheers!
[ddg]
by Darwin Grosse on December 6, 2017


